Introduction
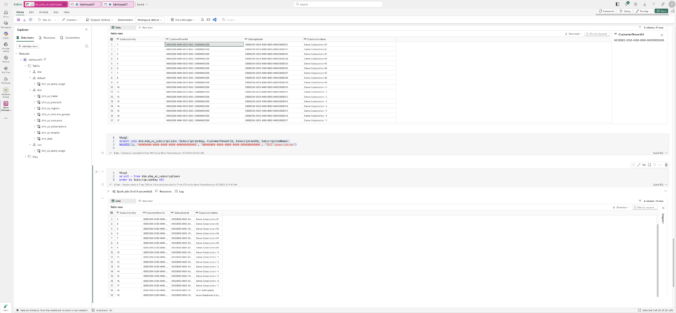
In my latest article, I show how you can store Azure Databricks tables directly in Microsoft OneLake. I cover the required configuration steps in both Databricks and Microsoft Fabric and guide you through the entire setup process. You’ll also learn how to expose those tables through a Lakehouse, making them easy to access and reuse for analytics, reporting, and other data projects. I also show how data can be written from Microsoft Fabric to Azure Databricks and from Azure Databricks back to Microsoft Fabric.
Important this feature is still in preview (2026/09/04)!
What are the Requirements?
- Azure Databrick Workspace (You can use the Trial Premium – 14-Days Free DBUs pricing tier for a Demo
- Microsoft Fabric Workspace with F, P or TRIAL Capacity assgined
- Databricks Workspace must be enabled for Unity Catalog
- Fabric Administrator muss enable Users can create Azure Databricks Storage items in Tenant Settins
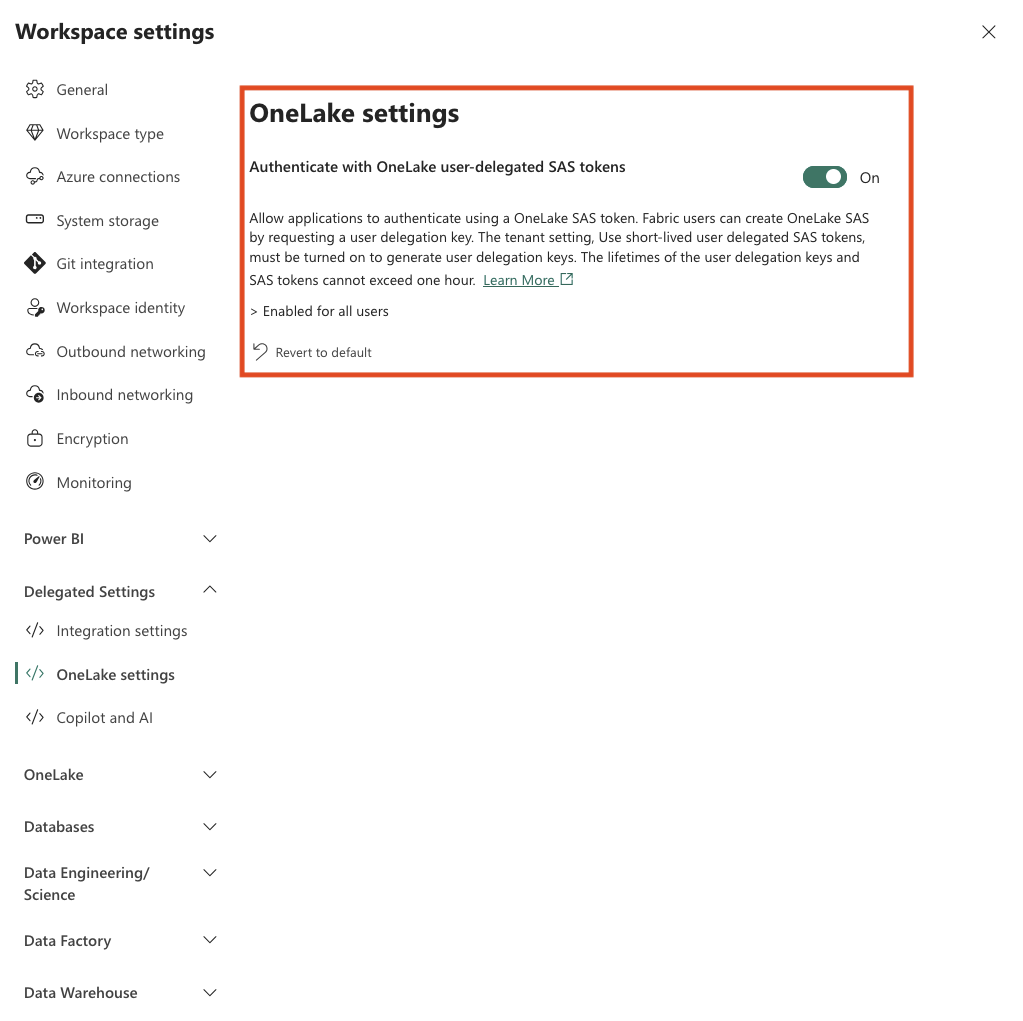
- Target Workspace must have Authenticate with OneLake user-delegated SAS tokens enabled in Workspace settings. You find this in Delegated settings and OneLake settings
- CREATE STORAGE CREDENTIAL privilige on the Unity Catalog metastore and CREATE EXTERNAL LOCATION privilige on both the metastore and the storage credential.
Step 1 in Microsoft Fabric
First, navigate to Tenant Settings and search for Databricks. Enable the setting “Users can create Azure Databricks Storage items” and click Apply. ( Screenshot 1 and 2)
After that, create a new workspace and Databricks storage item.
- To get started, create a new workspace. Select either Fabric Trial or Fabric, choose the appropriate capacity, and then click Apply.
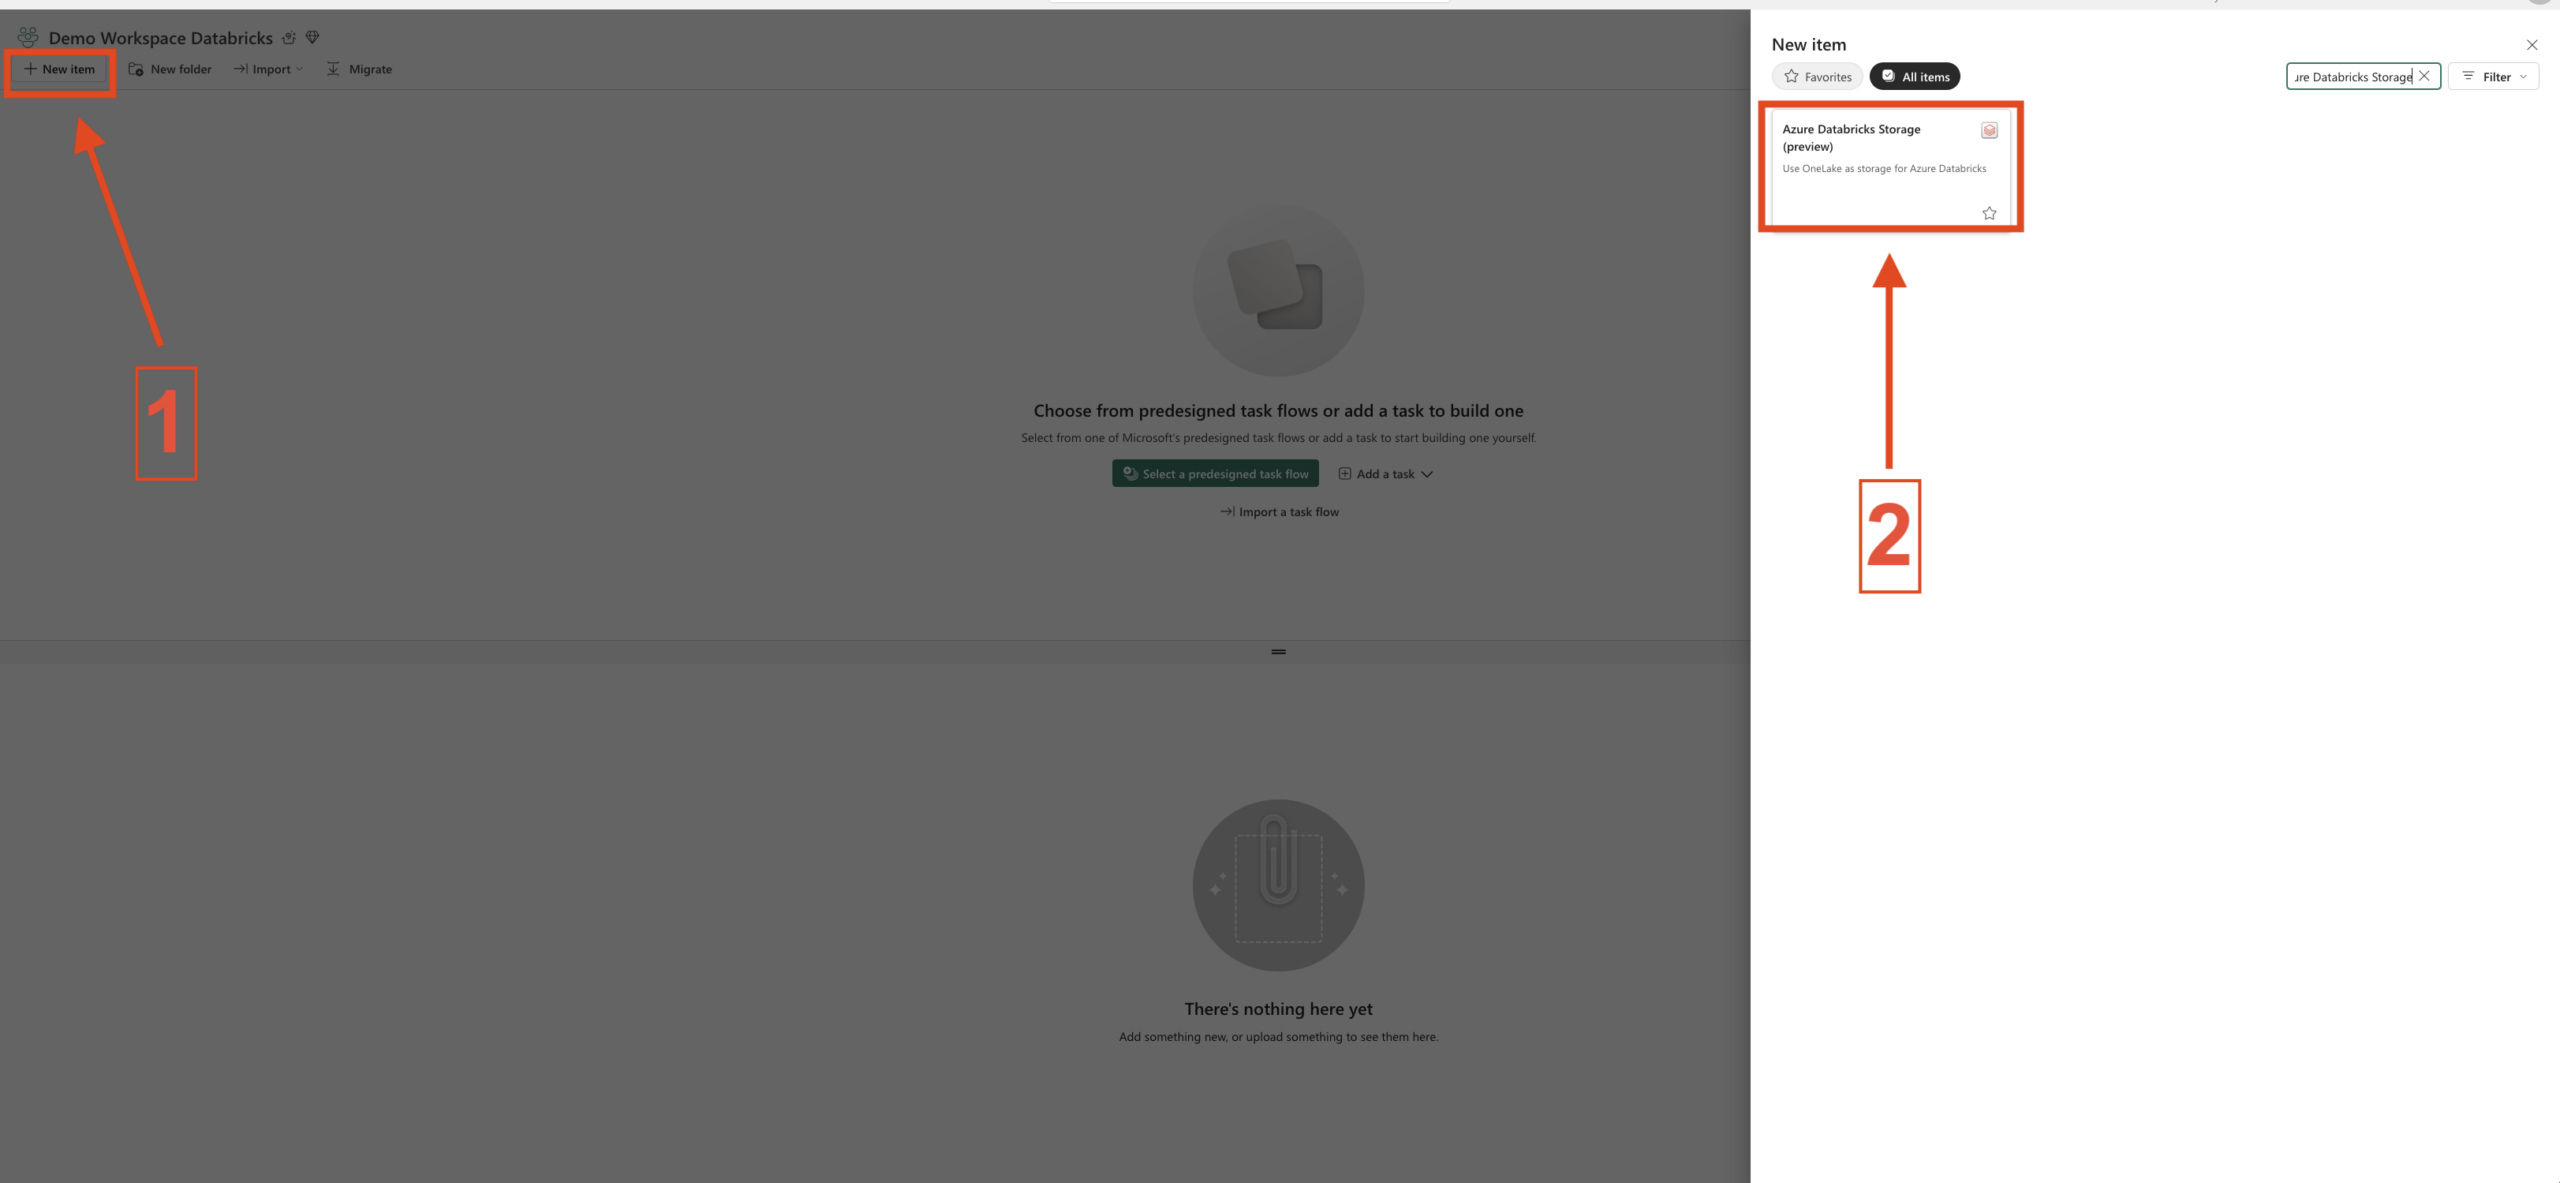
- Next, create a new Fabric item. Click New Item and search for Azure Databricks Storage (Preview).
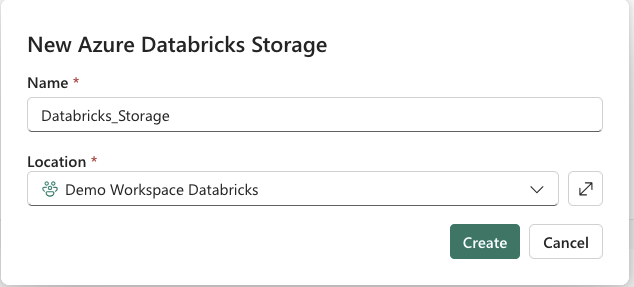
- Give the item a name and click on create.
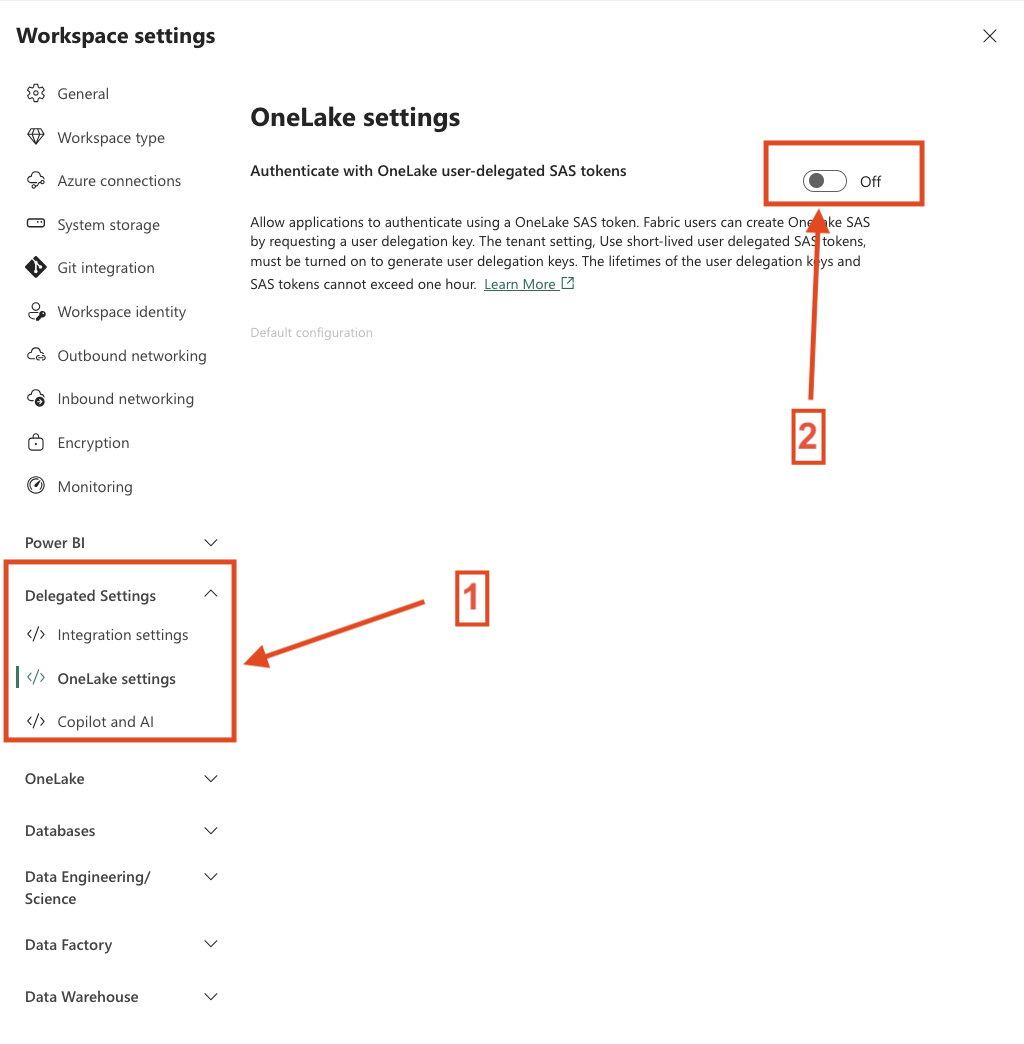
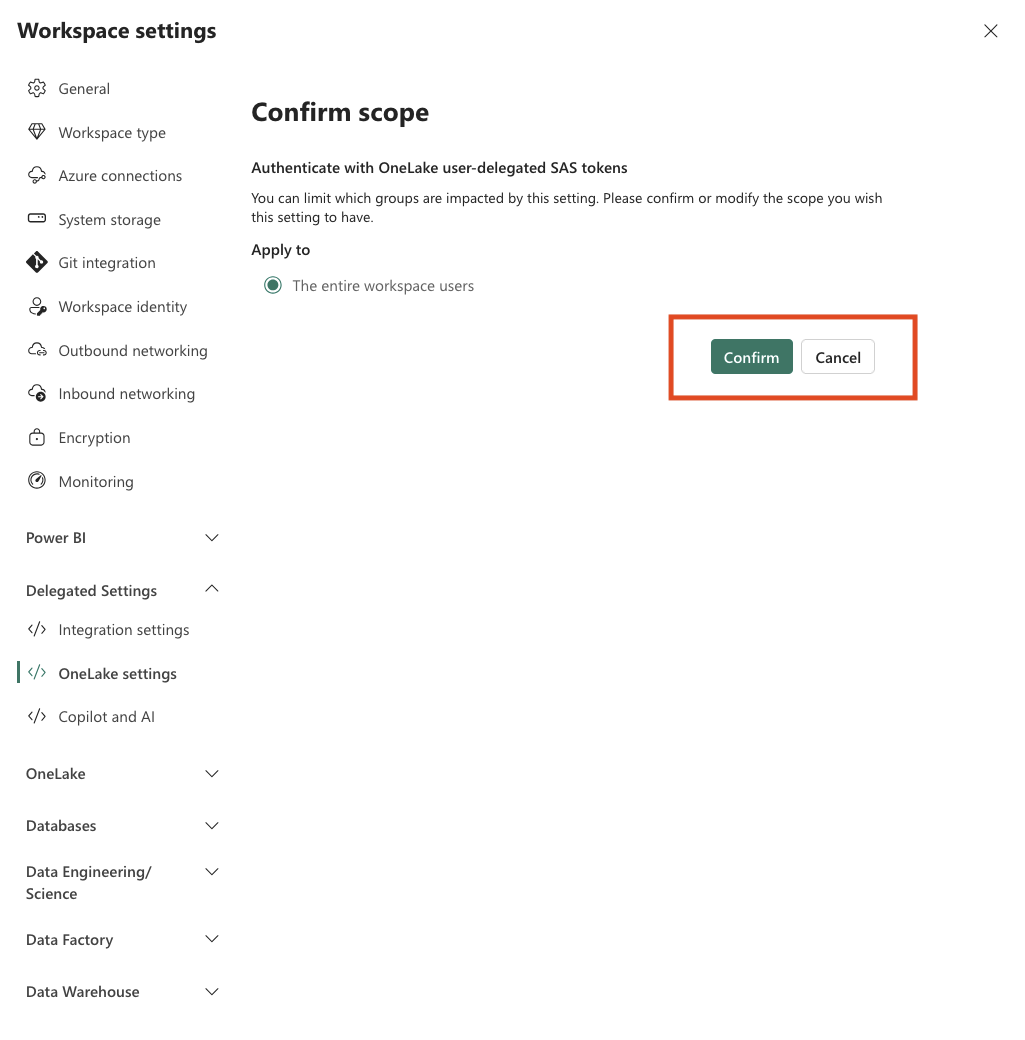
Next, go to the workspace settings and navigate to Delegated settings > OneLake settings. Locate the Authenticate with OneLake user-delegated SAS tokens setting, switch it to On, and click Confirm to save the change. (Screenshot 8-10)
Perfect, we are almsost there in Step 1.
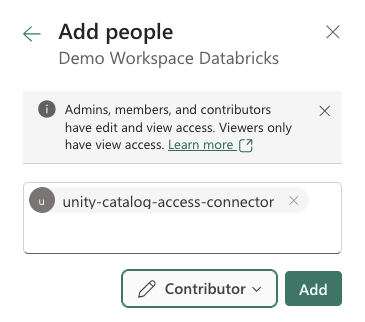
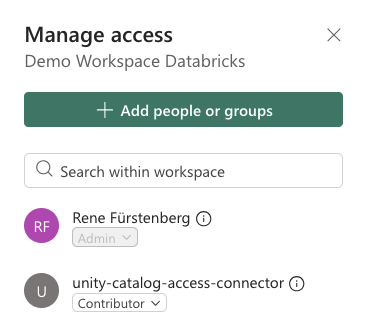
Finally, add the Databricks Access Connector managed identity to the Fabric workspace and grant it the Contributor role. No additional permissions are required for this setup. The managed identity is automatically created during the provisioning of the Azure Databricks workspace and can be used directly for the configuration.
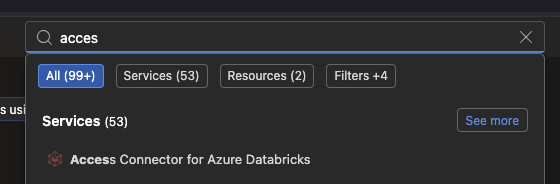
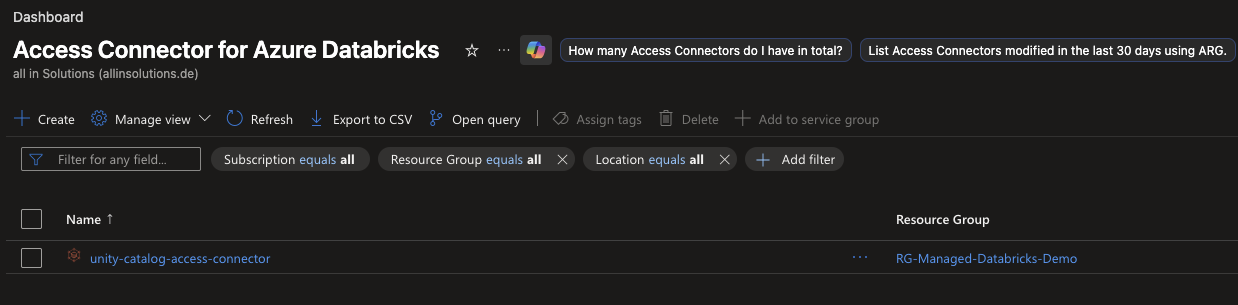
To find the correct Access Connector, search for Access Connector for Azure Databricks in the Azure portal (see Screenshot 11). In the overview, you’ll find the name of the Access Connector (see Screenshot 12). Make a note of this name, as you’ll need it during the configuration process. If you have multiple Access Connectors, be sure to select the correct one.
Before moving on, make a note of the Workspace ID and the Azure Databricks Storage Item ID. We’ll need both of them later. You can easily find these values in the URL of the Azure Databricks Storage Item. (See screenshot 17)
Now that step one is complete, let’s move on to the next step.
-
- 1. Admin Portal
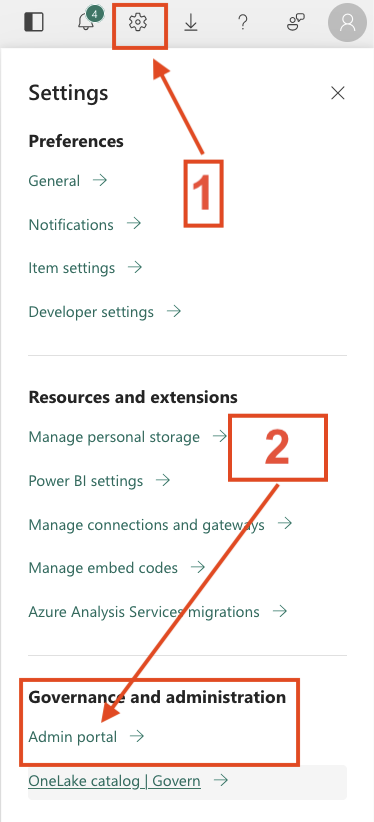
-
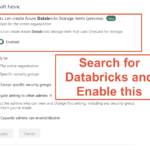
- 2. Activate the Setting in the Admin Portal
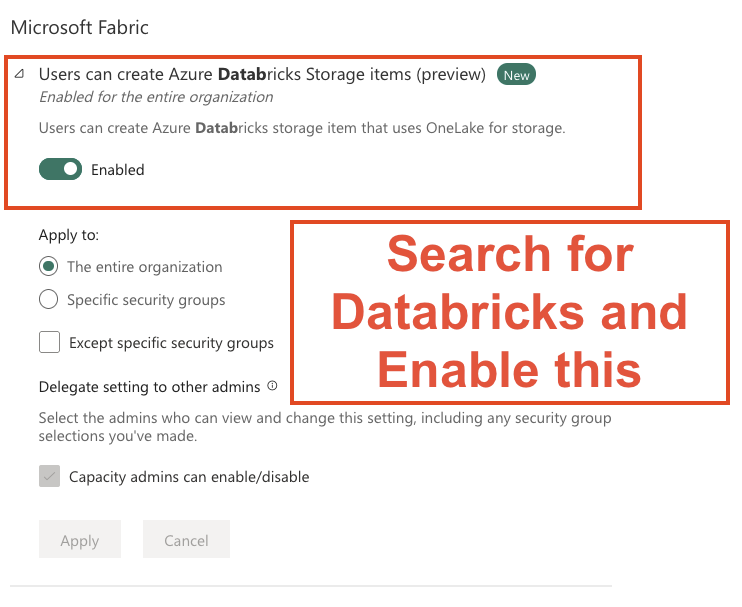
-
- 3. Create new Workspace
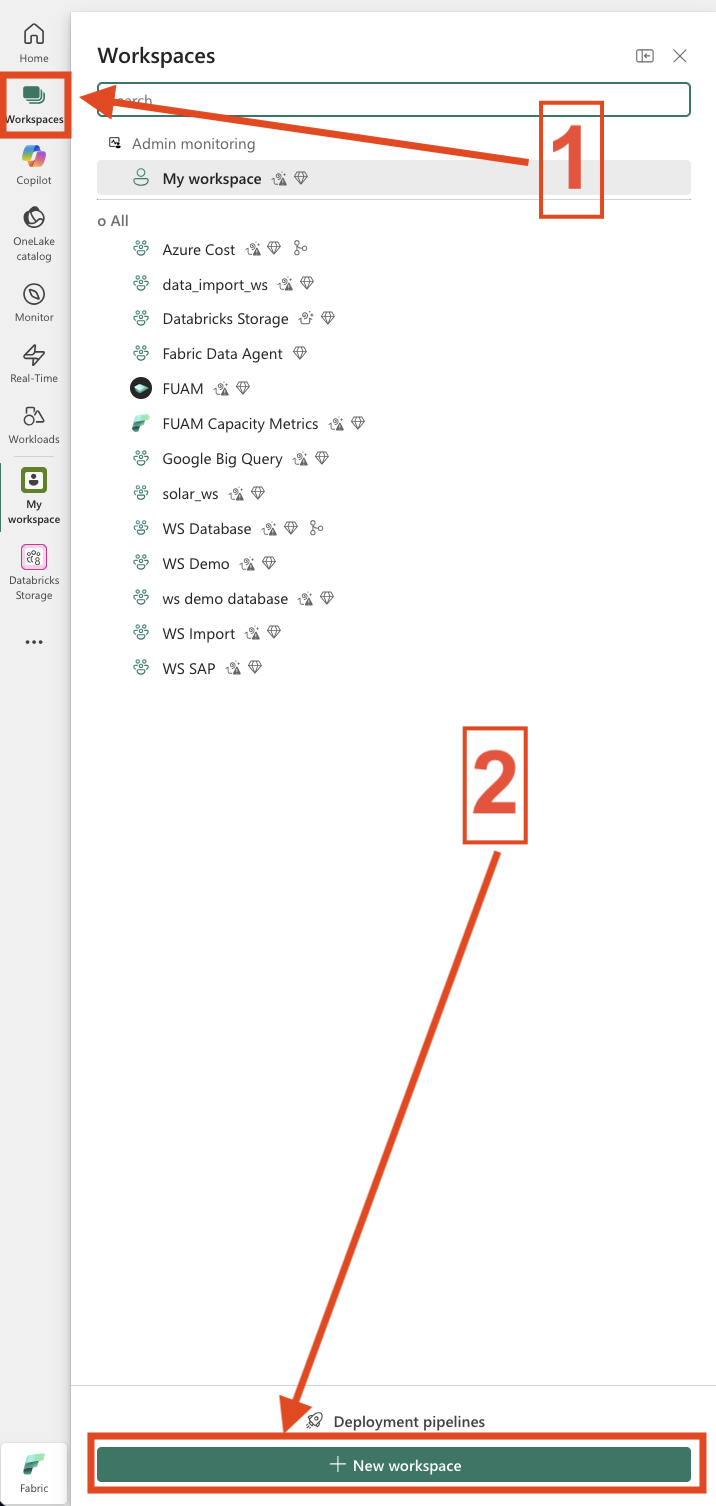
-
- 4. Select the Tarial or a Fabric Capacity
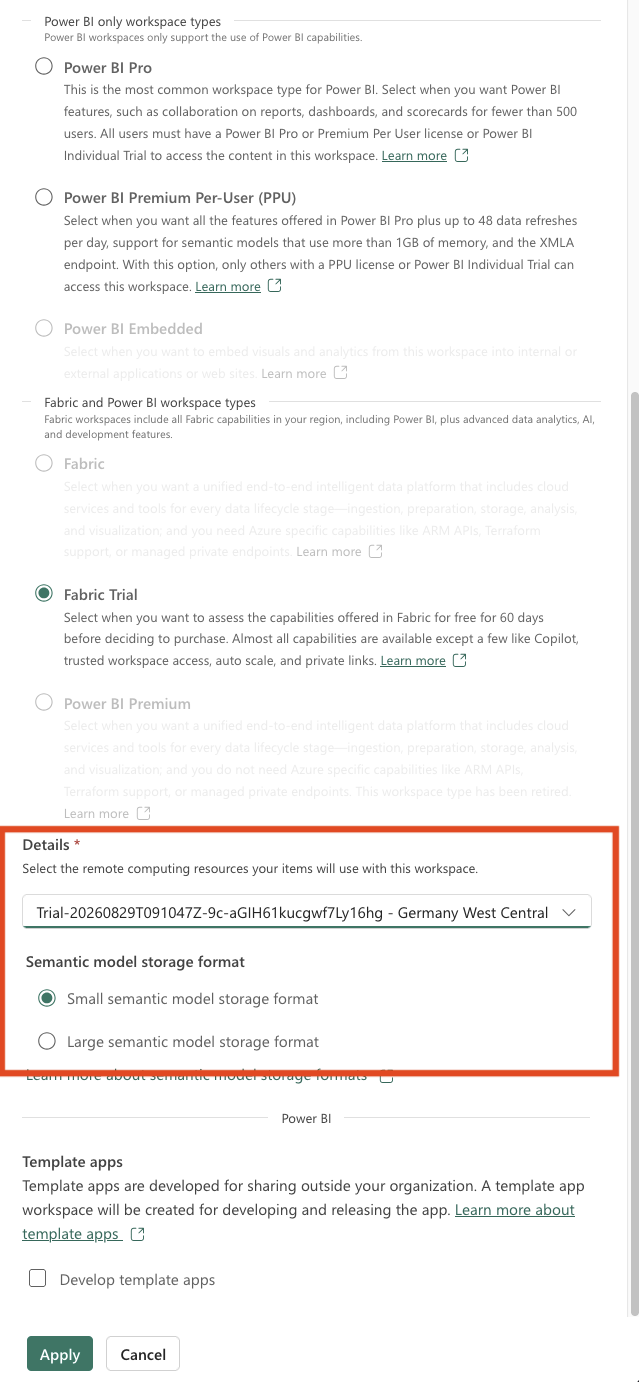
-
- 5. Workspace name and select Fabric Trial or Fabirc
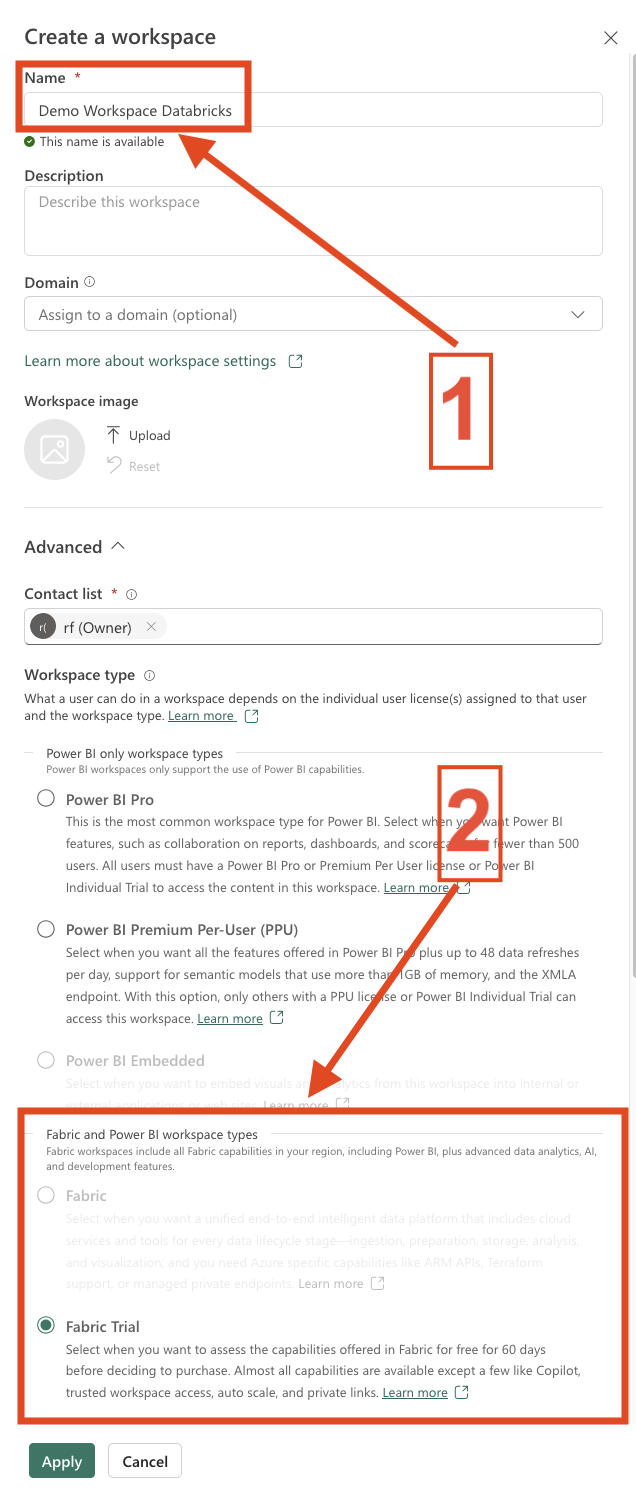
-
- 6. Create new item Azure Databricks
-
- 7. Databricks Storage item Name
-
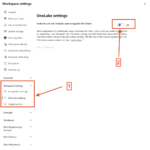
- 8. OneLake settings in Workspace
-
- 9. Confirm Scope
-
- 10. OneLake Overview Settings
-
- 11. Access Connector for Databricks
-
- 12. Access Connector Databricks Overview
-
- 13. Manage Access

-
- 14. Add people or groups
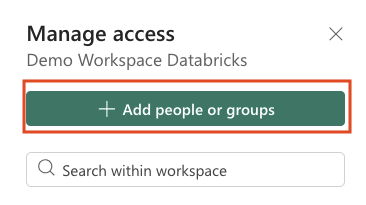
-
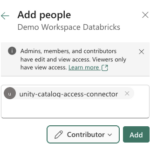
- 15. Search for the Access Connector and add it
-
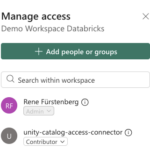
- 16. Workspace Access
-
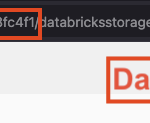
- 17. Workspace Id and Databricks Storage Item Id

Step 2 in Azure Databricks - Storage Credential
In the second step, we’ll take care of the Azure Databricks configuration. The first task is to create a Storage Credential.
To get started, sign in to your Azure Databricks workspace. Simply search for Azure Databricks in the Azure portal, open your workspace resource, and click Launch Workspace.
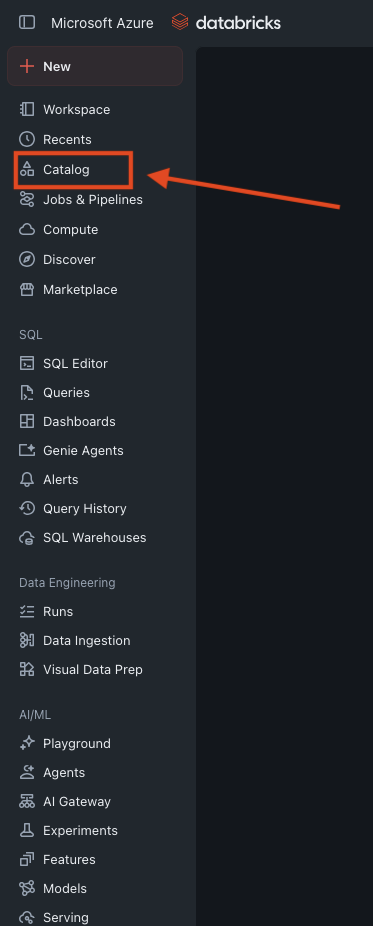
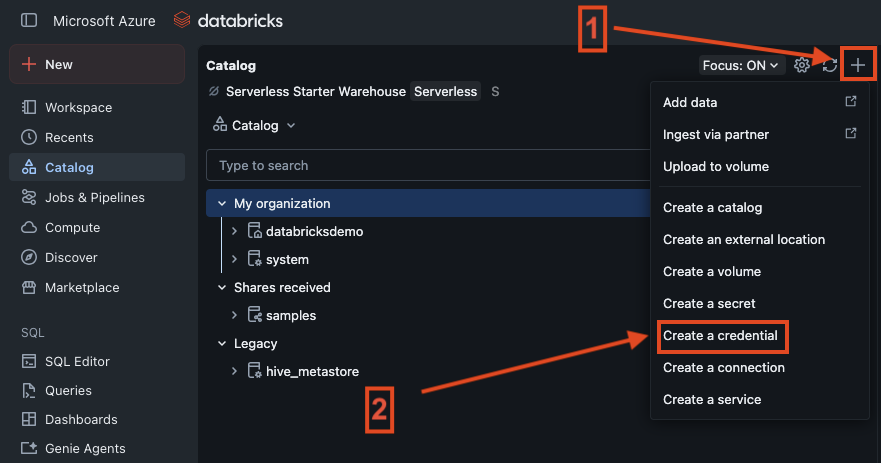
Next, navigate to Catalog on the left-hand side, click the Settings (plus) icon, and select Create Credential.
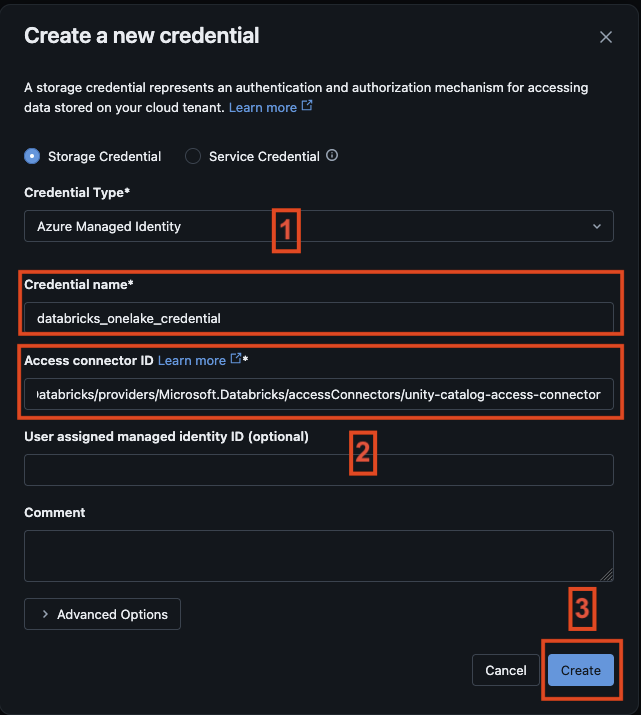
Provide a name for the credential, enter the Access Connector ID, and click Create.
You can find the Access Connector ID in the Azure portal by opening your Databricks Access Connector resource and navigating to Properties. Copy the Resource ID, as you’ll need it for the Storage Credential configuration.
-
- 1. Databricks Workspace – Catalog
-
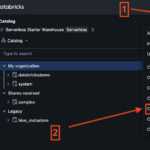
- 2. Creata a credential
-
- 3. Create a new credential
Step 3 in Azure Databricks - OneLake external location
Before we can add OneLake as an external location, we first need to enable the required preview feature in Azure Databricks.
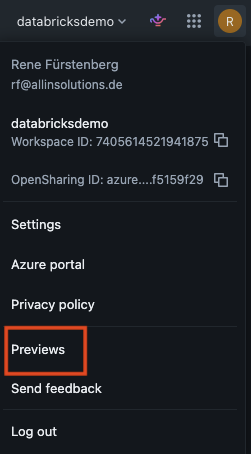
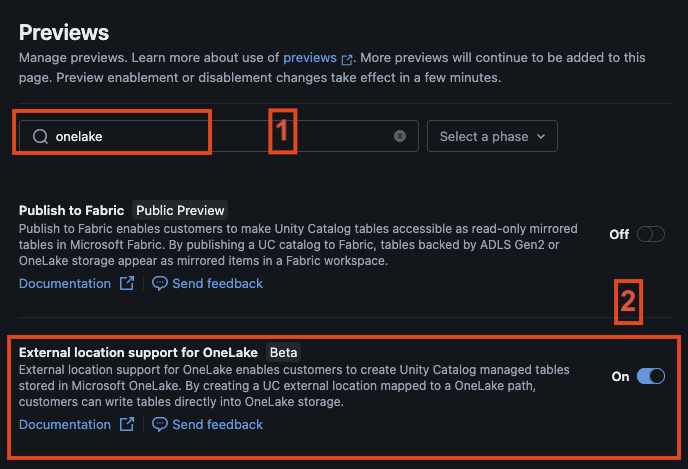
Click your profile icon in the upper-right corner of the workspace and select Previews. In the search field, search for OneLake and enable the feature External location support for OneLake (Beta) by setting the toggle to On.
Important: At the time of writing, this is still a Beta feature. Things may change as the feature evolves, so it’s worth keeping an eye on future updates and documentation changes.
With the preview feature enabled, we can continue with the external location configuration in the next step.
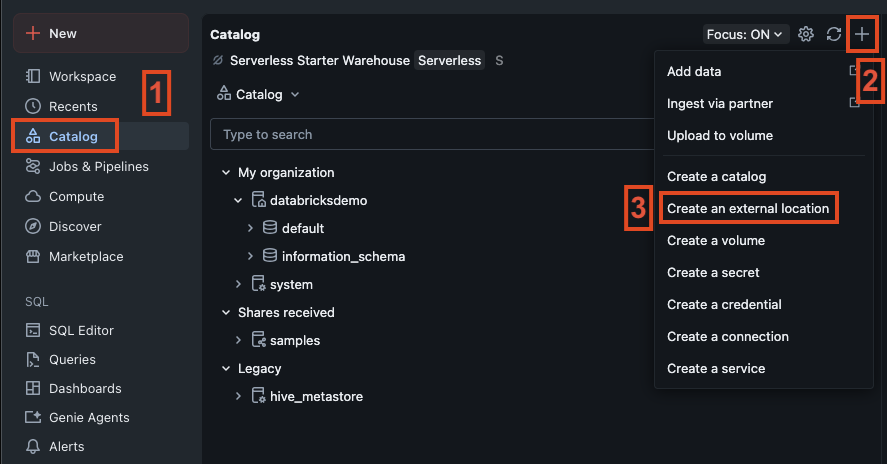
To create the external location, navigate to Catalog, click the Settings (plus) icon, and select Create an external Location.
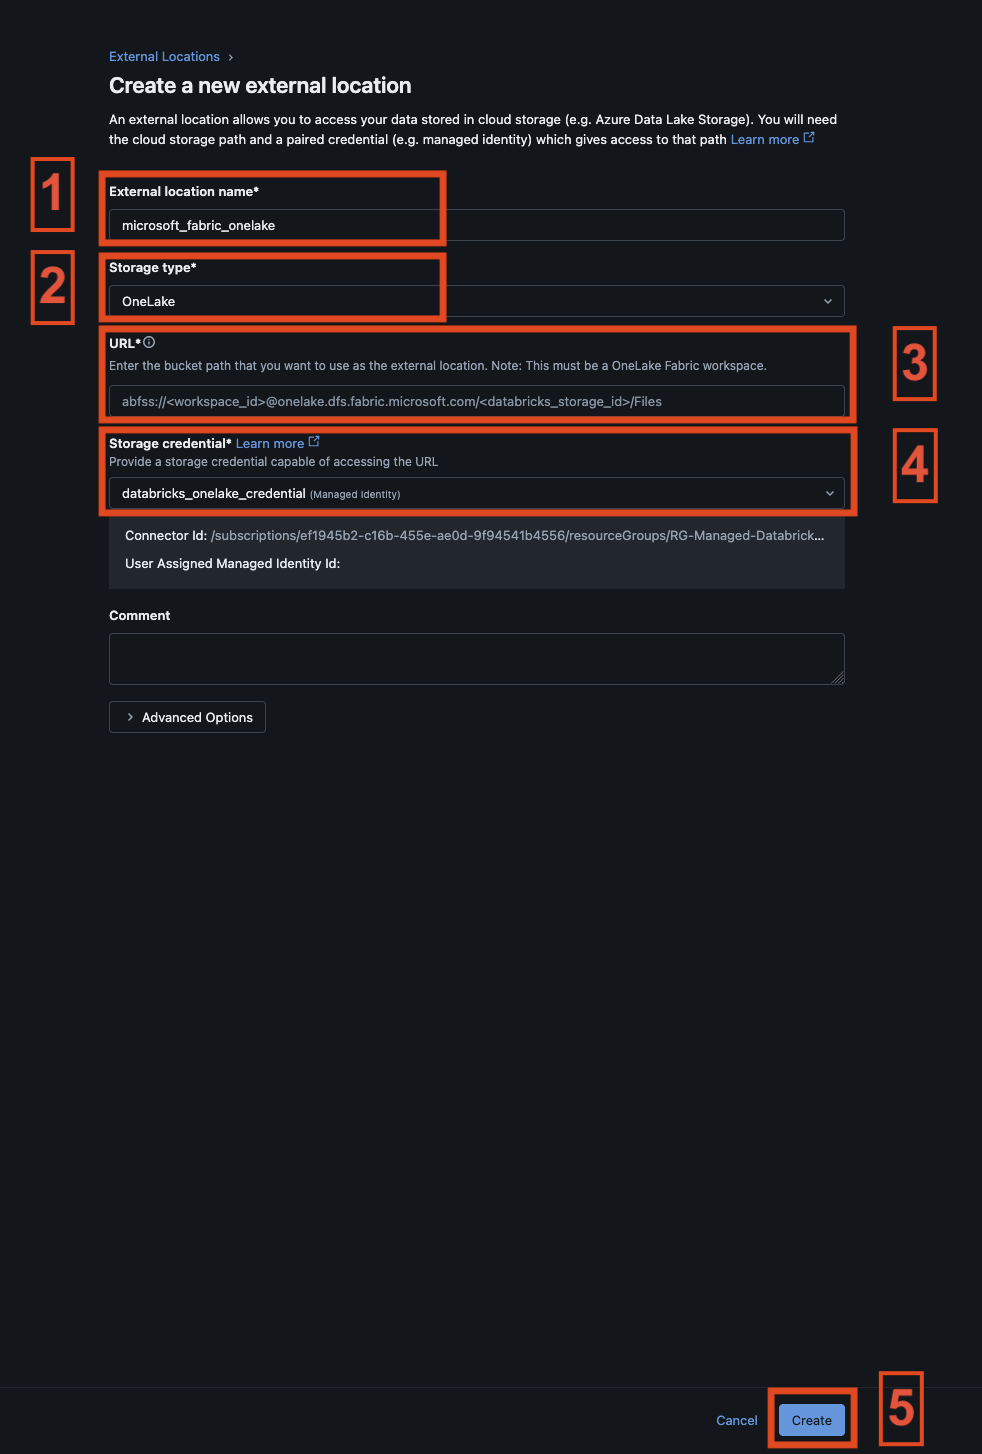
Next, provide a name for the external location and select OneLake as the storage type.
If you don’t see the OneLake option, try refreshing the page. If it’s still missing, revisit the Previews settings and make sure the External location support for OneLake (Beta) feature is enabled.
In Step 1, we made a note of both the Workspace ID and the Azure Databricks Storage Item ID from Microsoft Fabric. We’ll now use these values to build the URL for the external location. Simply replace the placeholders in the following URL with your own IDs:
abfss://<WorkspaceID>@onelake.dfs.fabric.microsoft.com/<DatabricksStorageID>/Files/After entering the URL, simply select the Storage Credential created in the previous step. Once everything is configured, click Create to save the external location. If the configuration is valid, Azure Databricks will create the external location and you’re ready to move on to the next step.
-
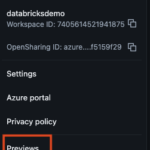
- 1. Preview feature OneLake
-

- 2. External location support for OneLake – Beta
-
- 3. Create an external location
-
- 4. Create a new external location
Step 4 in Azure Databricks - Create Unity Catalog objects on the OneLake external location
At this point, we’re ready to create catalogs and tables. There are two ways to do this:
Option 1: Use a script that automatically creates the catalog, schemas, and tables.
Option 2: Use the Databricks UI to create the catalog, tables, and sample data manually.
In this article, I’ll focus on the second approach so you can see exactly how the individual components are configured and connected.
To create the catalog, click Create in the upper-right corner and select Create a Catalog.
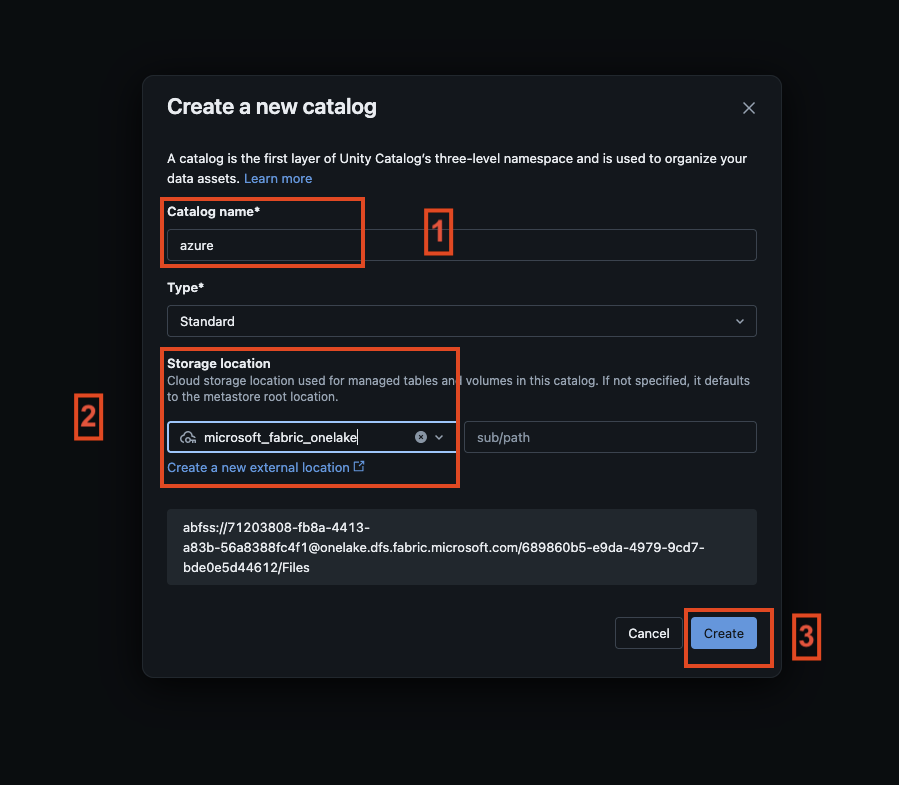
In the dialog that appears, provide a name for the catalog and choose the OneLake external location that we created earlier as the storage location.
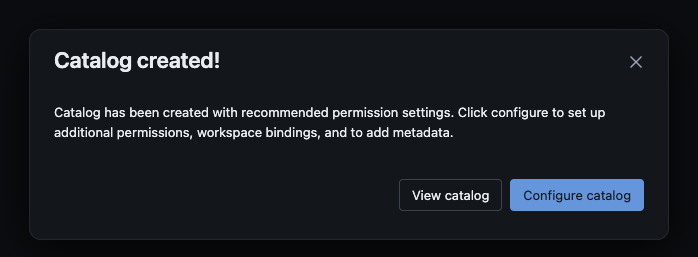
After clicking Create, you’ll be presented with additional catalog configuration options. We don’t need to configure anything else for this scenario, so simply click View Catalog.
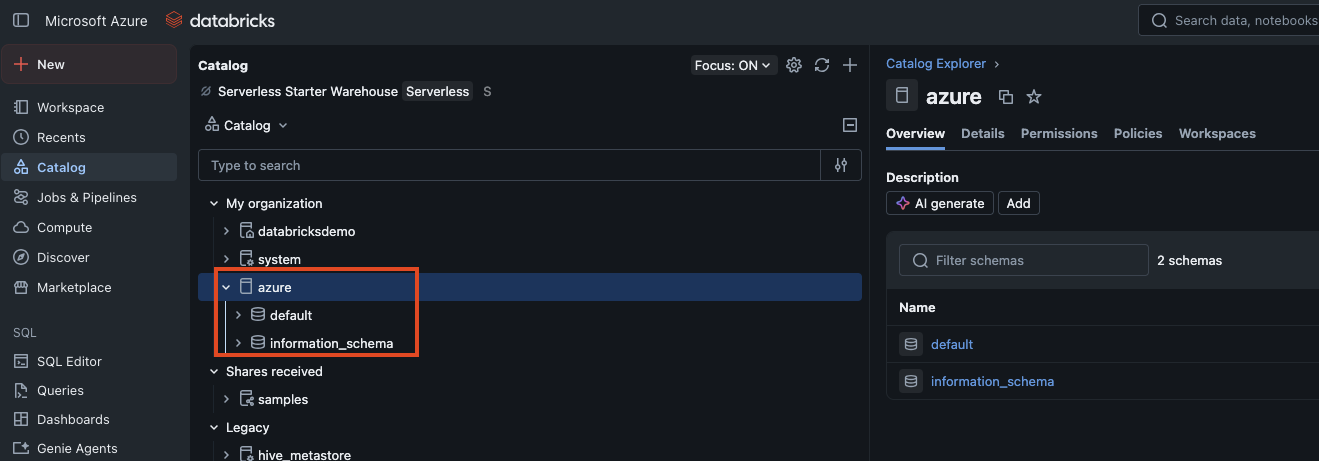
Once the catalog opens, you should be able to see it in the catalog overview. We’re now ready to create schemas and tables inside the catalog.
In the first step, I’ll create a table in the default schema. Later on, we’ll create a new schema and add another table to it.
We’ll come back to this when we move over to Microsoft Fabric. There, you’ll see the difference between tables stored in the default schema and those stored in a custom schema.
To create a table in the default schema, open the default schema, click Create in the upper-right corner, and select Table.
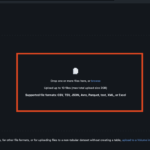
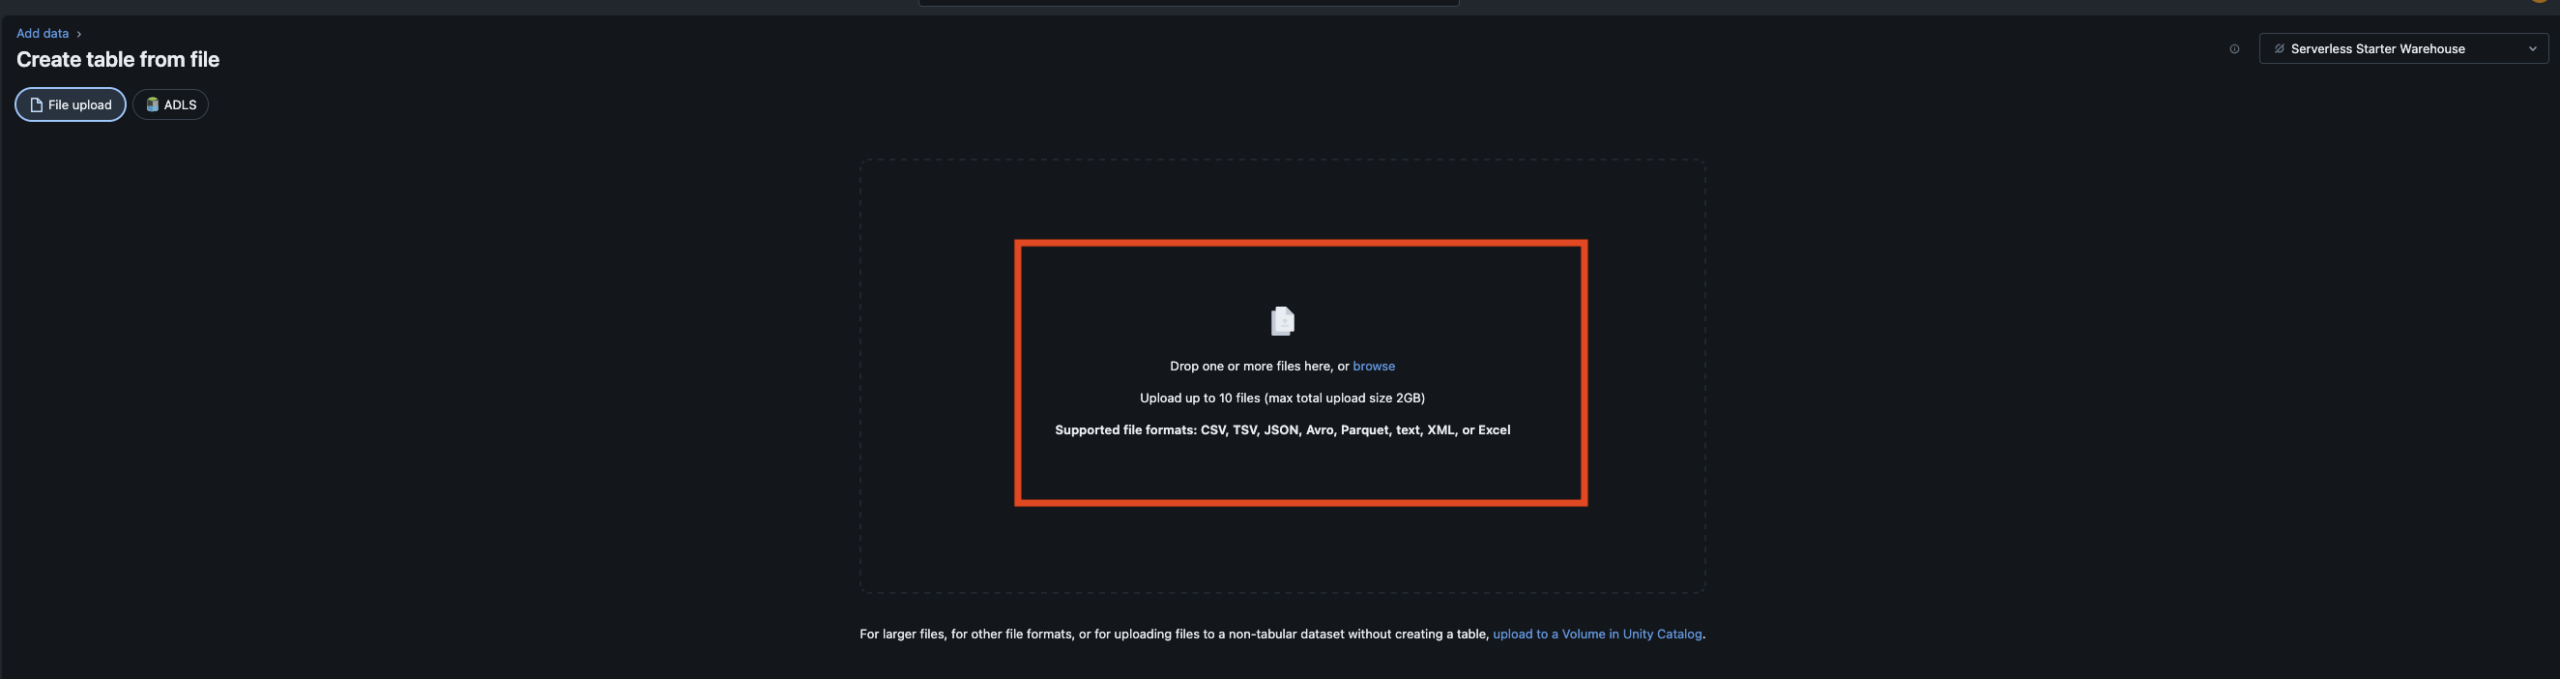
A new dialog appears where you can either drag and drop a file or select one using the Browse option.
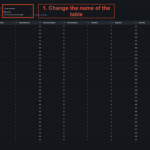
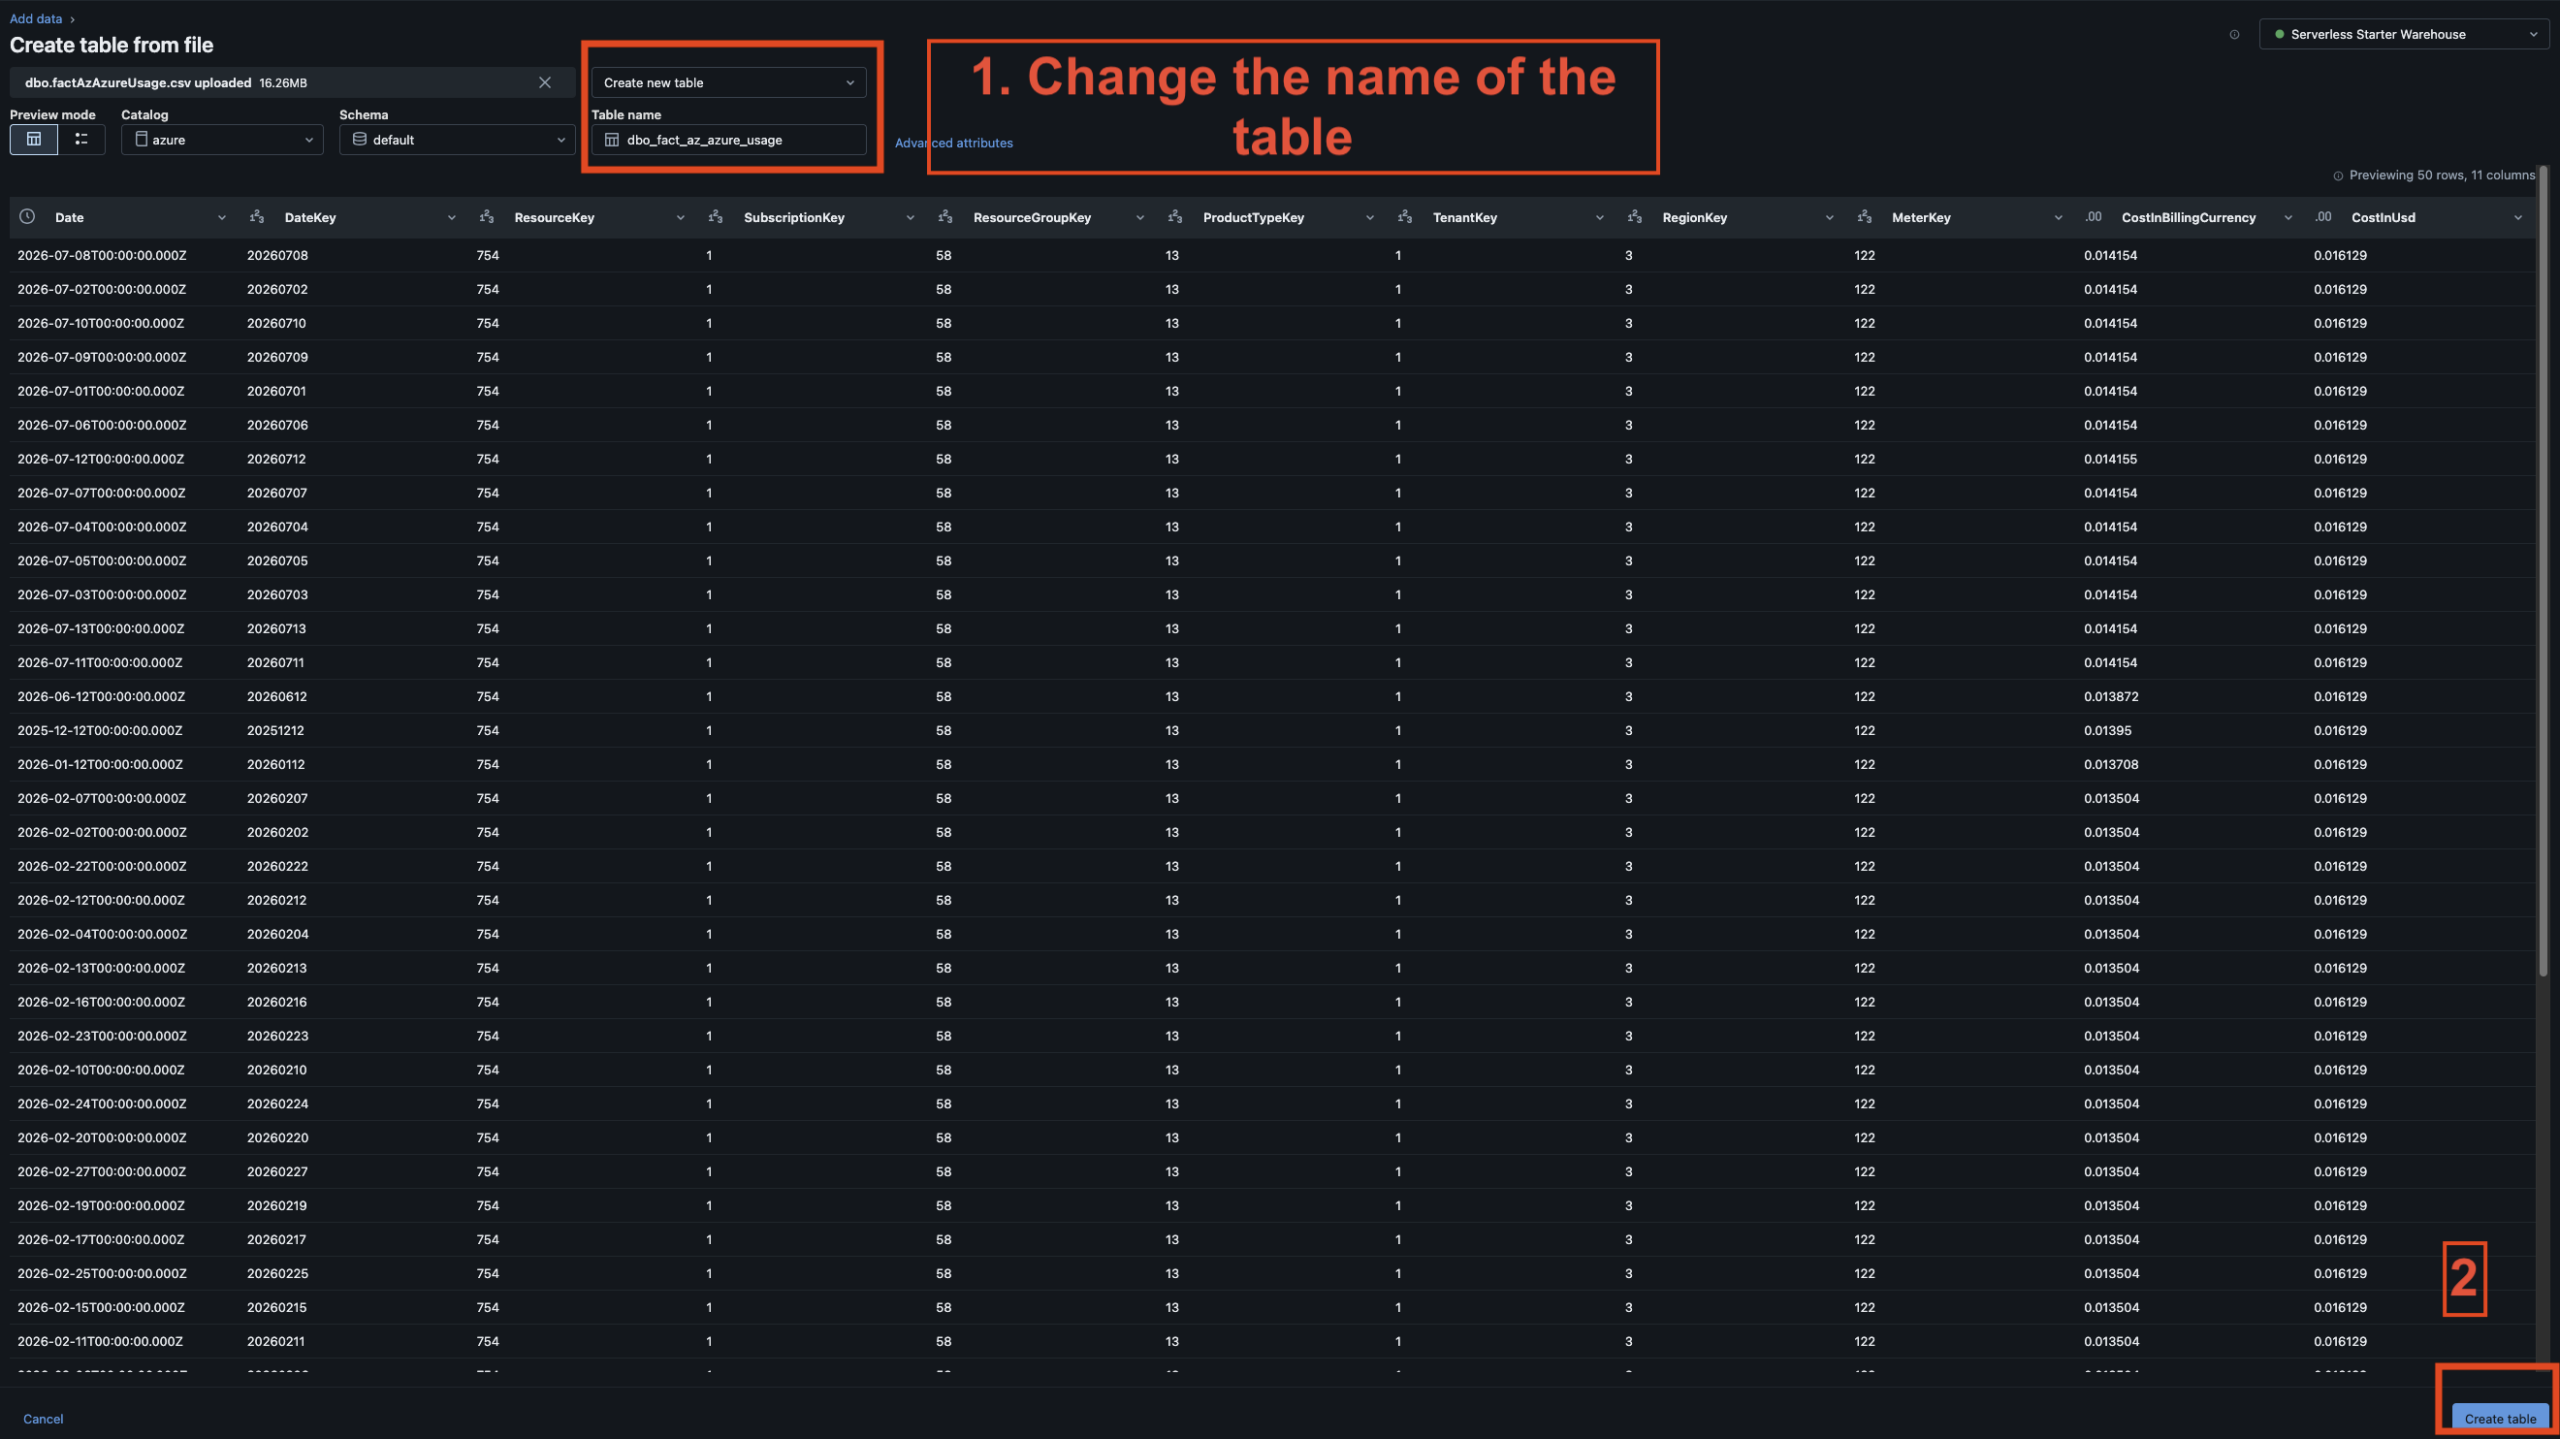
For this example, I’m using a Parquet file and simply drag it into the upload area. After a few seconds, Databricks displays a preview of the data and allows you to modify various settings.
In my case, I only change the table name and keep all other settings as they are. Once you’re happy with the configuration, click Create Table.
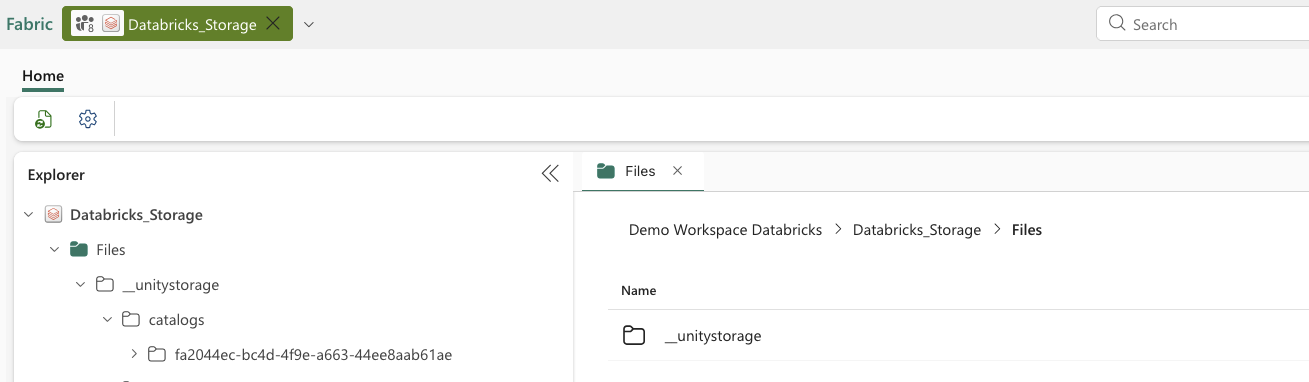
Now let’s switch back to the Microsoft Fabric portal and open the Azure Databricks Storage Item.
After refreshing the view and expanding all folders, you should see that the data is being stored directly in OneLake.
However, the current structure isn’t very intuitive. At first glance, it’s difficult to determine which folders belong to which tables or schemas.
Don’t worry, we’ll fix that later. In an upcoming step, I’ll show how to expose these tables in a much more user-friendly way within Microsoft Fabric.
Let’s move on to Step 5 and return to Azure Databricks to create a new schema.
So far, we’ve only worked with the default schema. In this step, we’ll create our own schema and add a table to it.
Later, when we switch back to Microsoft Fabric, we’ll be able to clearly see the difference between tables stored in the default schema and those stored in a custom schema.
-

- 1. Create a new catalog

-
- 2. Create a new catalog – properties
-
- 3. Catalog created – Configure catalog
-
- 4. Created catalog
-
- 5. Create table in the default schema

-
- 6. Add File for create the table
-
- 7. Preview of the file
-
- 8. Databricks storage item in Fabric
Step 5 - Create a new Schema and add tables
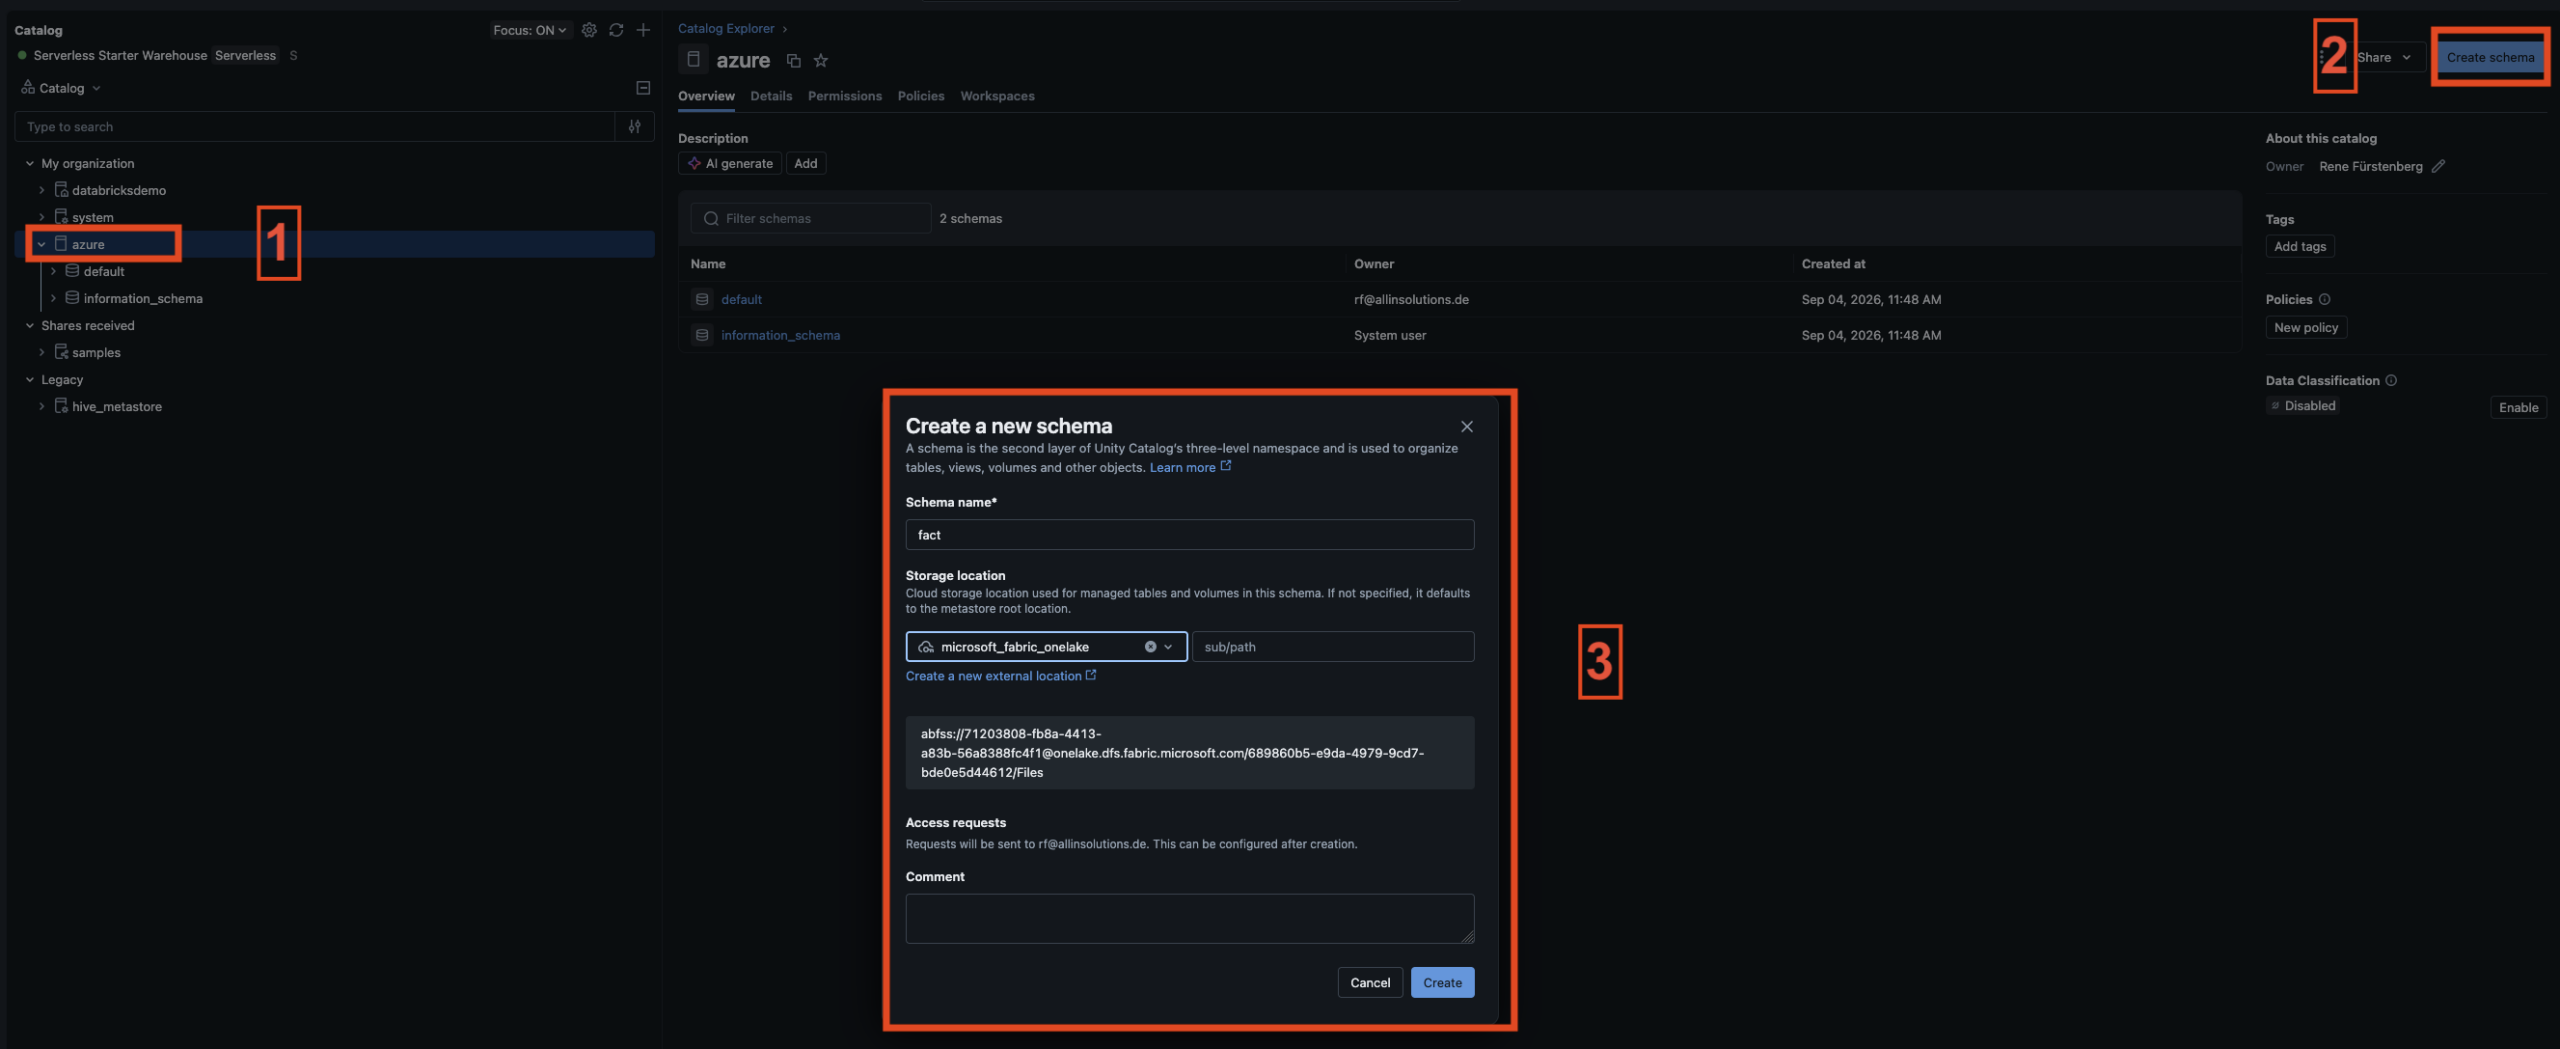
Creating a new schema is easy. Open your catalog, click Create in the upper-right corner, and select Schema.
Give the schema a name and set the storage location to your OneLake external location. Then click Create.
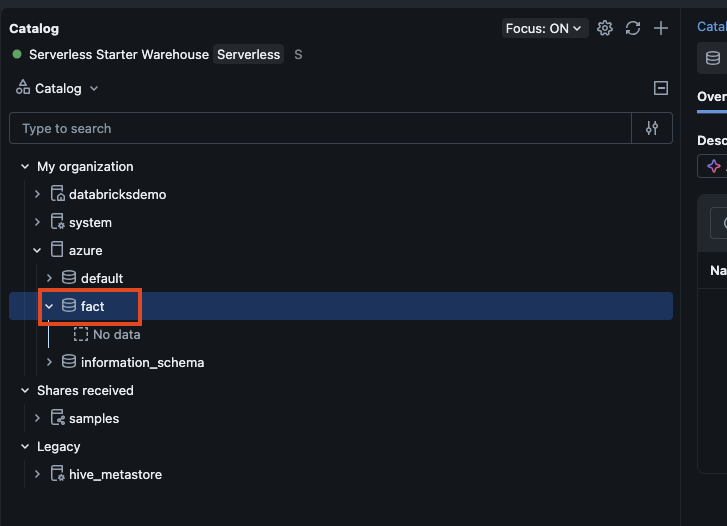
The new schema will immediately appear in the catalog and is ready to be used for creating tables. This also gives us a cleaner way to organize our data compared to storing everything in the default schema.
Creating a table in the new schema works exactly the same way as before. Open the schema, click Create in the upper-right corner, and select Table.
Upload your file, review the preview, and adjust any settings if necessary. In my case, I only rename the table and keep the remaining settings as they are.
Once you’re happy with the configuration, click Create Table. The table will then be created in the new schema, ready for us to compare with the table stored in the default schema later on.
Let’s head back to Microsoft Fabric and refresh the Azure Databricks Storage Item.
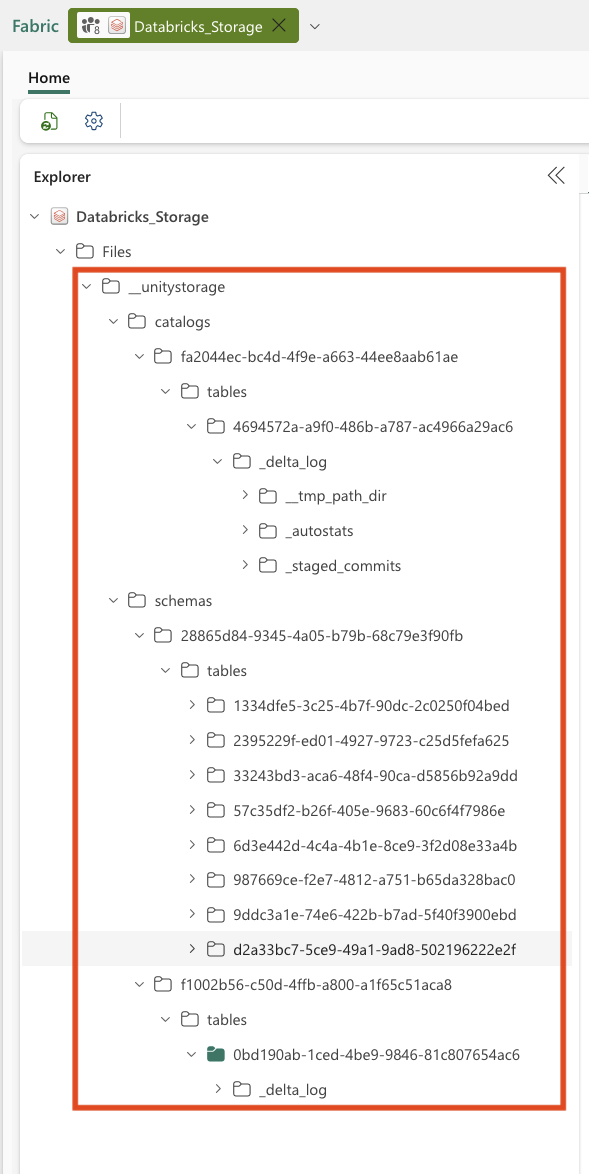
This time, you’ll notice that a new schemas folder has appeared under __unitystorage. That’s because we created a custom schema in Azure Databricks, and the data is now being stored in OneLake.
At first glance, though, things are still a bit confusing. The folder names don’t tell us much about the actual schemas or tables they contain.
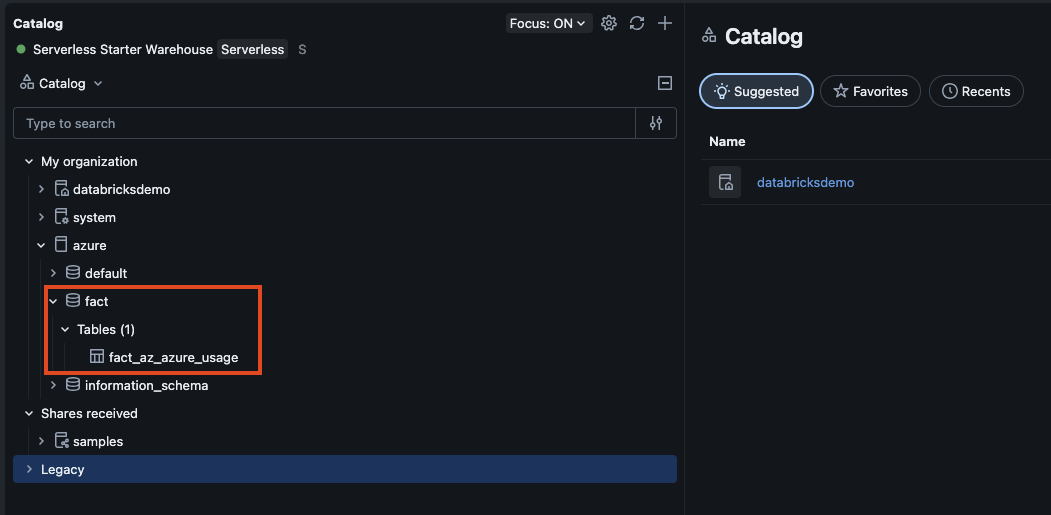
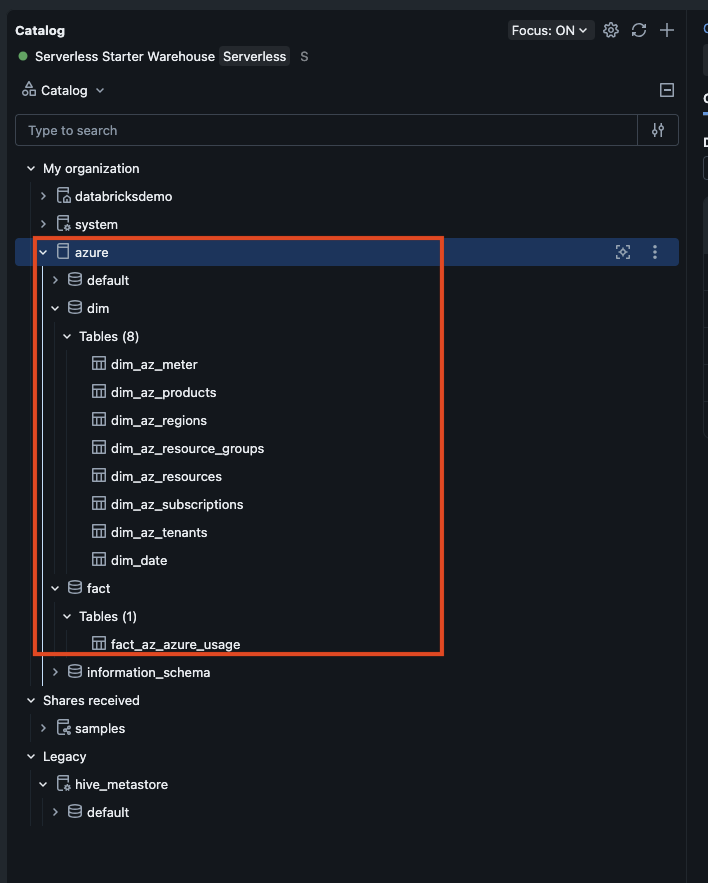
To complete the demo, I’m going to create another schema called dim and add eight more tables to it.
This gives us a more realistic data model and makes it easier to demonstrate how catalogs, schemas, and tables from Azure Databricks are represented in OneLake and later consumed in Microsoft Fabric.
Let’s take one more look at the table structure in the Azure Databricks Storage Item within Microsoft Fabric.
After refreshing the view and expanding the folder structure, we can clearly see that the data is now organized under the schemas folder.
Although the folder names are still based on internal identifiers, we can already recognize the overall structure. In this example, we have two custom schemas: one containing a single table and another containing eight tables (Screenshot 5).
This allows us to verify that the tables and schemas created in Azure Databricks are being stored correctly in OneLake and that the underlying folder structure reflects the hierarchy we’ve created in Unity Catalog.
If you’re trying to figure out which folder in the Azure Databricks Storage Item belongs to which Databricks table, there is a way to do it.
Open the table details in Databricks, for example for dim_az_meter, and look at the Storage Location. At the end of the storage path, you’ll find a unique identifier (Screenshot 6). Compare this identifier with the folder IDs in the Azure Databricks Storage Item in Microsoft Fabric. Matching IDs indicate the corresponding table.
However, the structure is still not very user-friendly, as there are no meaningful schema or table names visible. In the next step, we’ll address this and make the data much easier to navigate and consume from within Microsoft Fabric.
-
- 1. Create a new Schema in the catalog
-
- 2. New Schema
-
- 3. New Schema fact
-
- 4. New Schema and new tables
-
- 5. Table and Schema structure in Fabric Databricks storage item
-
- 6. Table details to identify the table in Fabric

Step 6 - Make the tables visible in Microsoft Fabric
As a next step, create a Schema Lakehouse in Microsoft Fabric. I won’t go into the details of creating a Lakehouse, as that’s not the focus of this article.
To make the Databricks tables visible in a Lakehouse, we need to use a notebook. You can download the notebook from my GitHub repository:
GitHub Link to the Notebook: Click here
The notebook uses a connection to access Azure Databricks and relies on the Fabric Workspace Identity for authentication. To make everything work, we’ll need to:
- Create a connection that can be used by the notebook.
- Configure the Fabric Workspace Identity for authentication.
- Grant the Workspace Identity the required permissions in Azure Databricks, including access to the catalog created earlier.
— Microsoft Fabric —
Import the notebook into Microsoft Fabric using Import notebook → From this computer. After opening the notebook, connect it to the Schema Lakehouse created earlier and make it to default Lakehouse. We’ll then configure the required parameters and execute the notebook to expose the Databricks tables within the Lakehouse.
Before running the notebook, we need to create a connection that can be used by the notebook.
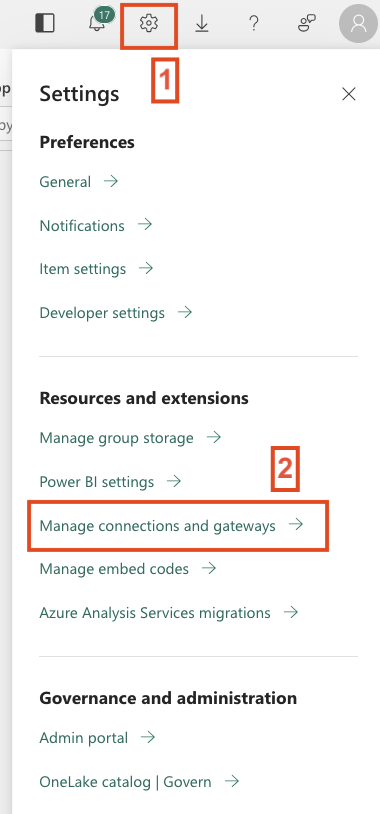
- In the Microsoft Fabric portal, click the Settings (gear) icon and select Manage connections and gateways.
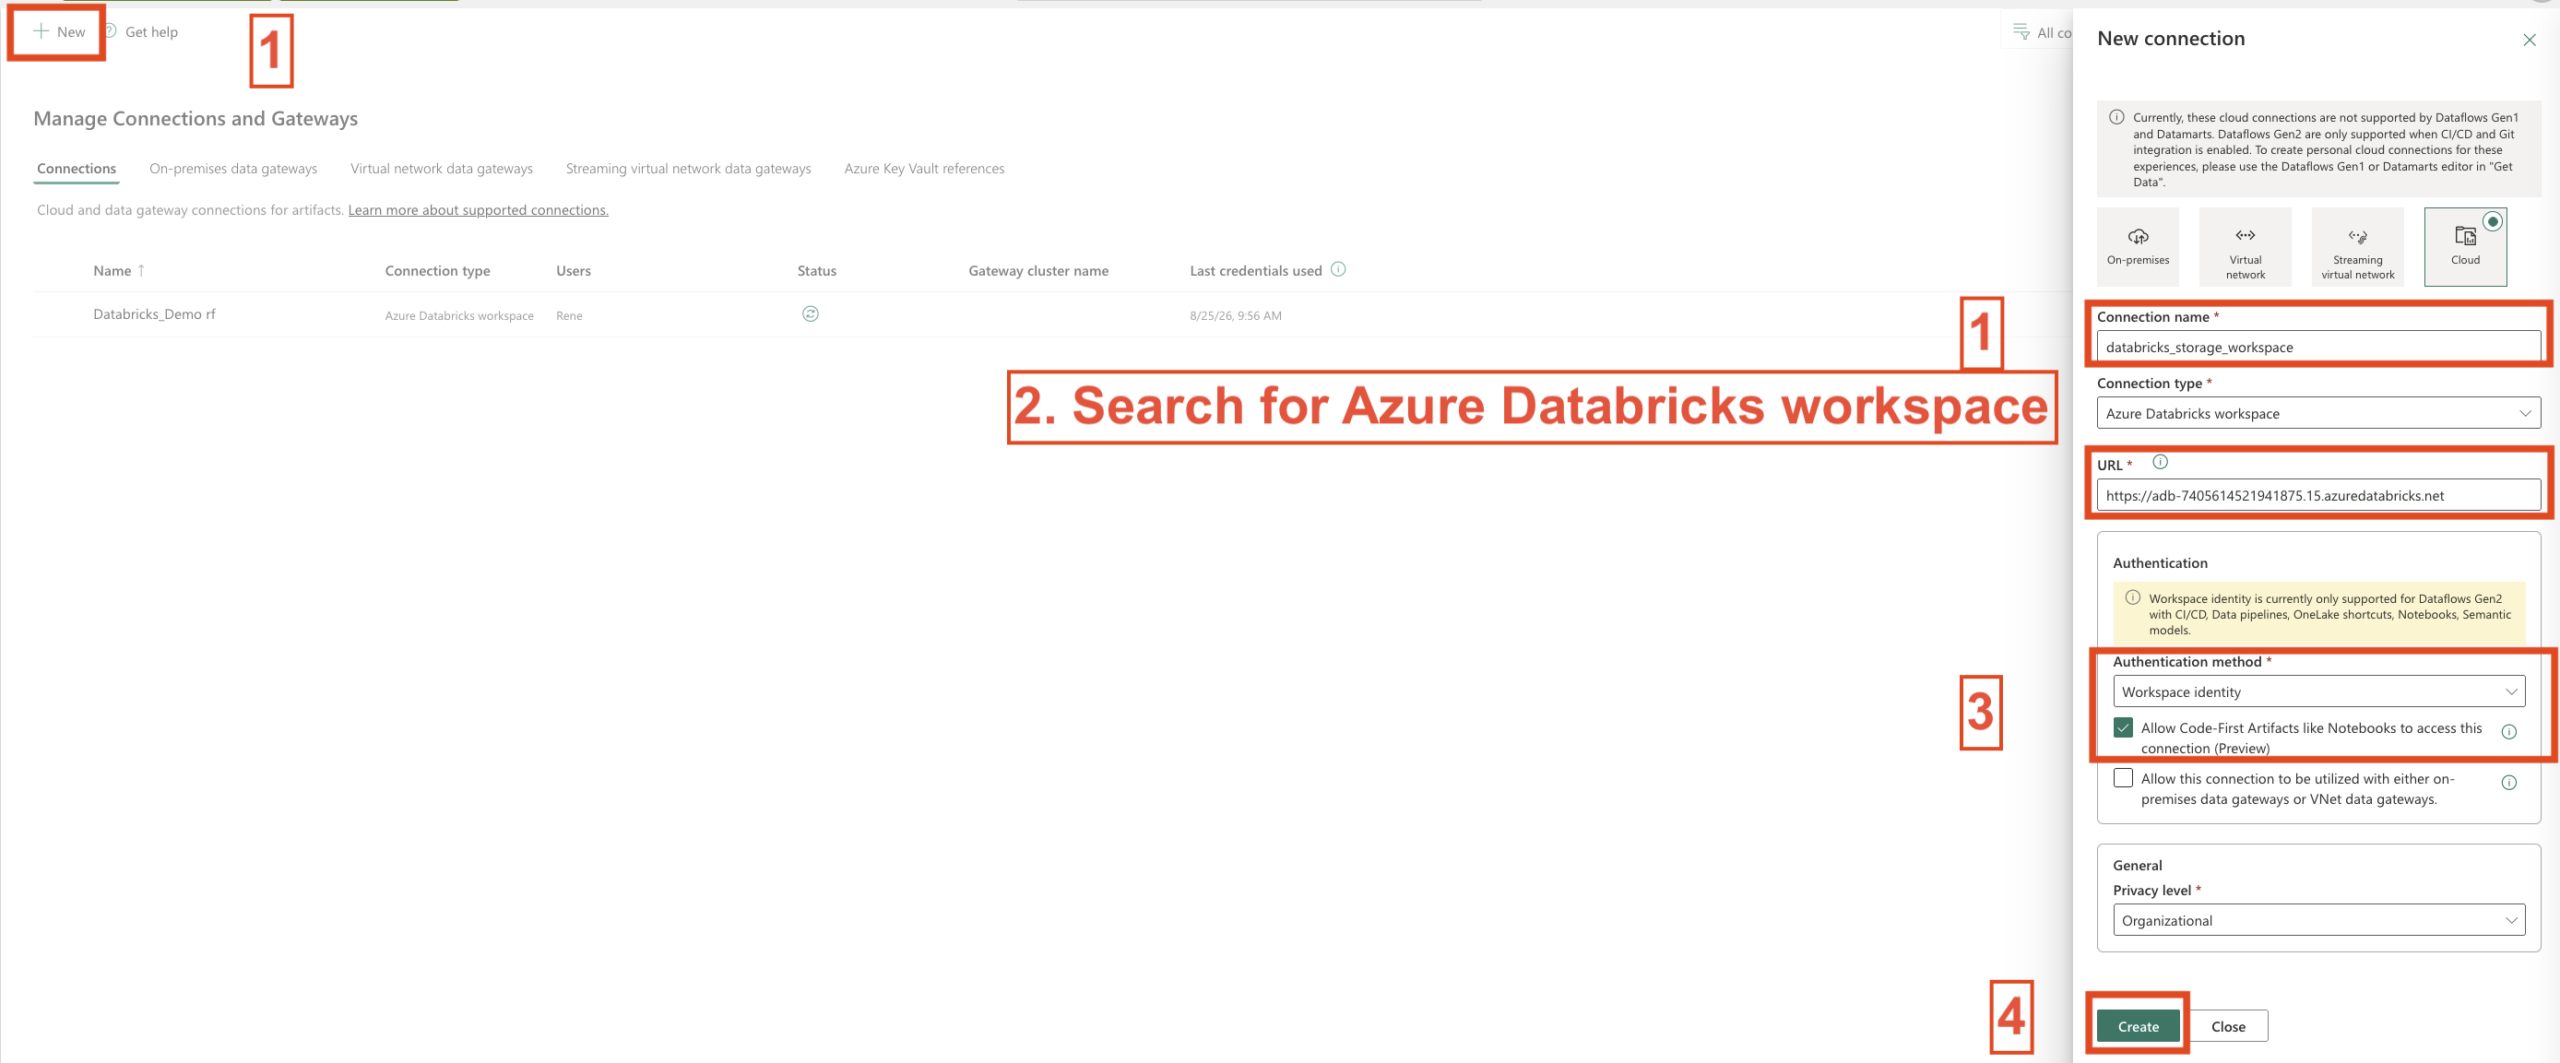
- Click New in the upper-left corner.
- Select Cloud as the connection type.
- Enter a meaningful Connection name.
- In Connection type, search for and select Workspace.
- For the URL, enter the URL of your Azure Databricks workspace.
You can find this URL in the Azure portal by opening your Azure Databricks resource.
On the overview page, copy the Workspace URL and paste it into the connection configuration. - For Authentication, select Workspace Identity.
- Enable the option Allow Code-First Artifacts like Notebooks to access this connection (Preview).
This setting is required so the notebook can access and use the connection. - Click Create.
In Screenshot 2 and 3 you can see the configuration for the connection.
Important: If the Allow Code-First Artifacts like Notebooks to access this connection (Preview) option is not enabled, the notebook will not be able to use the connection later in this walkthrough.
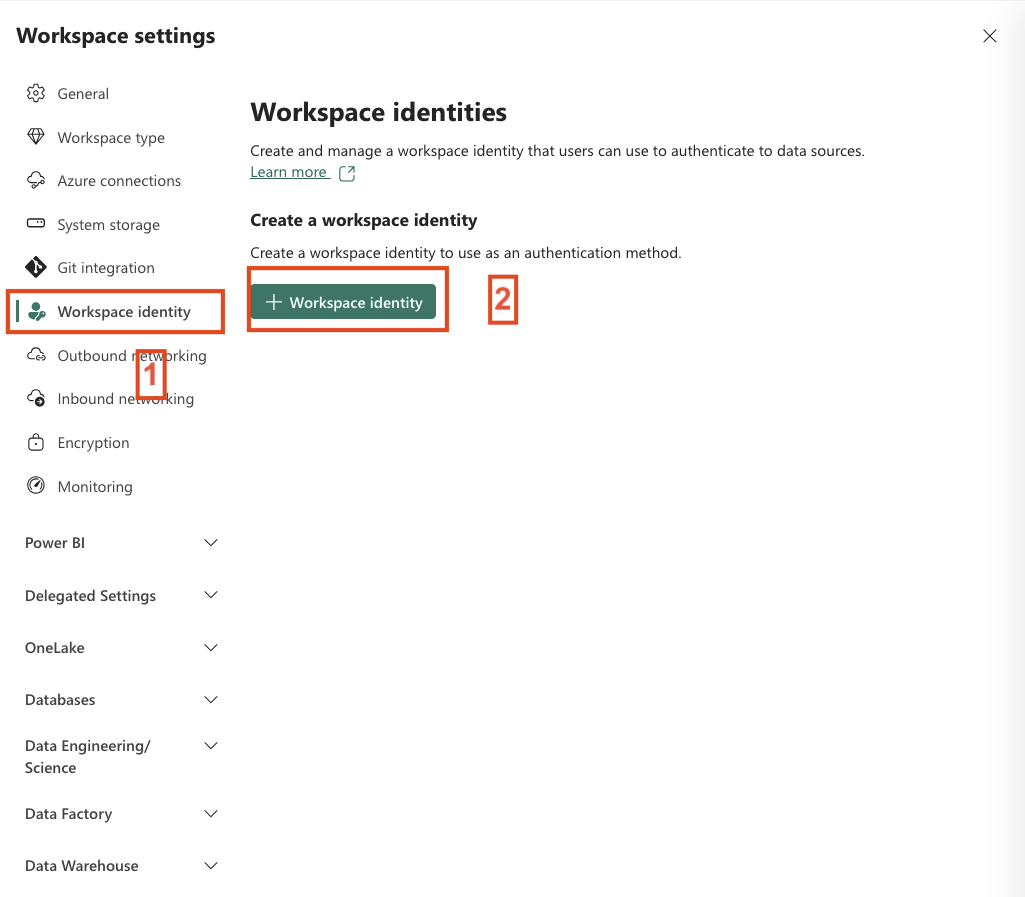
Next, we’ll create a Workspace Identity.
- Open the Workspace Settings.
- Navigate to Workspace Identity.
- Click + Workspace Identity.
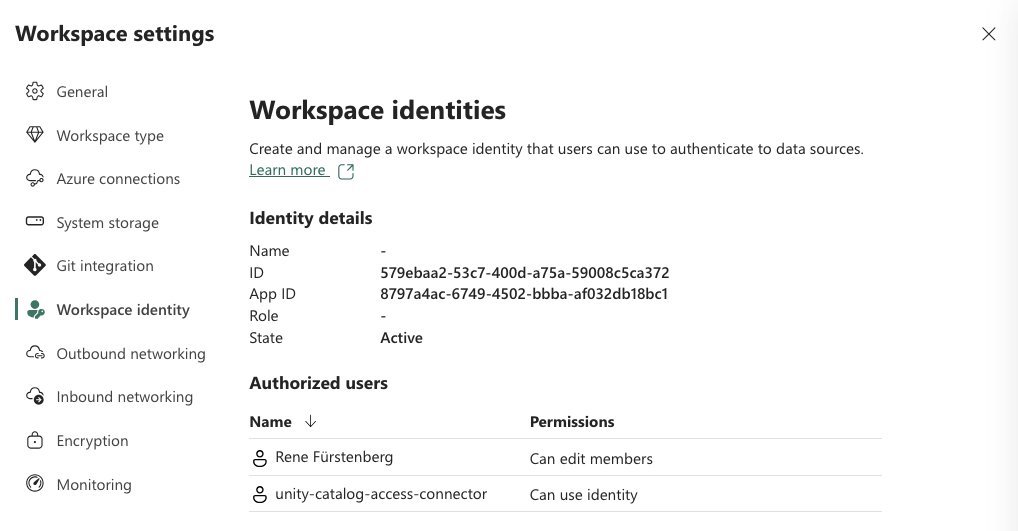
After a few moments, the Workspace Identity will be available and ready to use. You can also see this in screenshot 4 and 5.
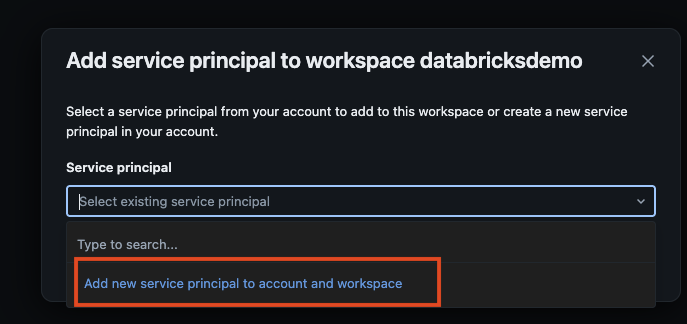
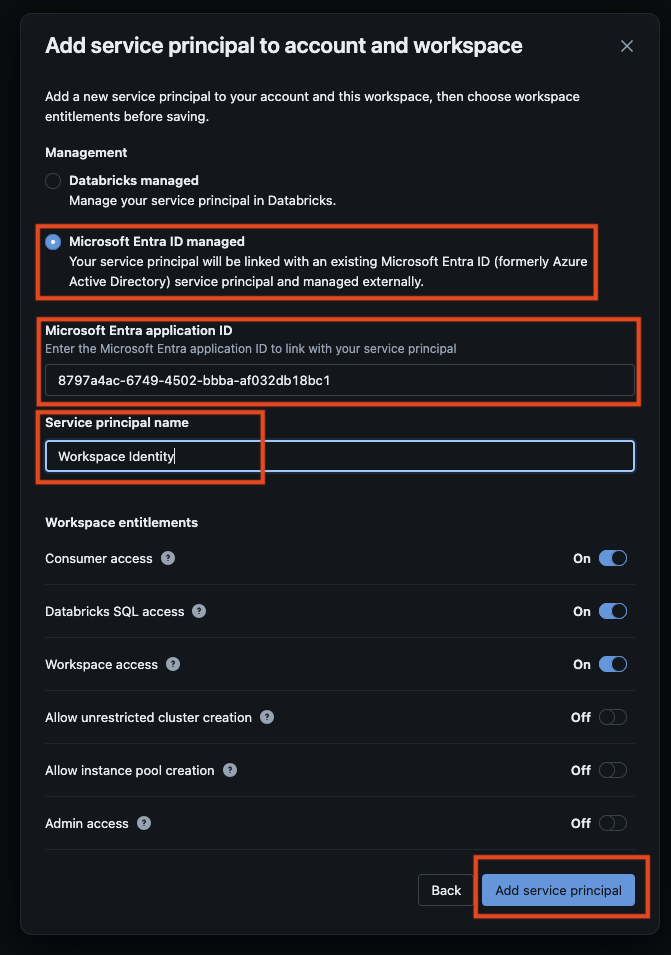
Important: Copy the Application (Client) ID of the Workspace Identity and keep it handy. We’ll need it later when configuring permissions in Azure Databricks.
— Azure Databricks —
In the next step, we’ll grant this identity the required permissions in Azure Databricks so that the notebook can access the catalog and retrieve the necessary metadata.
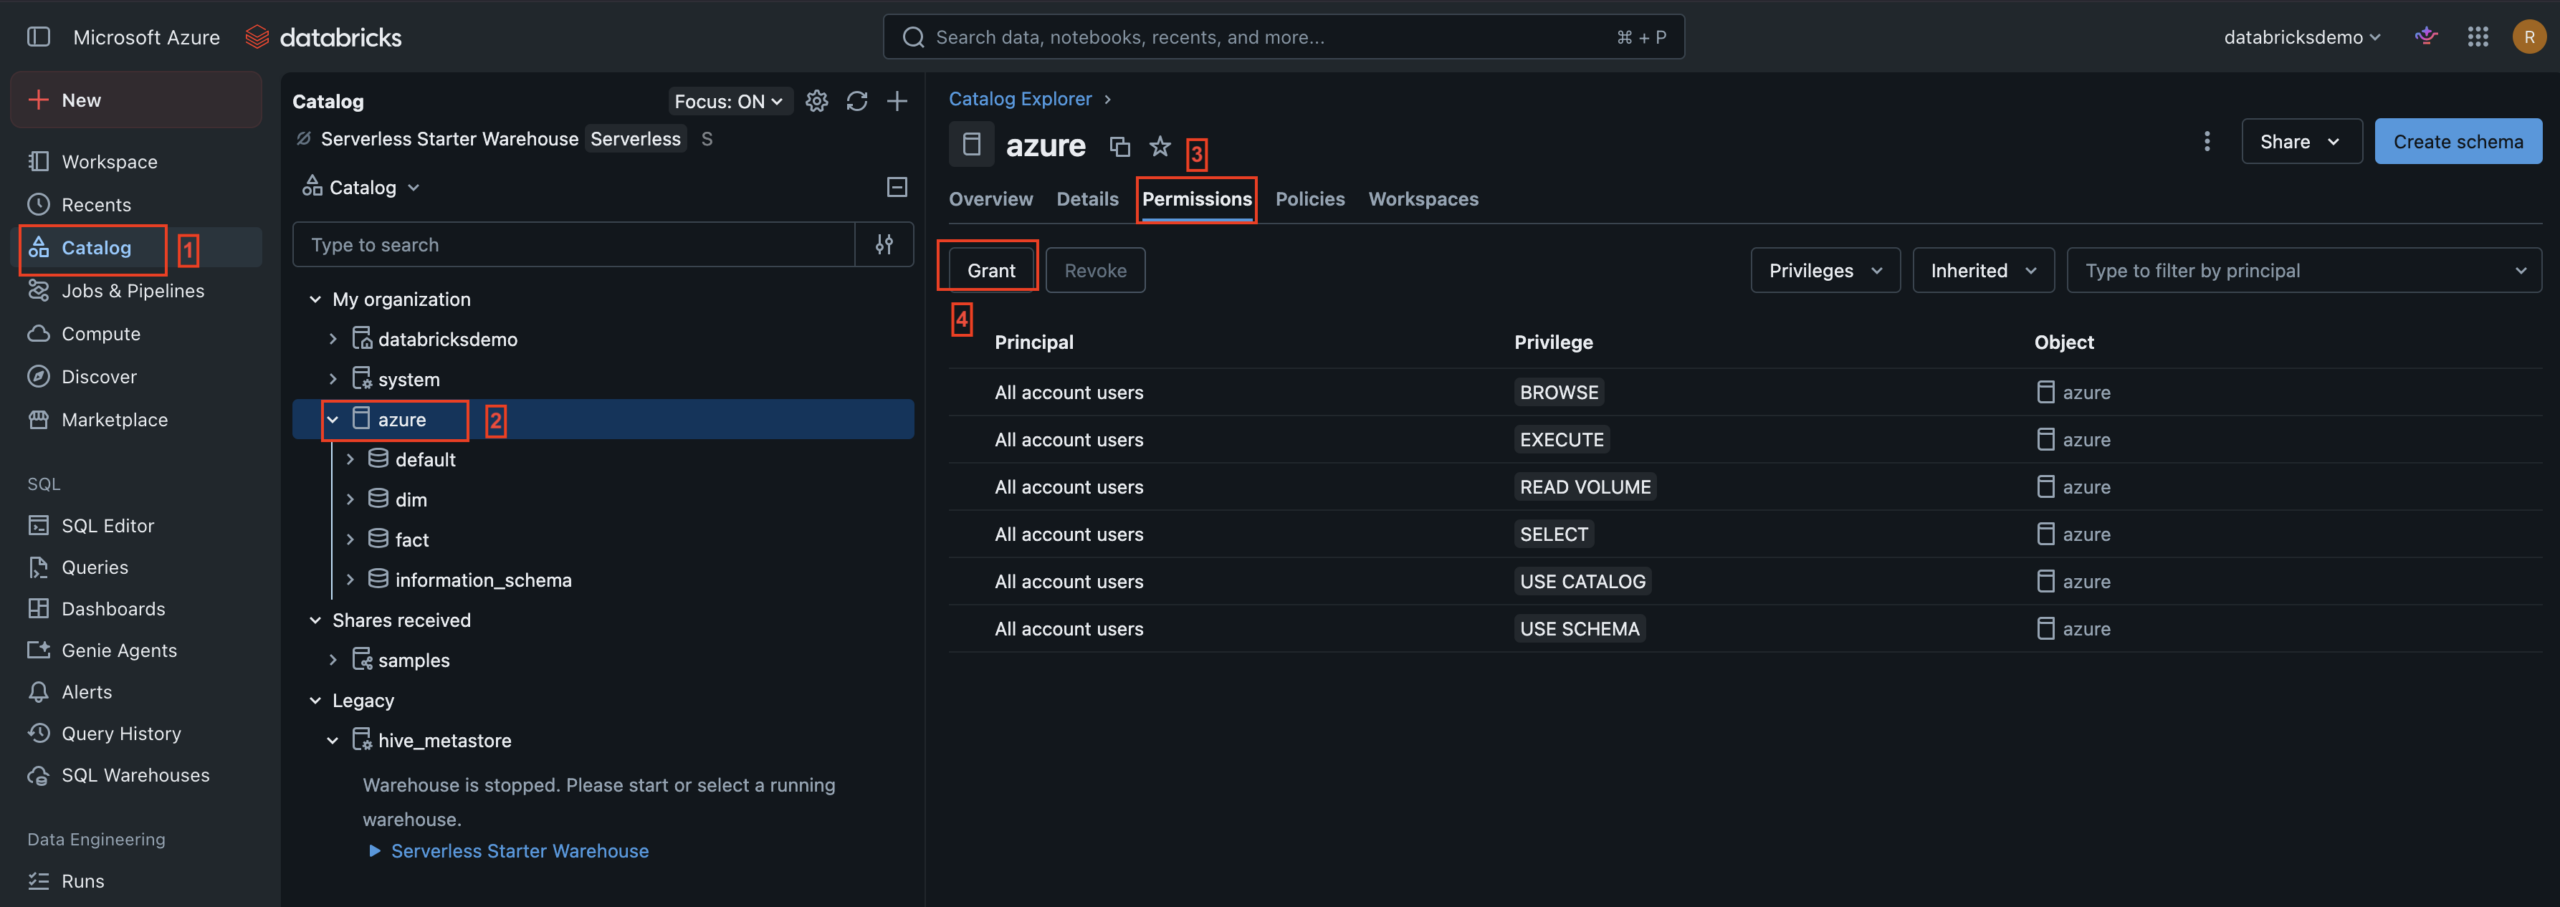
The final preparation step is to grant the required permissions on the catalog in Azure Databricks.
- Navigate to Catalog in the left-hand menu.
- Select the catalog that contains your tables.
- Open the Permissions tab.
- Click Grant.
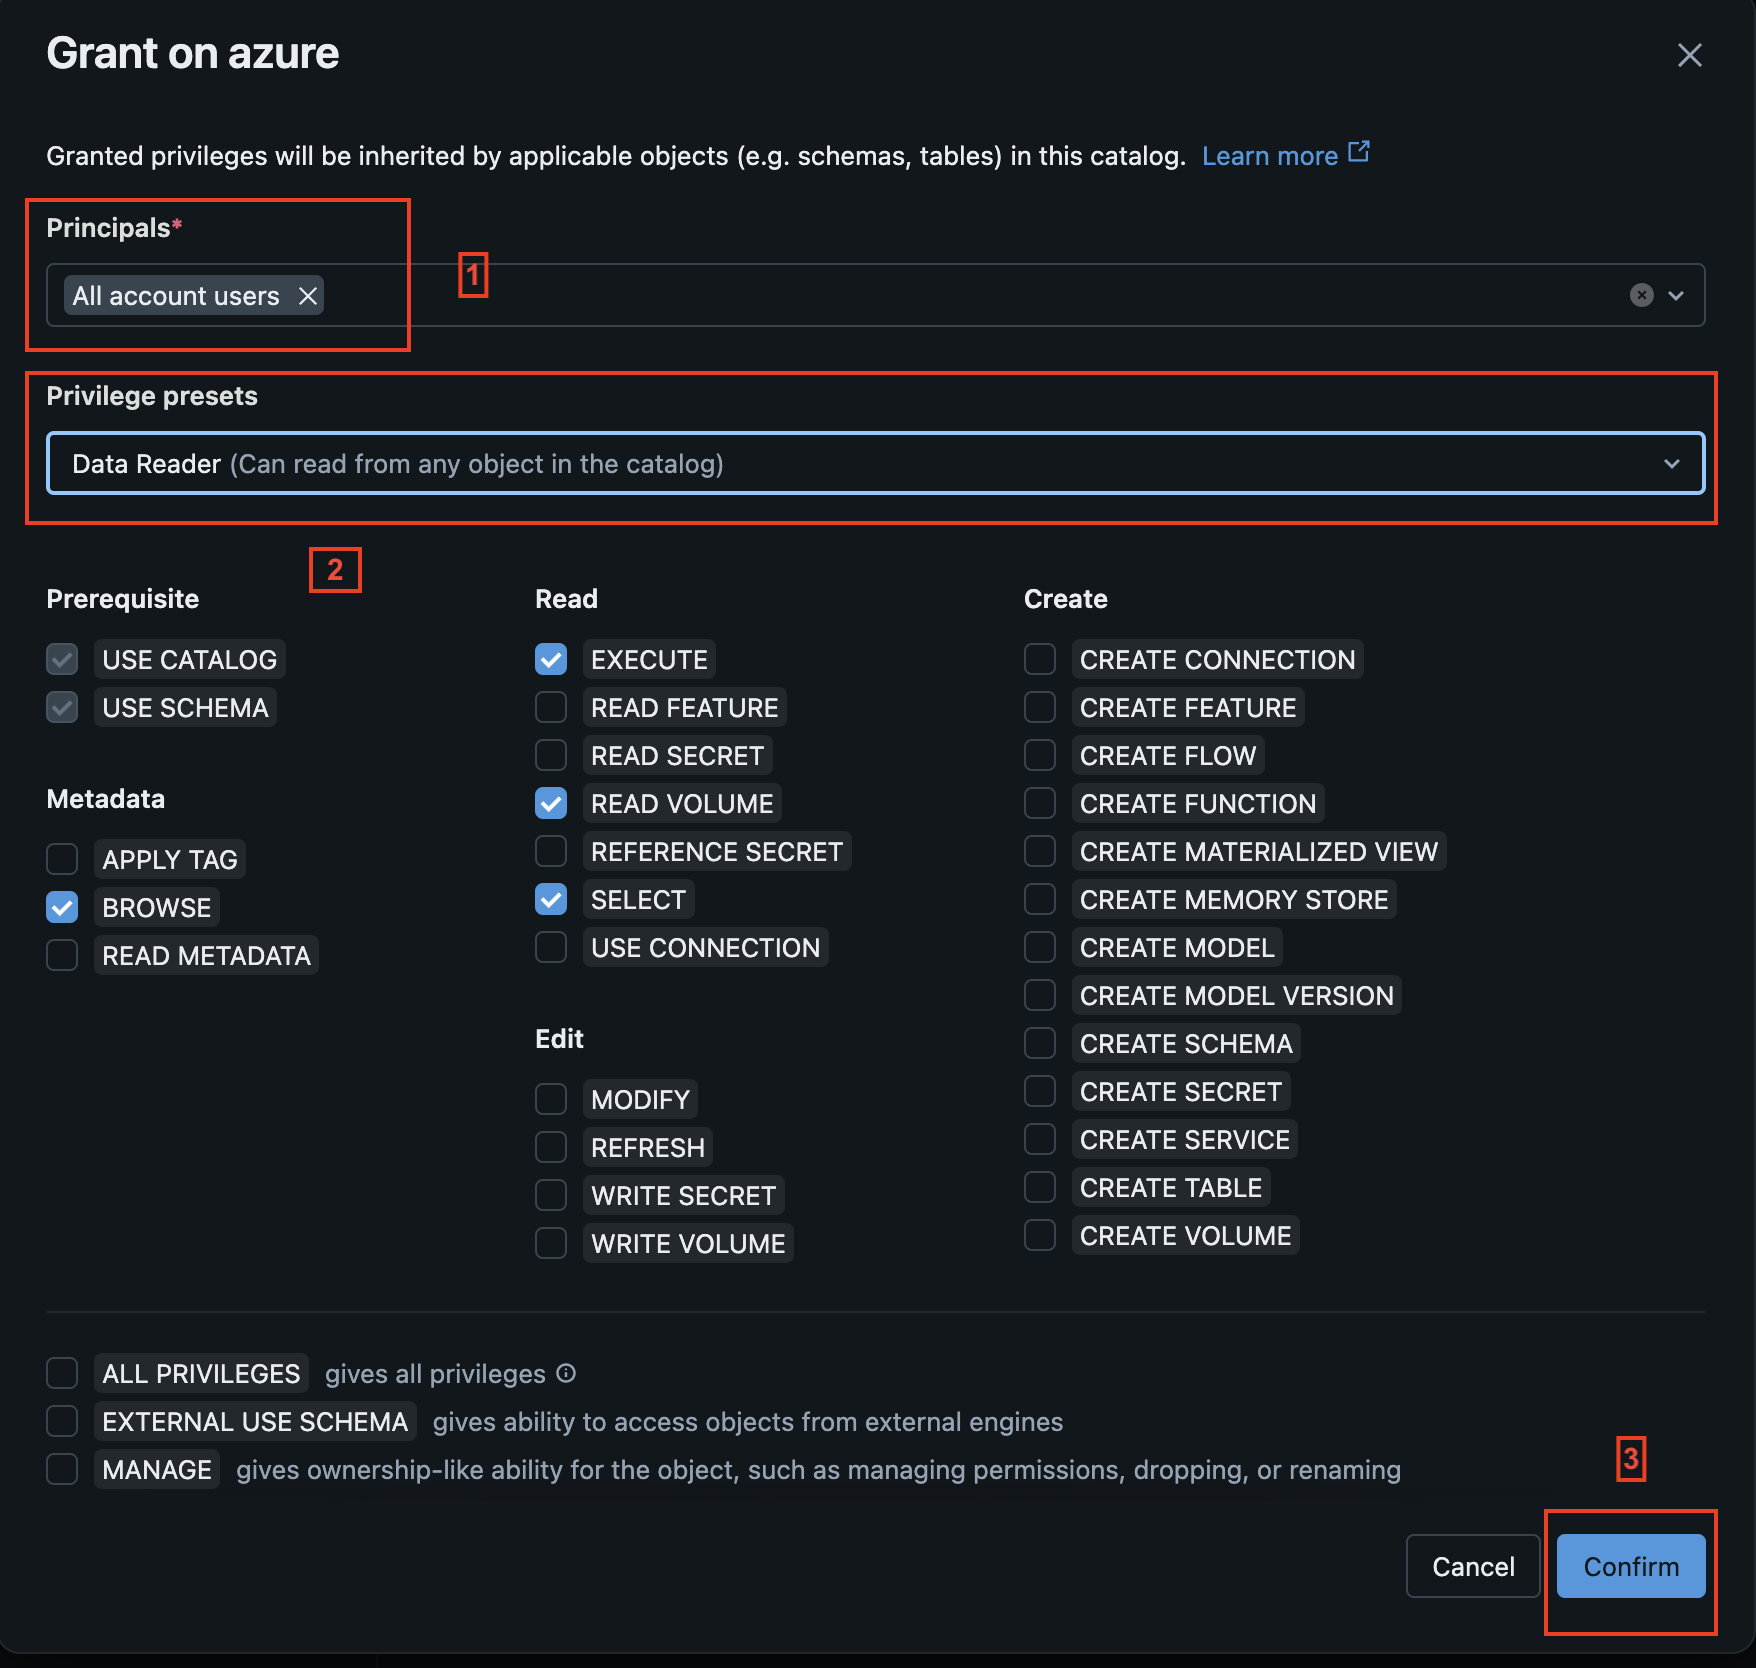
In the Grant Permissions dialog, select the principal that should receive access.
For the purpose of this demo, I keep things simple and grant permissions to All Account Users. In a production environment, however, it’s recommended to follow the principle of least privilege and only grant access to users or groups that actually require it.
For the permission set, select the predefined Data Reader role. This is sufficient for the notebook to read the catalog metadata and create the required shortcuts in the Schema Lakehouse.
Once everything is configured, click Confirm. You can also see in screenshot 10 and 11.
Note: If you’re using the Workspace Identity created earlier, make sure that the identity has access to the catalog. Without the required catalog permissions, the notebook won’t be able to enumerate schemas and tables.
The Databricks setup is now complete. Next, we’ll configure the notebook by updating a few settings before running it.
— Notebook —
We’re now in the final preparation step before running the notebook (Screenshot 12-14).
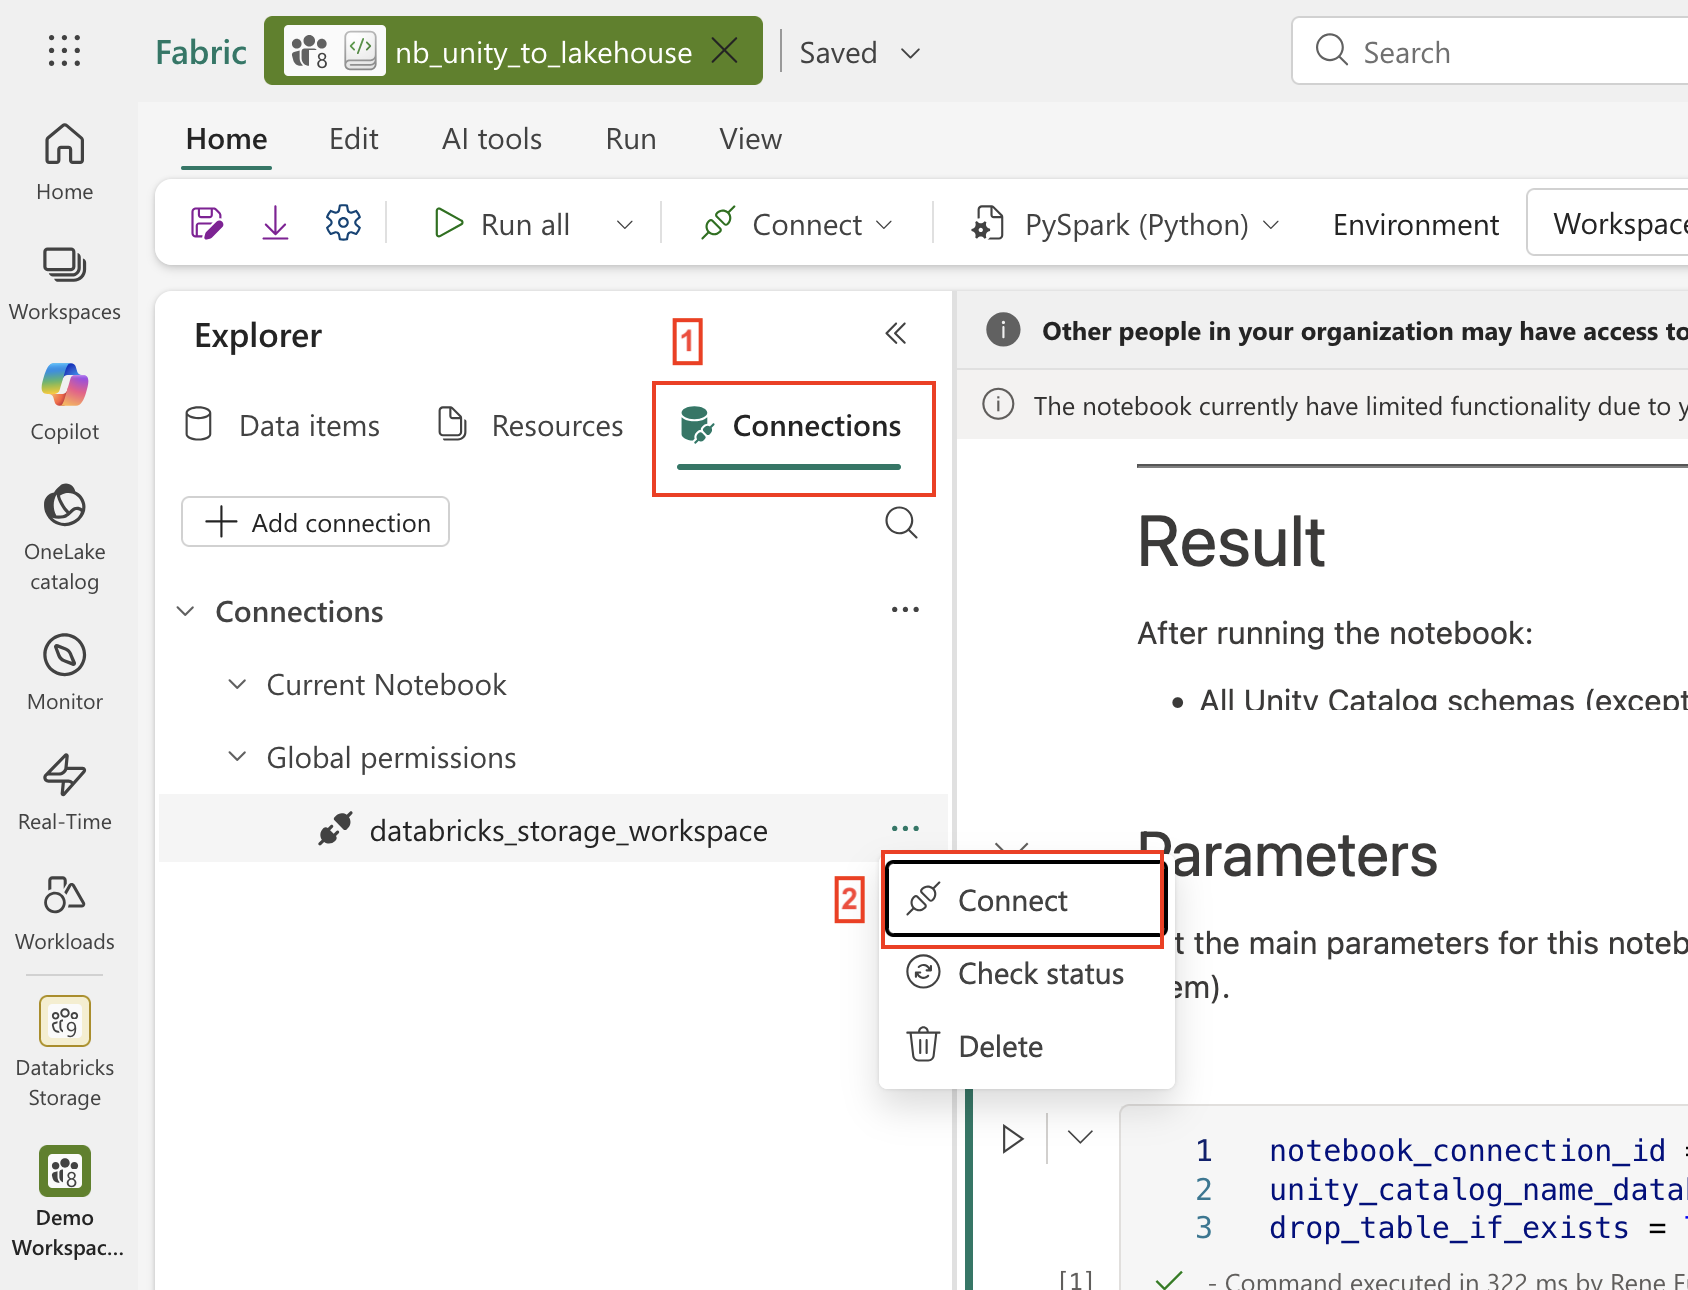
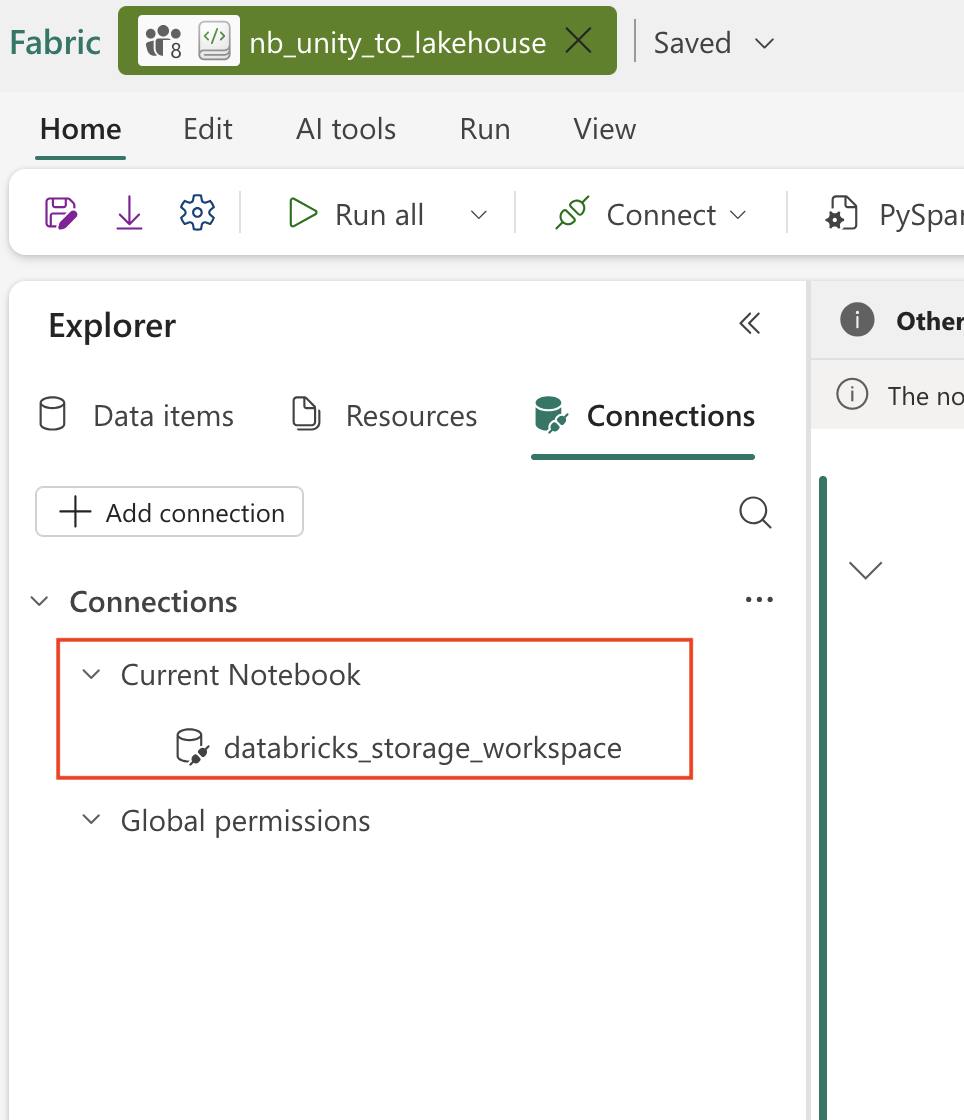
Open the imported notebook and navigate to the Connections tab. You should see the connection that we created earlier.
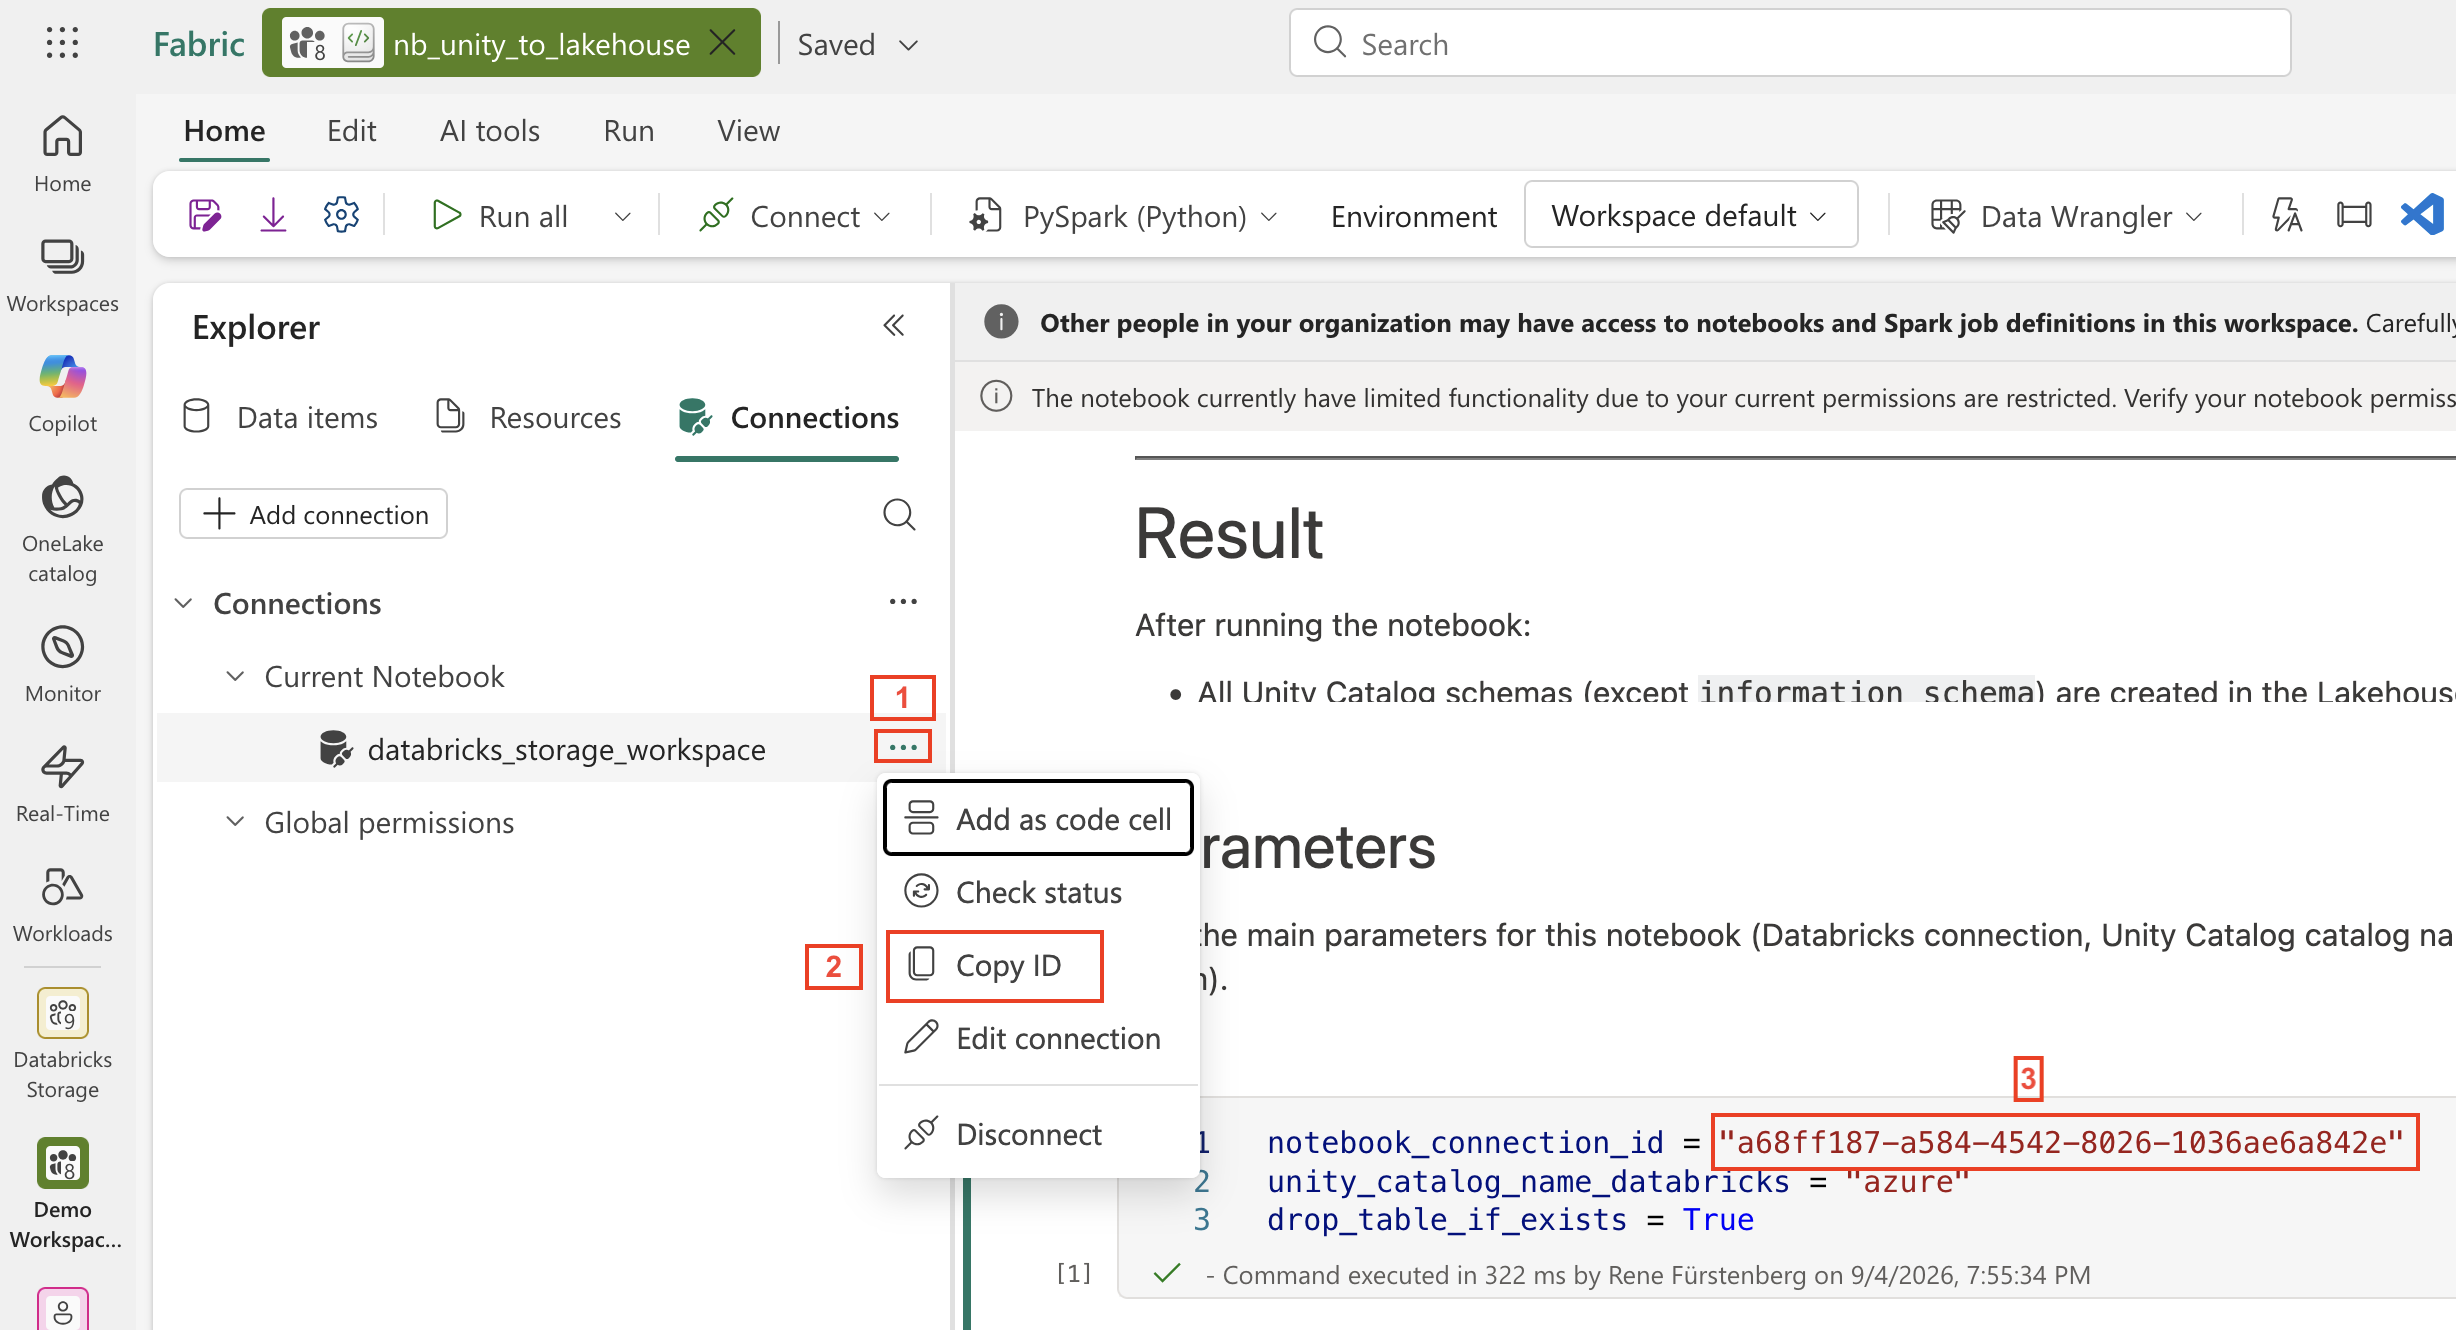
Click the three dots next to the connection and select Connect. After the connection has been linked to the notebook, click the three dots once more and select Copy ID.
Next, open the Parameters cell in the notebook and replace the existing Connection ID value with the ID you just copied.
Once that’s done, we’re ready to configure the remaining notebook parameters and execute the notebook.
Go to Step 7.
-
- 1. Import Notebook
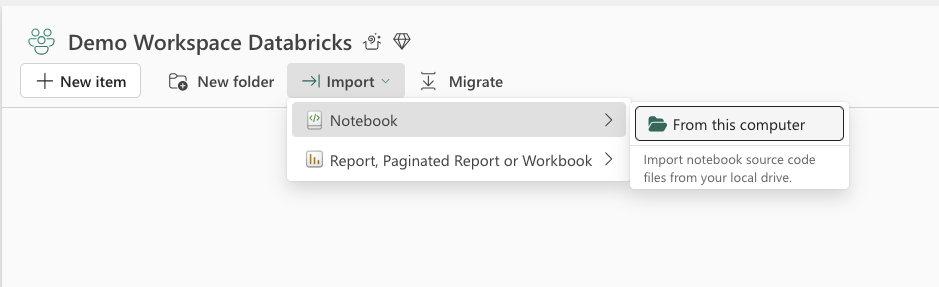
-
- 2. Manage connections and gateways
-
- 3. Create New Connection for Databricks
-
- 4. Create the workspace identity
-
- 5. Overview of the created Workspace identiy
-
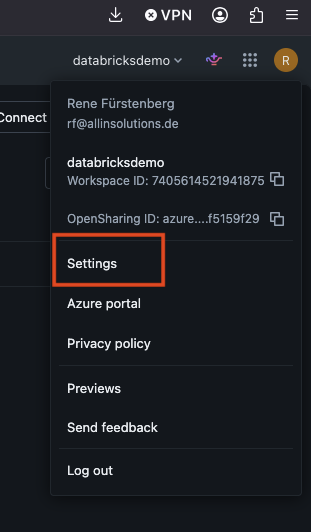
- 6. Databricks Settings
-
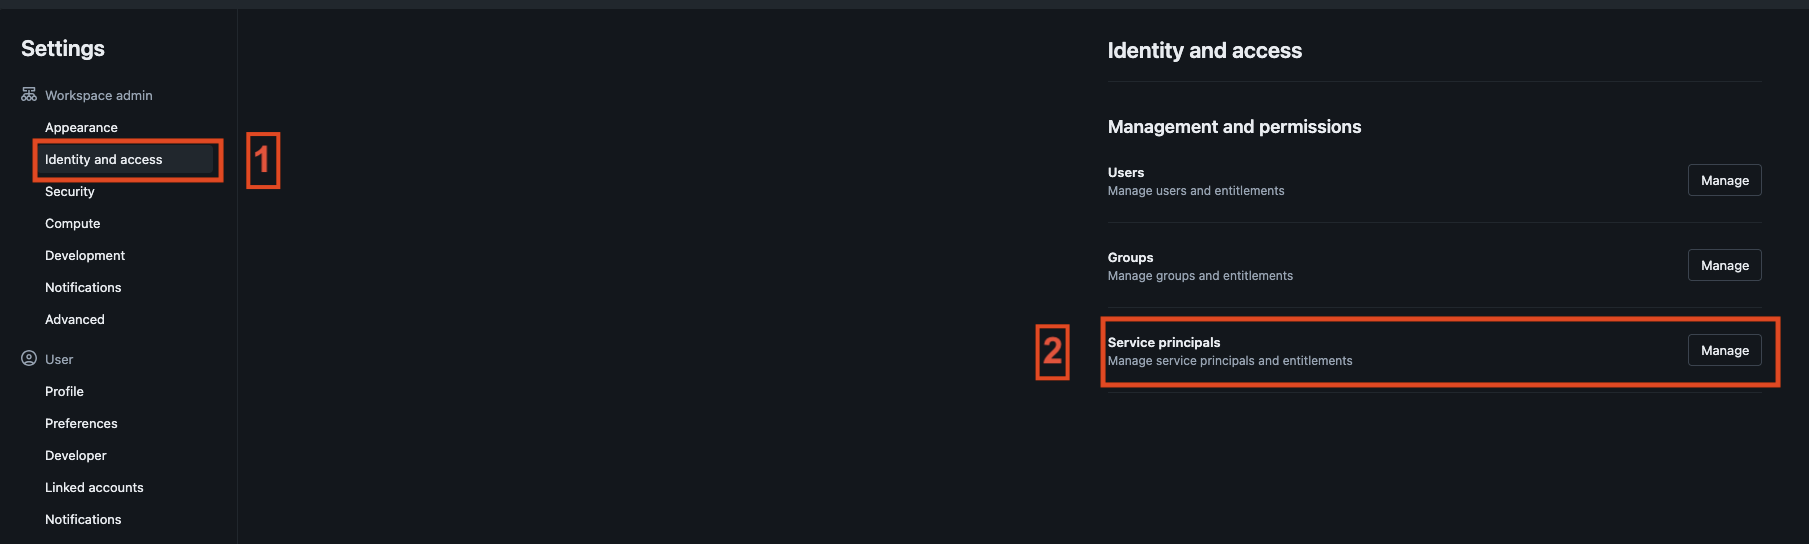
- 7. Identity and access – Service principals
-
- 8. Add new service principal to account and workspace
-
- 9. Service principal properties
-
- 10. Garant permissions to catalog
-
- 11. Permissions dialog
-
- 12. Connect the Connection to Notebook
-
- 13. Current Connection
-
- 14. Copy the ID
Step 7 - Execute the Notebook
And finally, the moment we’ve been working towards: let’s run the notebook.
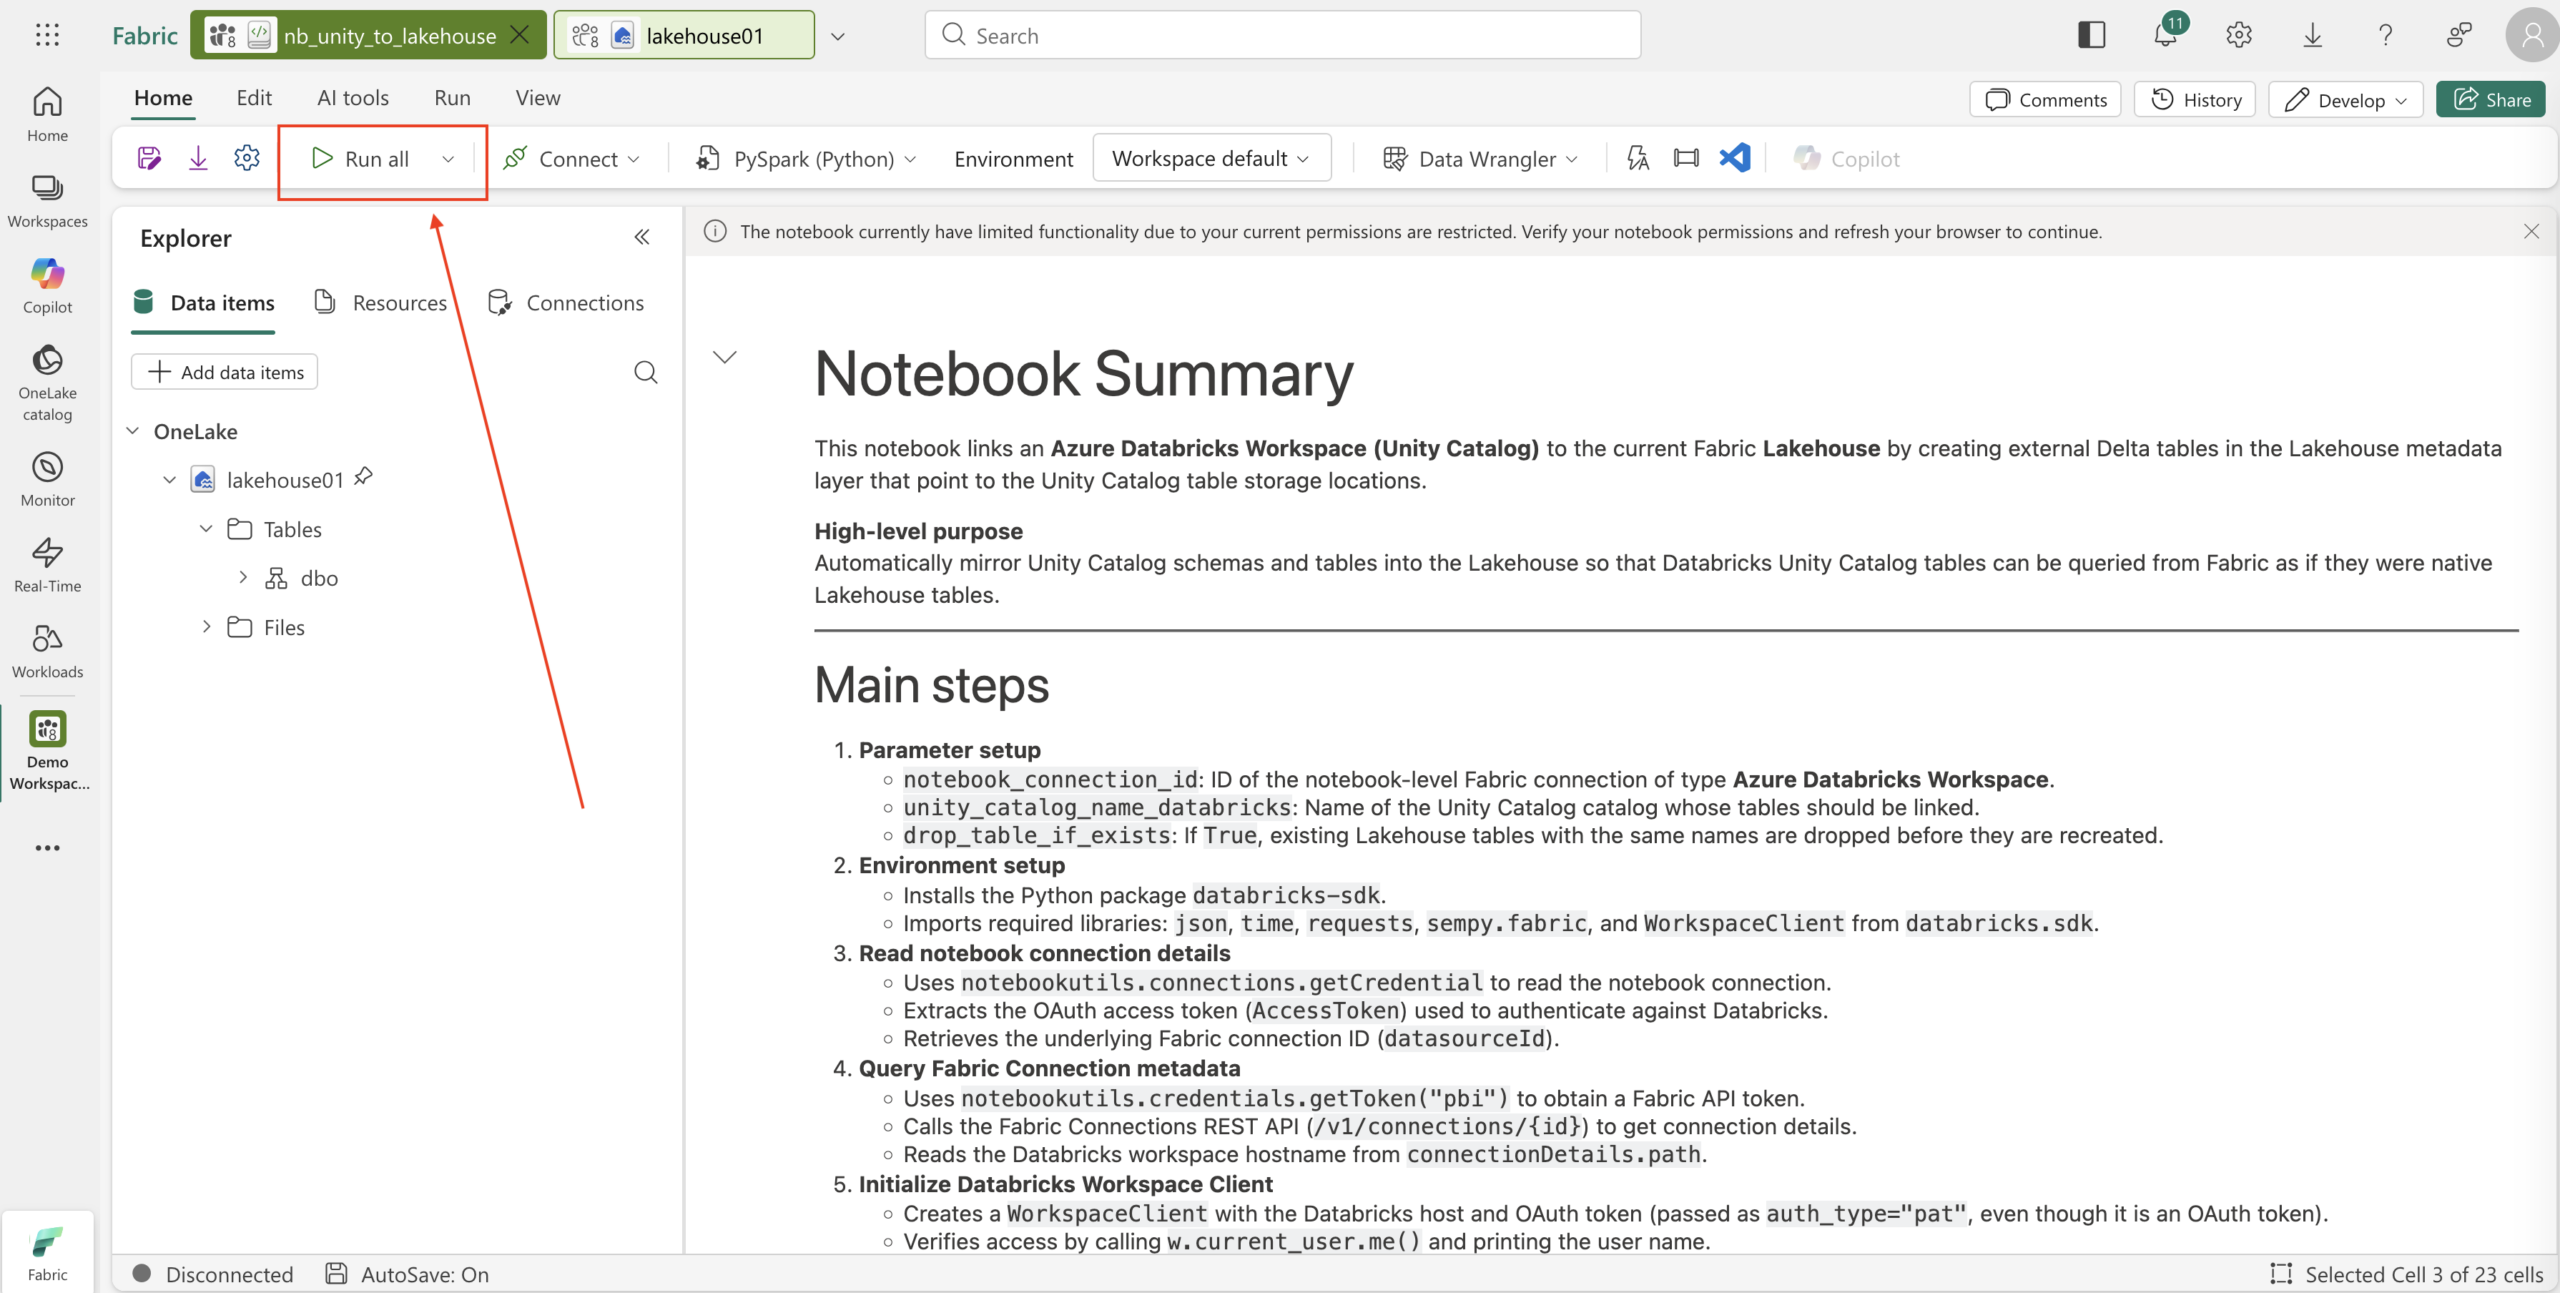
Simply click Run all at the top of the notebook.
Fabric will start a Spark session if one isn’t already running. After a few moments, the notebook execution will begin and should complete without any errors. If a cell fails during execution, don’t panic. In most cases, the issue can be traced back to one of the previous configuration steps.
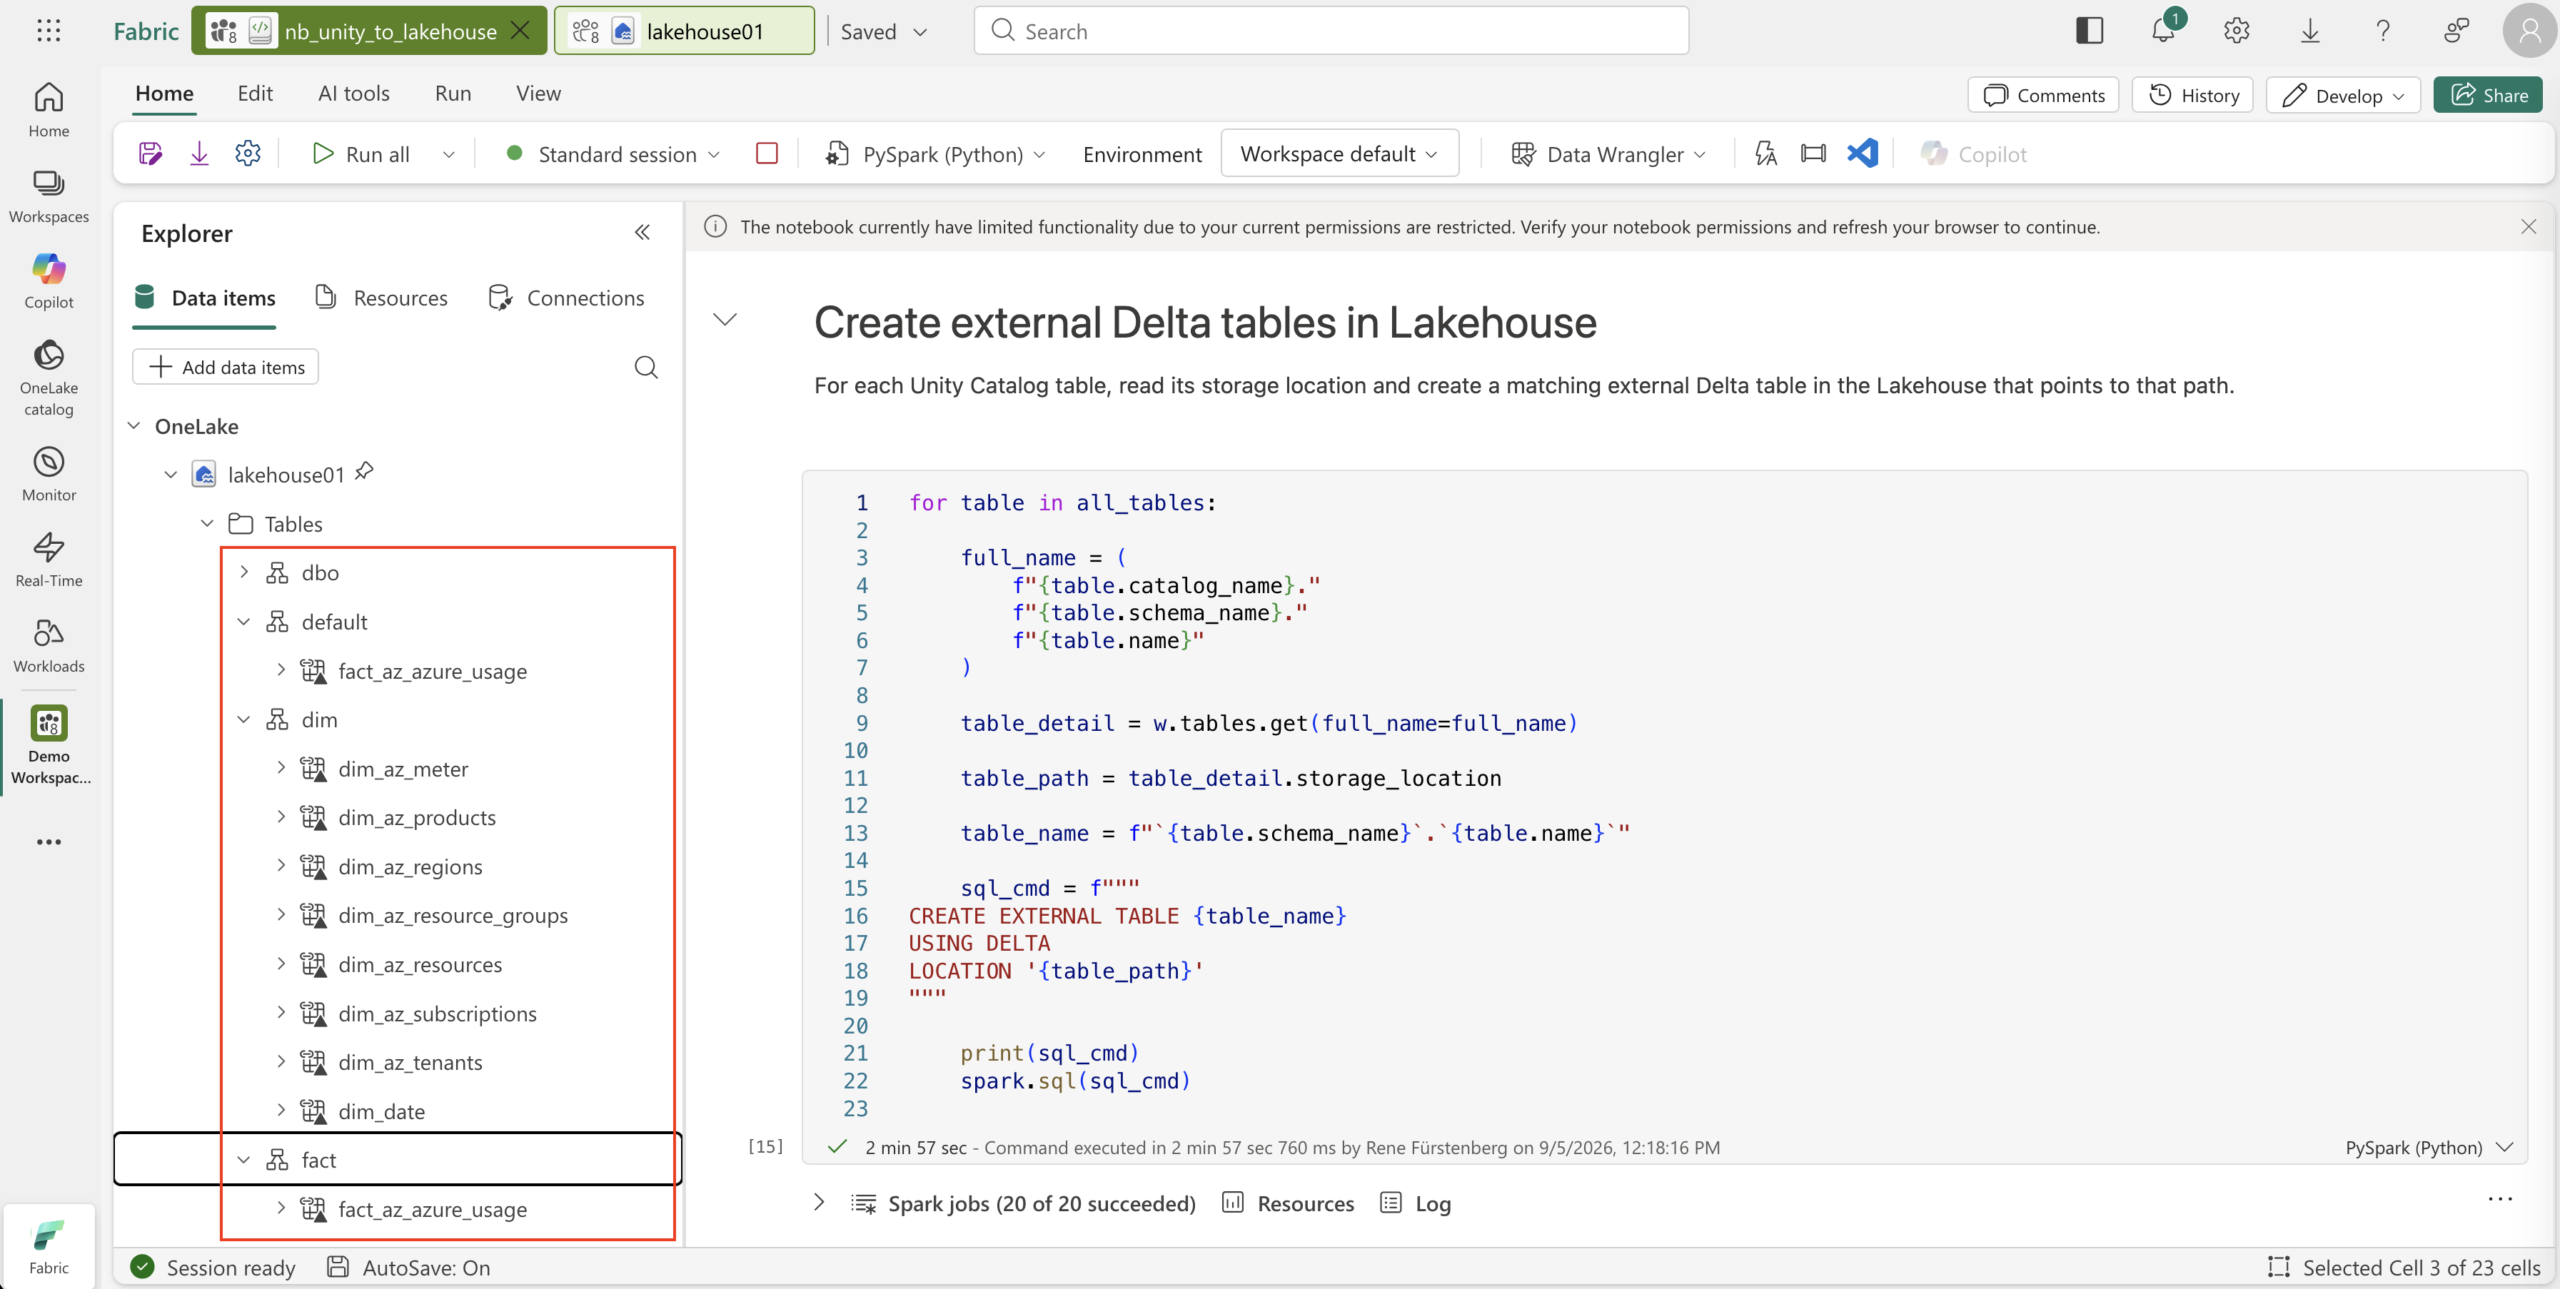
Once the notebook has finished, the schemas and tables from Azure Databricks will be exposed in the Schema Lakehouse and ready to use in Microsoft Fabric.
Perfect! The notebook has finished successfully, and all schemas and tables are now available in the Schema Lakehouse (Screenshot 2).
As you can see, shortcuts have been created automatically for the Databricks tables. This gives us a clean and user-friendly representation of the data inside Microsoft Fabric.
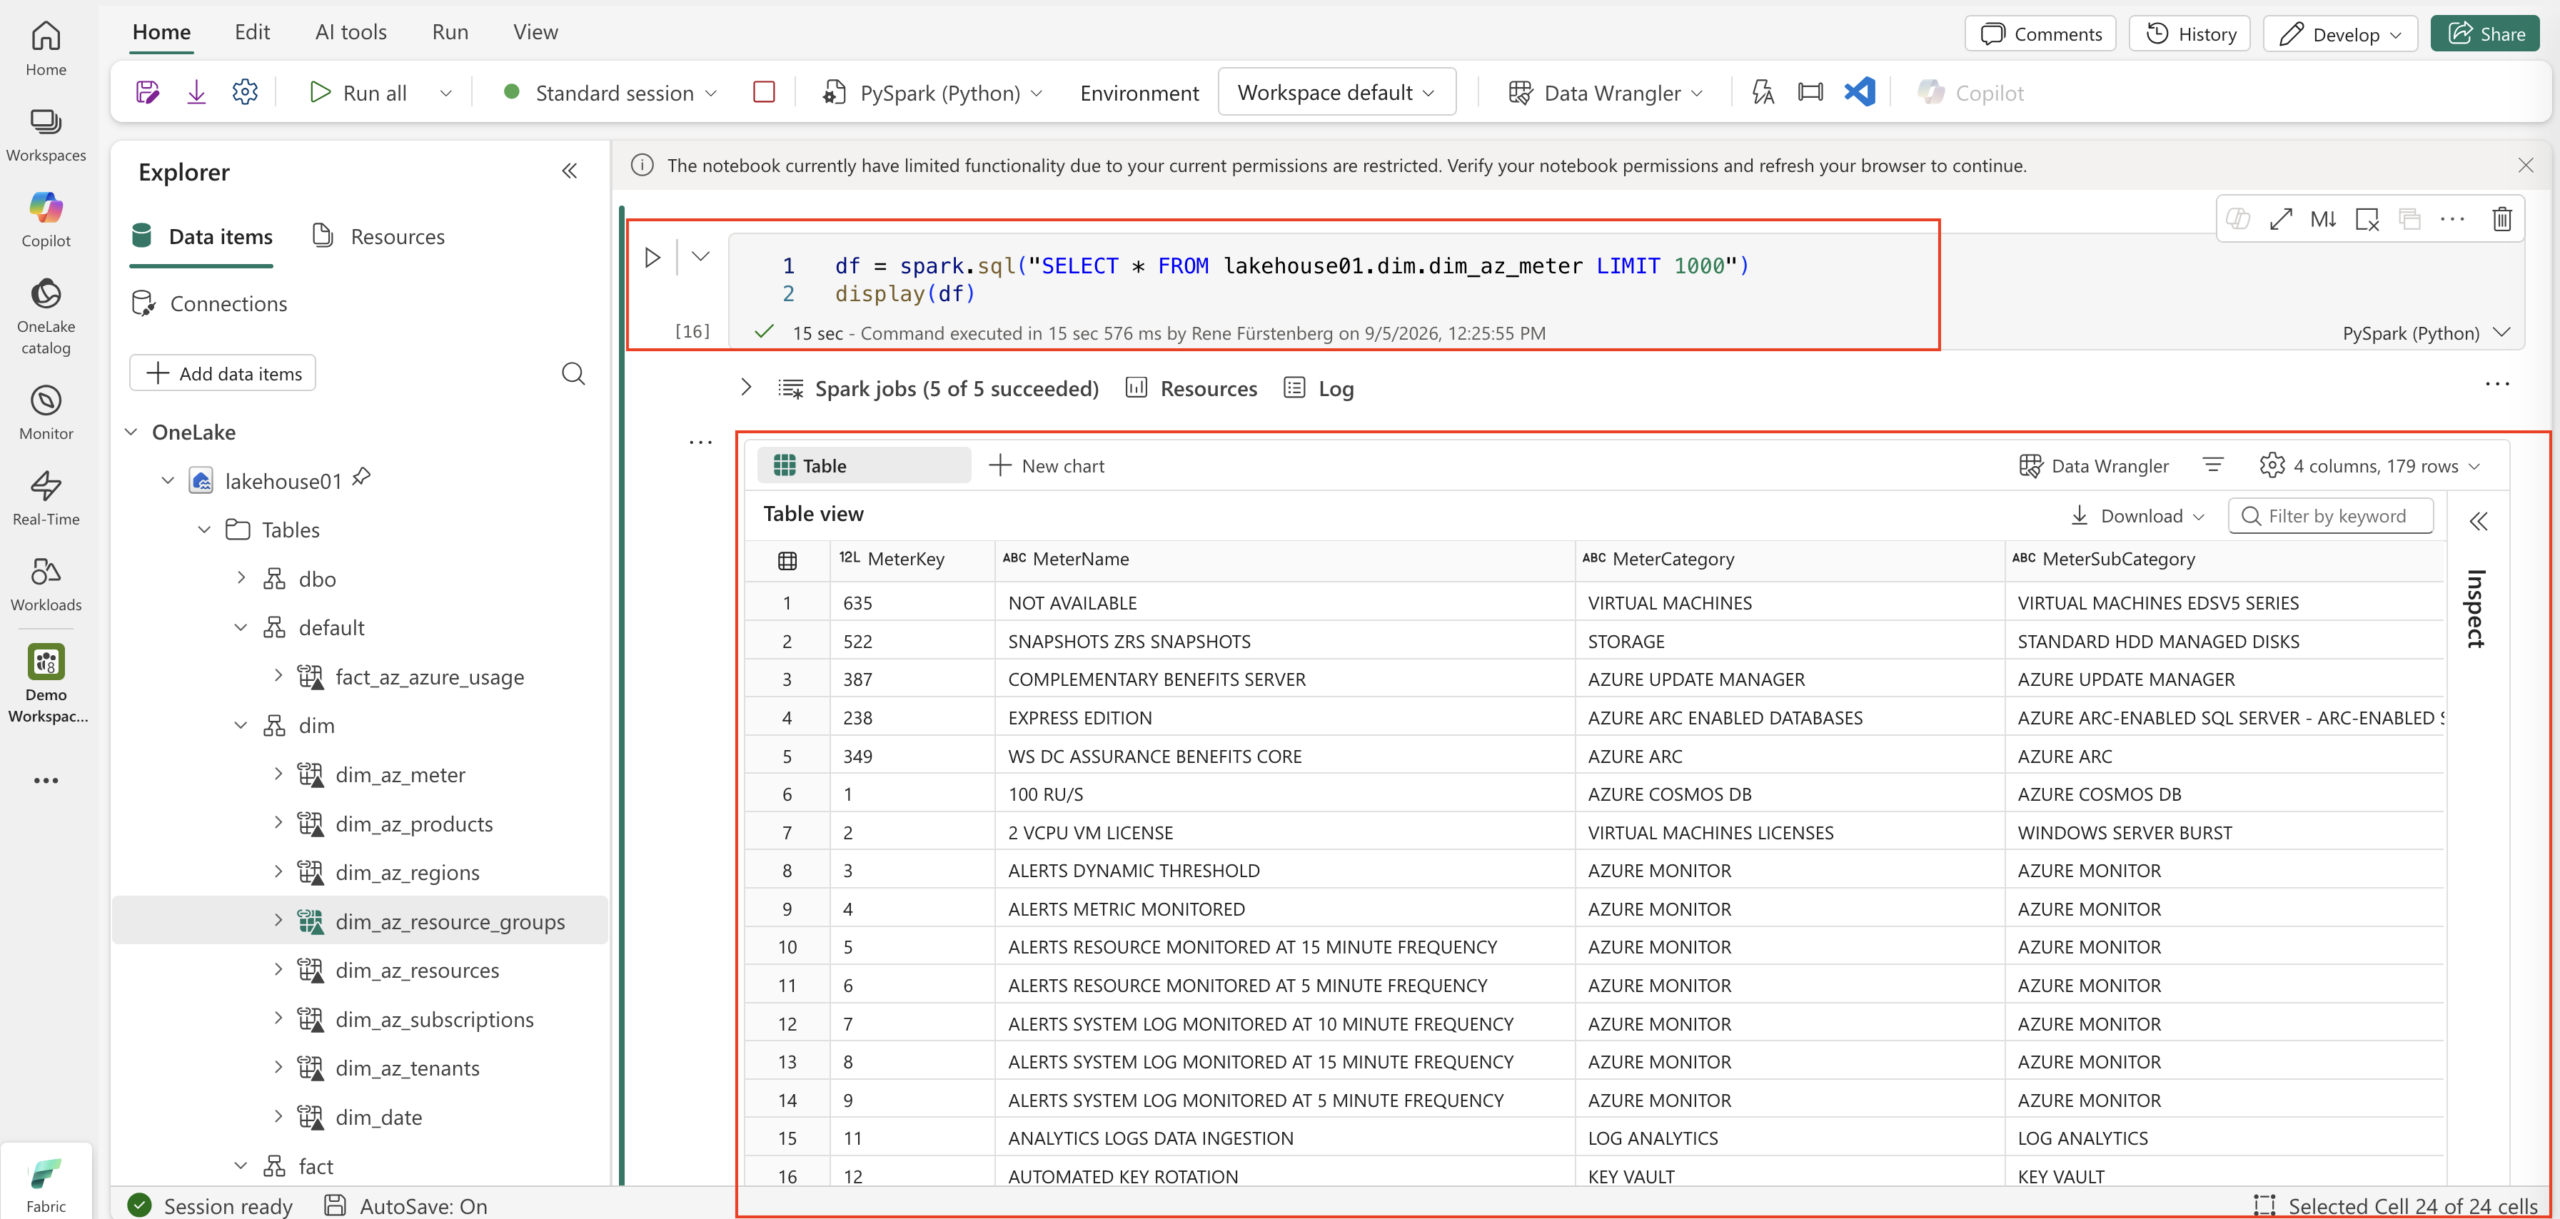
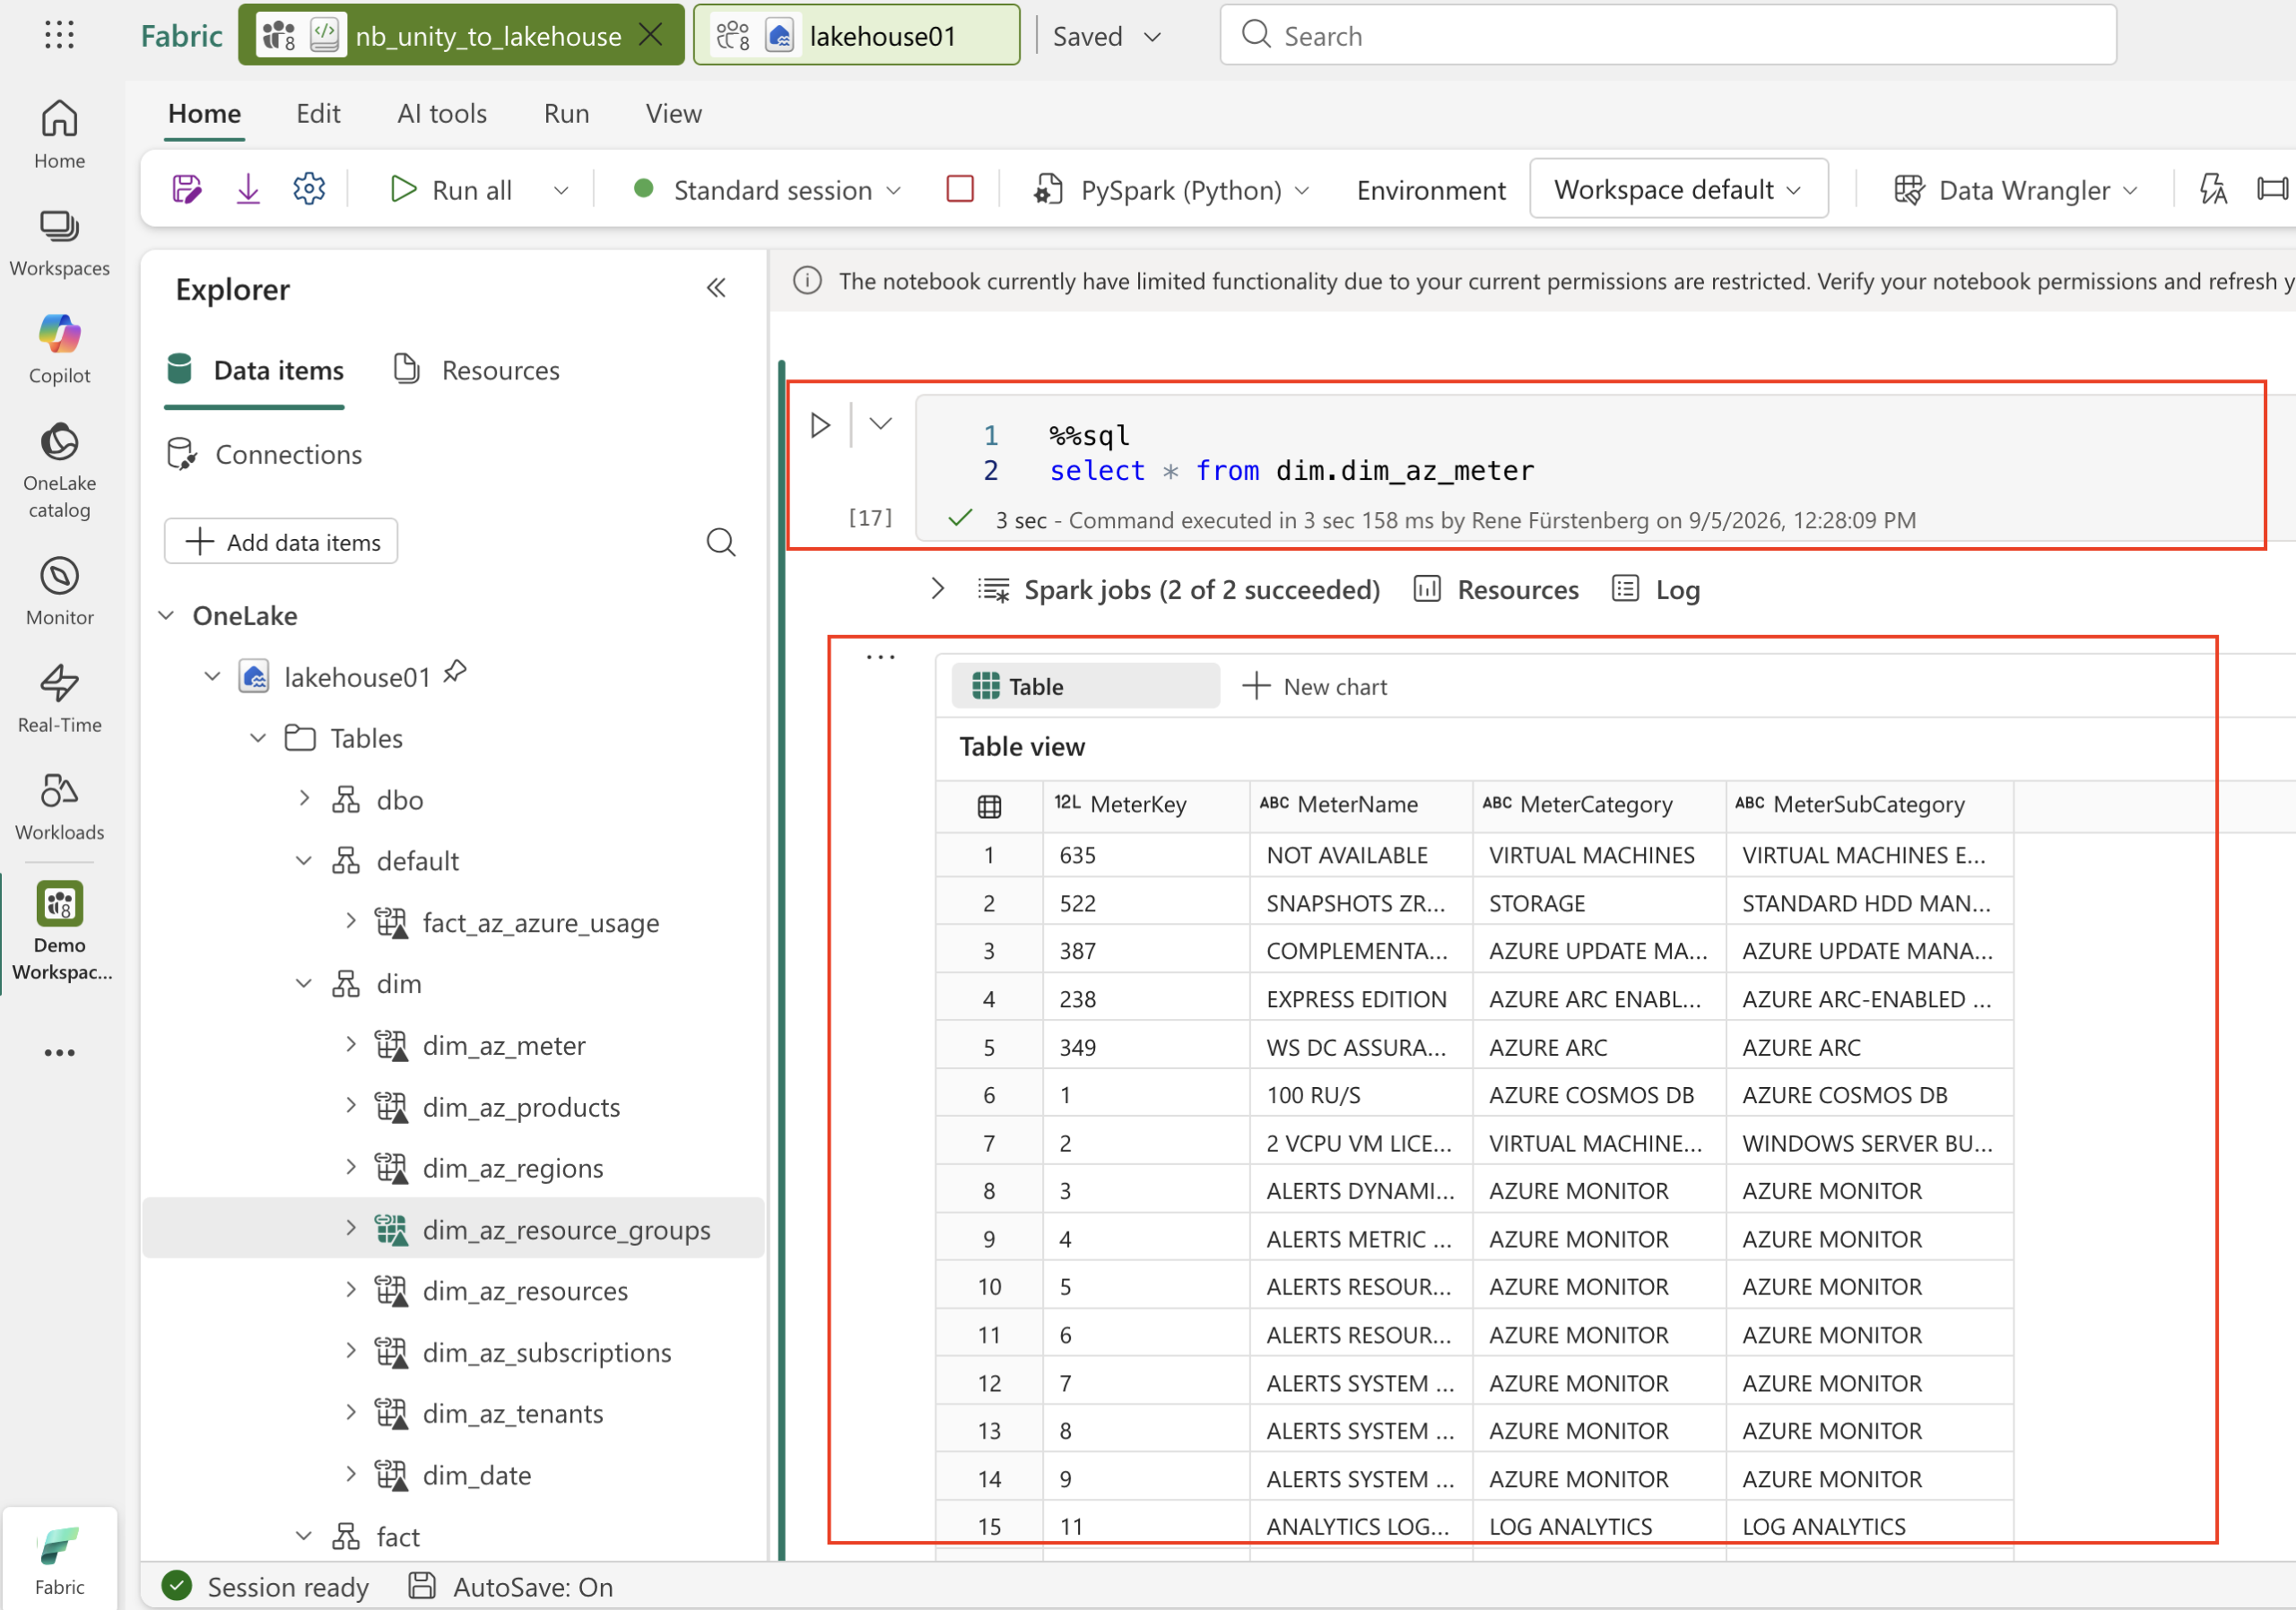
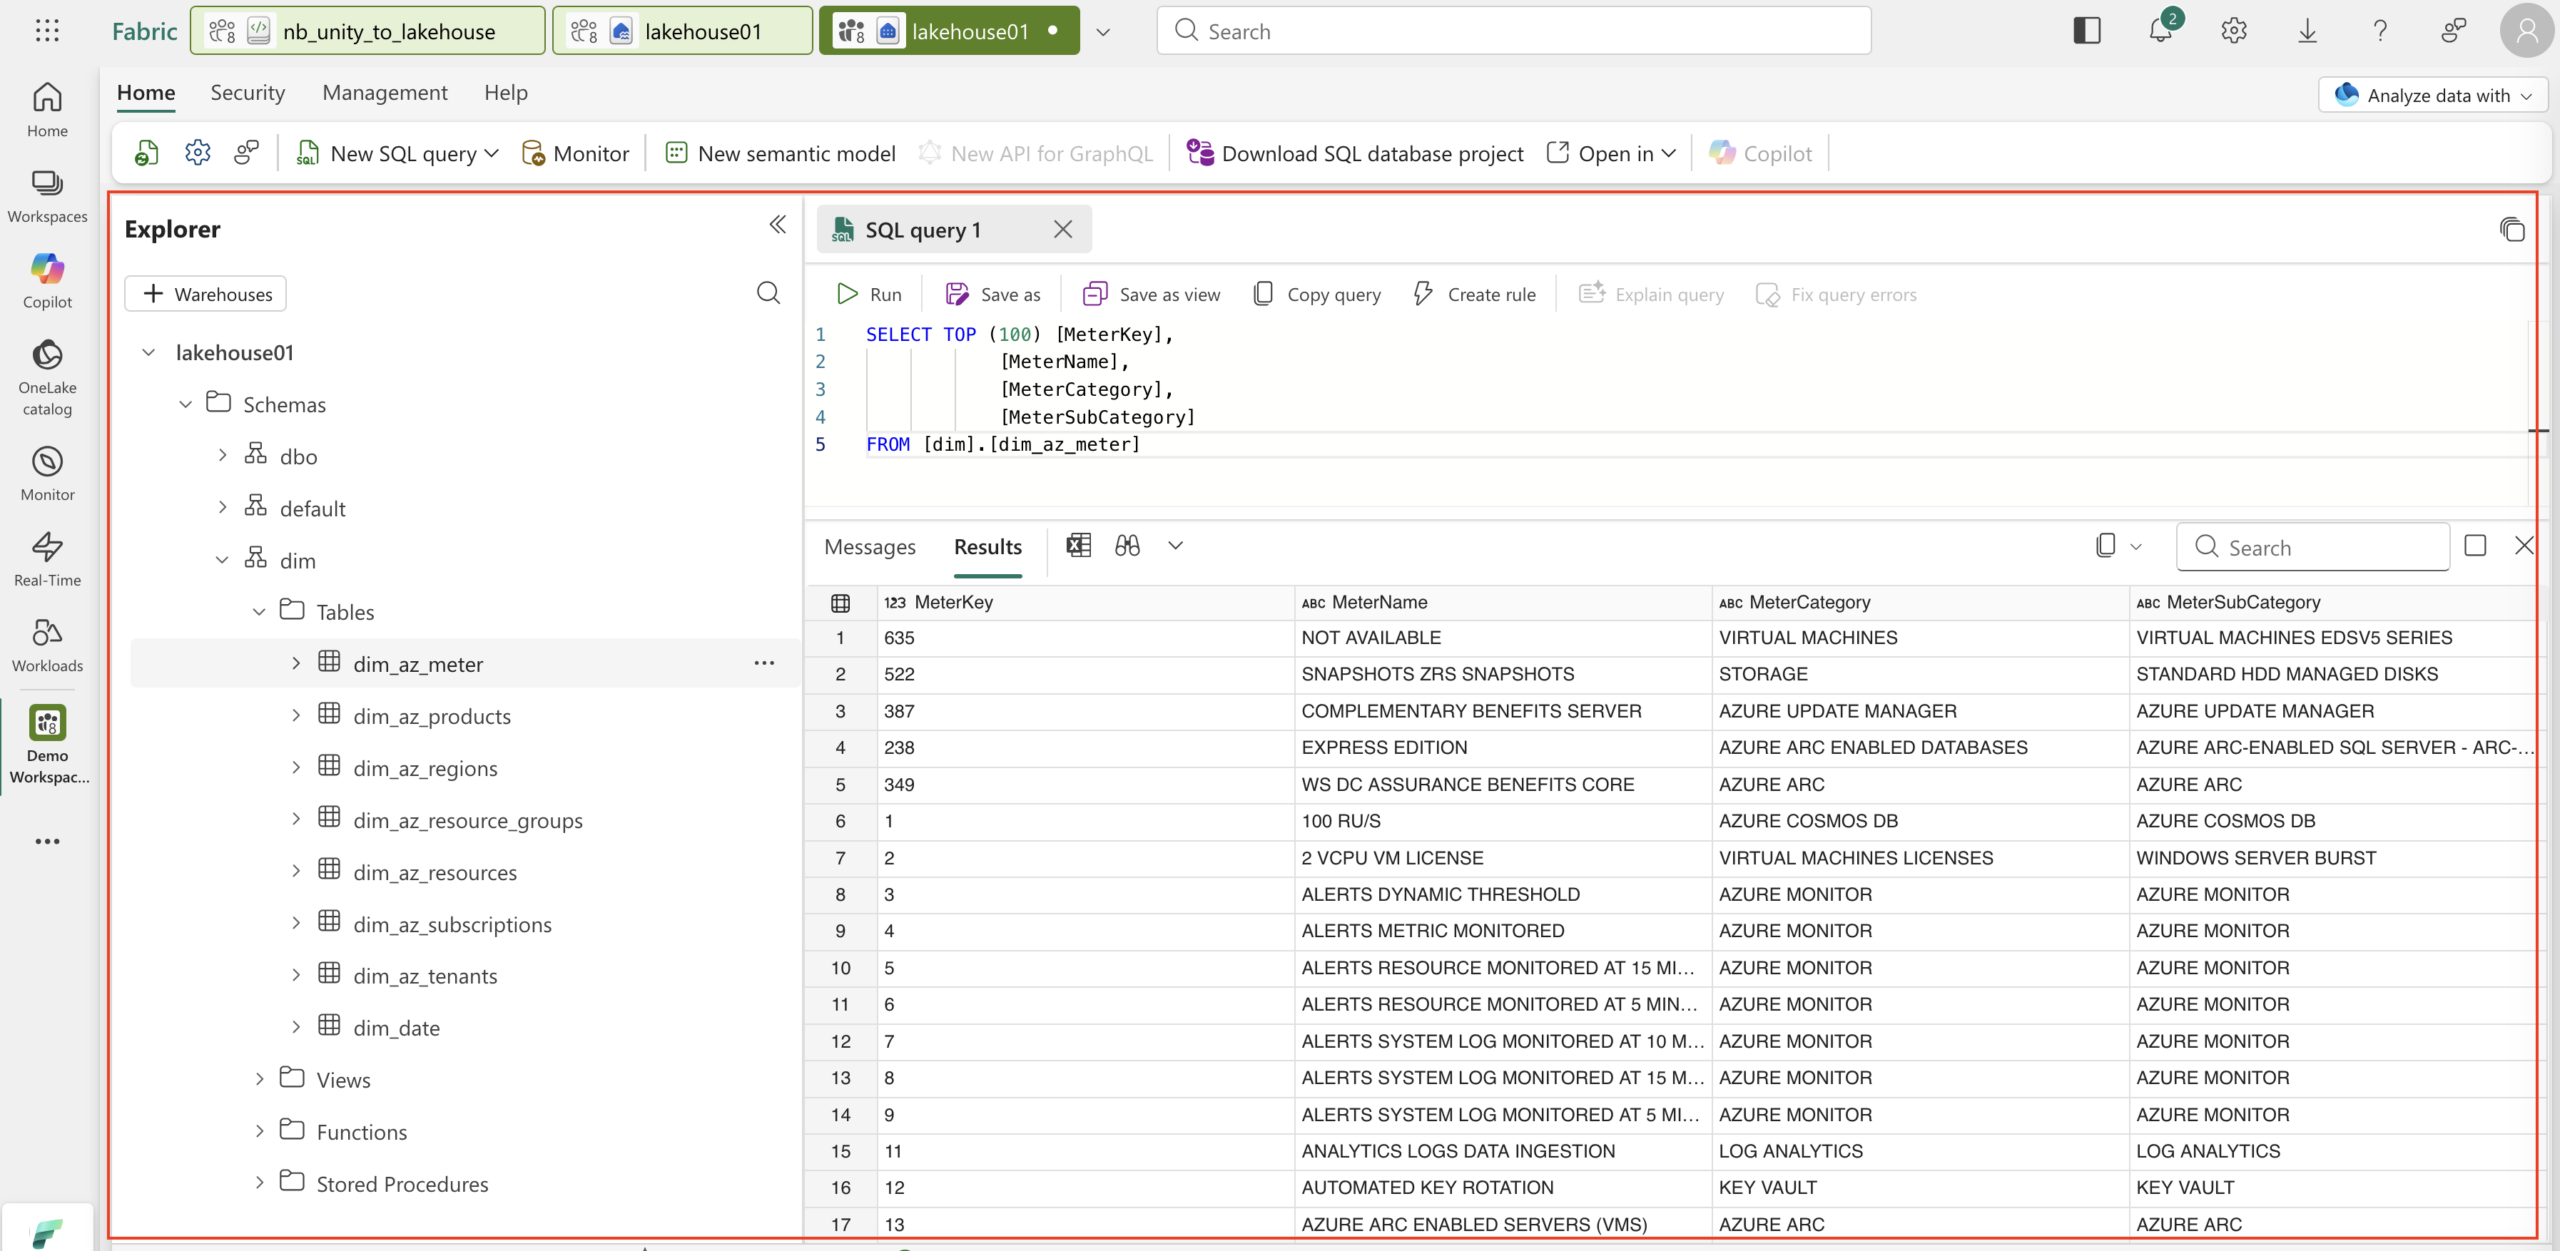
We can now query the tables directly from a Fabric Notebook or through the Lakehouse SQL Endpoint. From there, it’s easy to build a Semantic Model and create Power BI reports on top of the data.
And the best part: the data remains stored in OneLake and can be accessed without creating additional copies.
Screenshots 3 and 4 illustrate this nicely.
-
- 1. Start the Notebook
-
- 2. All Schemas and tables are added
-
- 3. Spark SQL in Notebook
-
- 4. SQL Query in Notebook
-
- 5. T-SQL Query in SQL analytics endpoint
Step 8 - Insert data into tables from Microsoft Fabric
In the final part of this article, we’ll take a look at how to insert data into the Databricks tables from a Fabric notebook and also from Databricks.
— In Fabric Notebook —
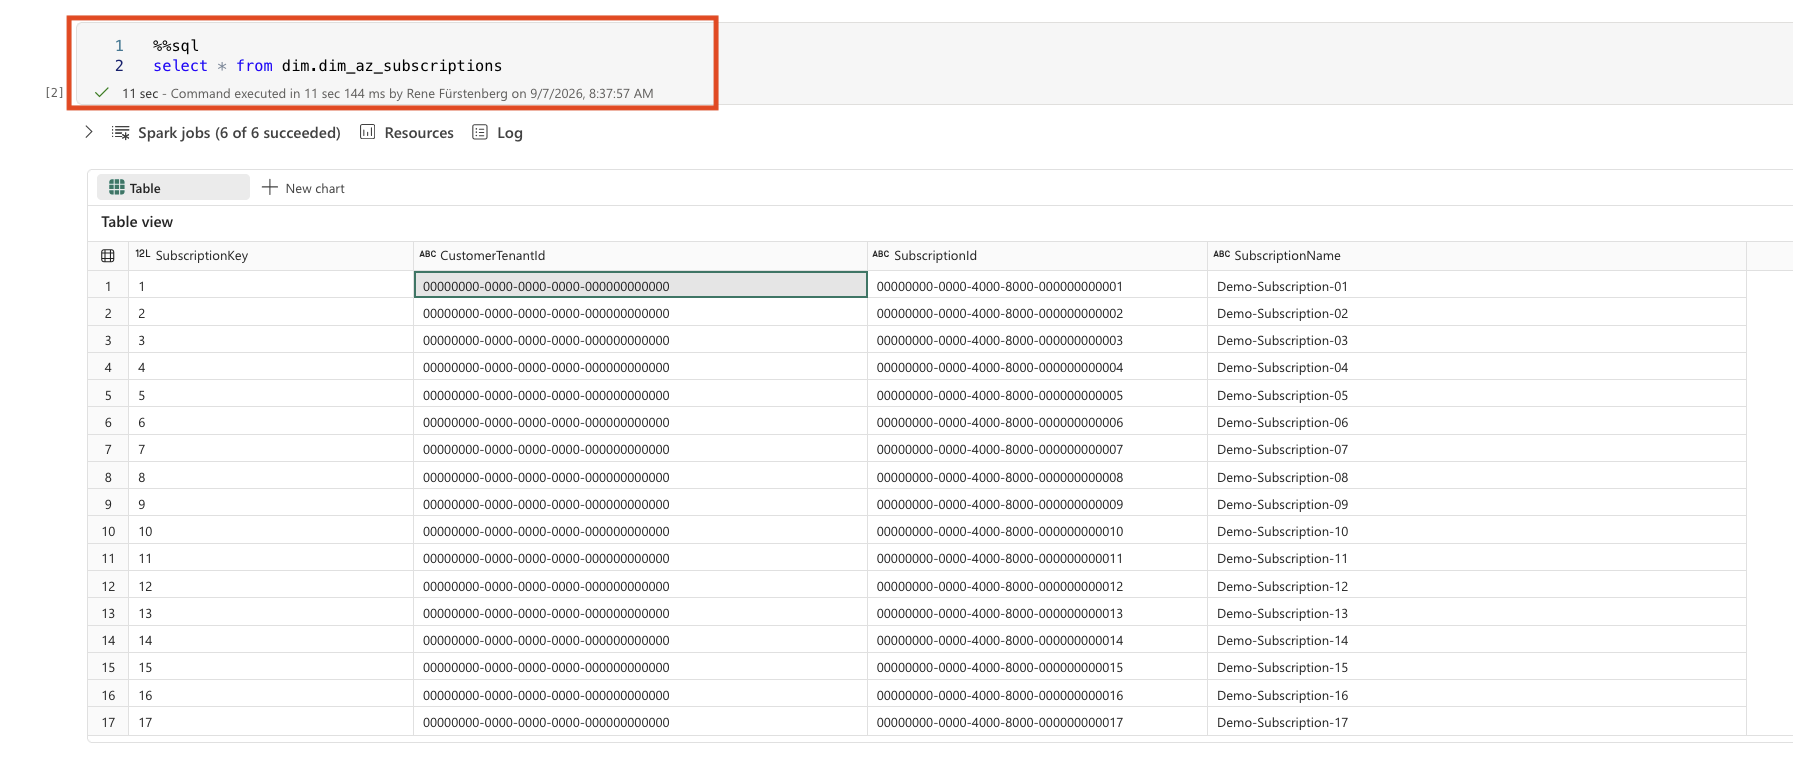
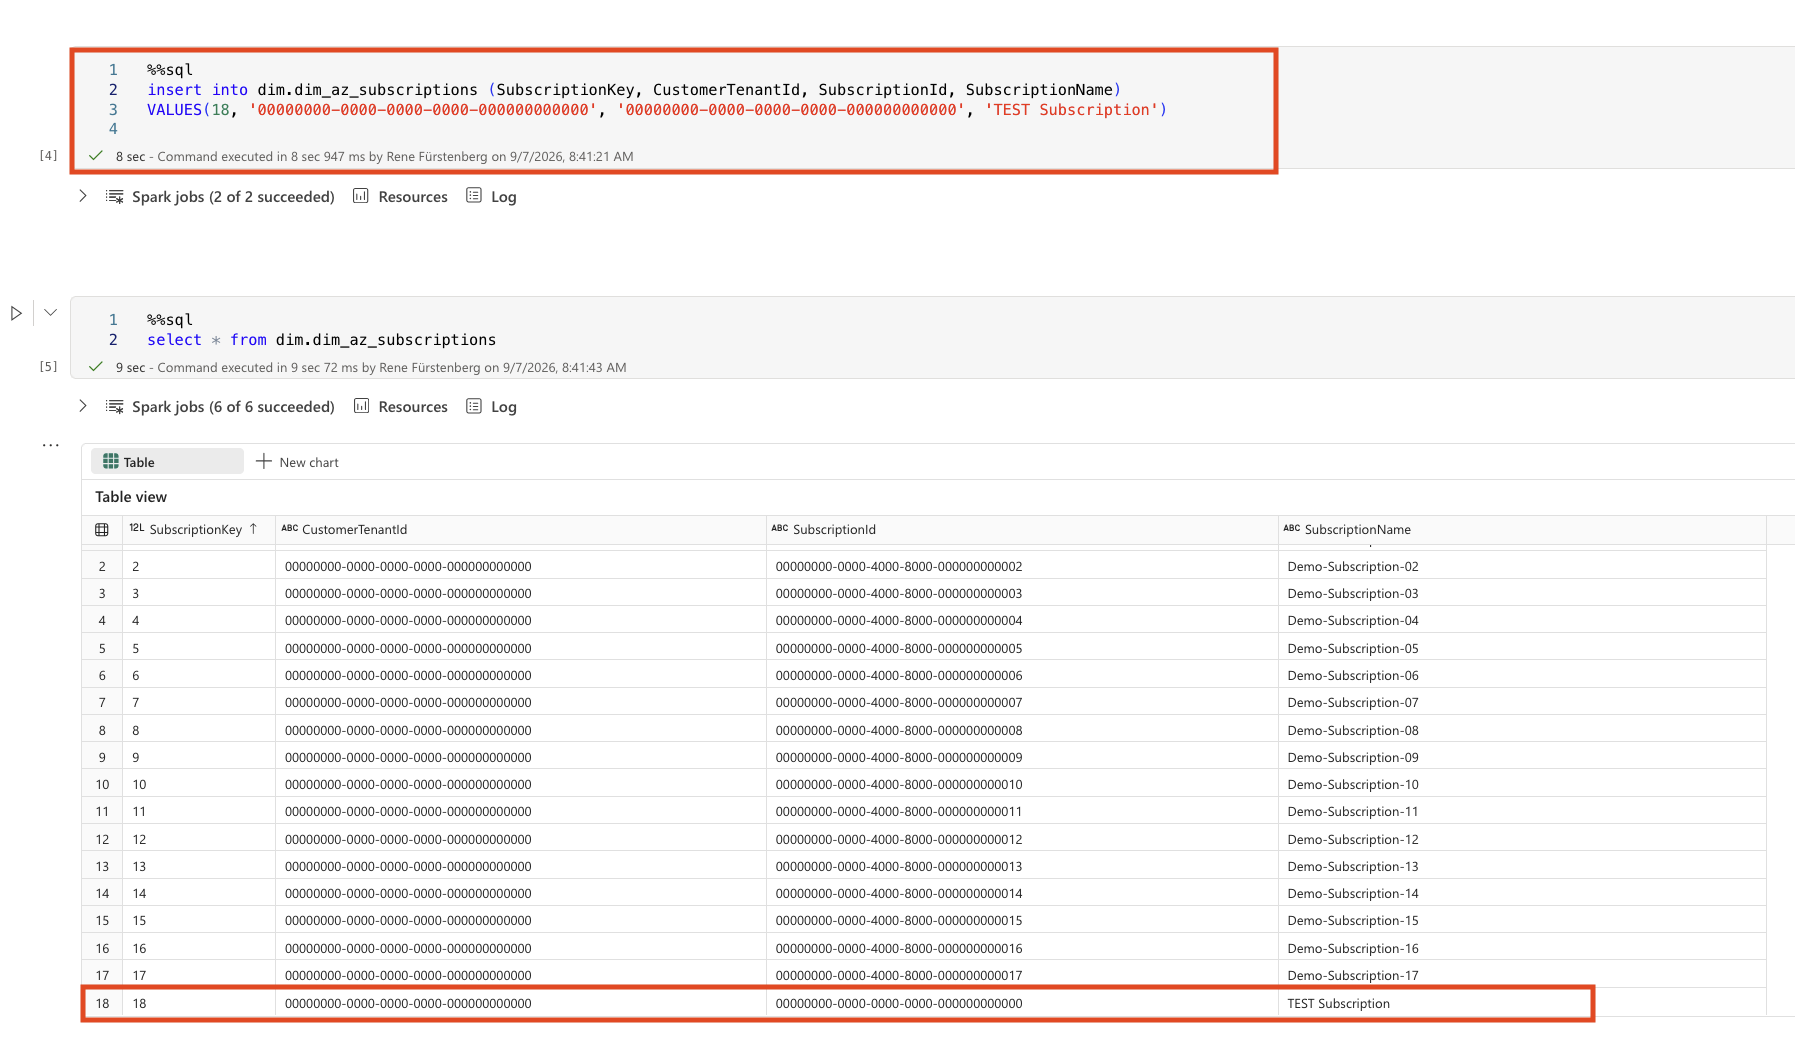
For simplicity, I’m using SQL in this example to insert data into the tables. However, Spark SQL and PySpark work just as well and can be used depending on your specific use case.
– In Databricks —
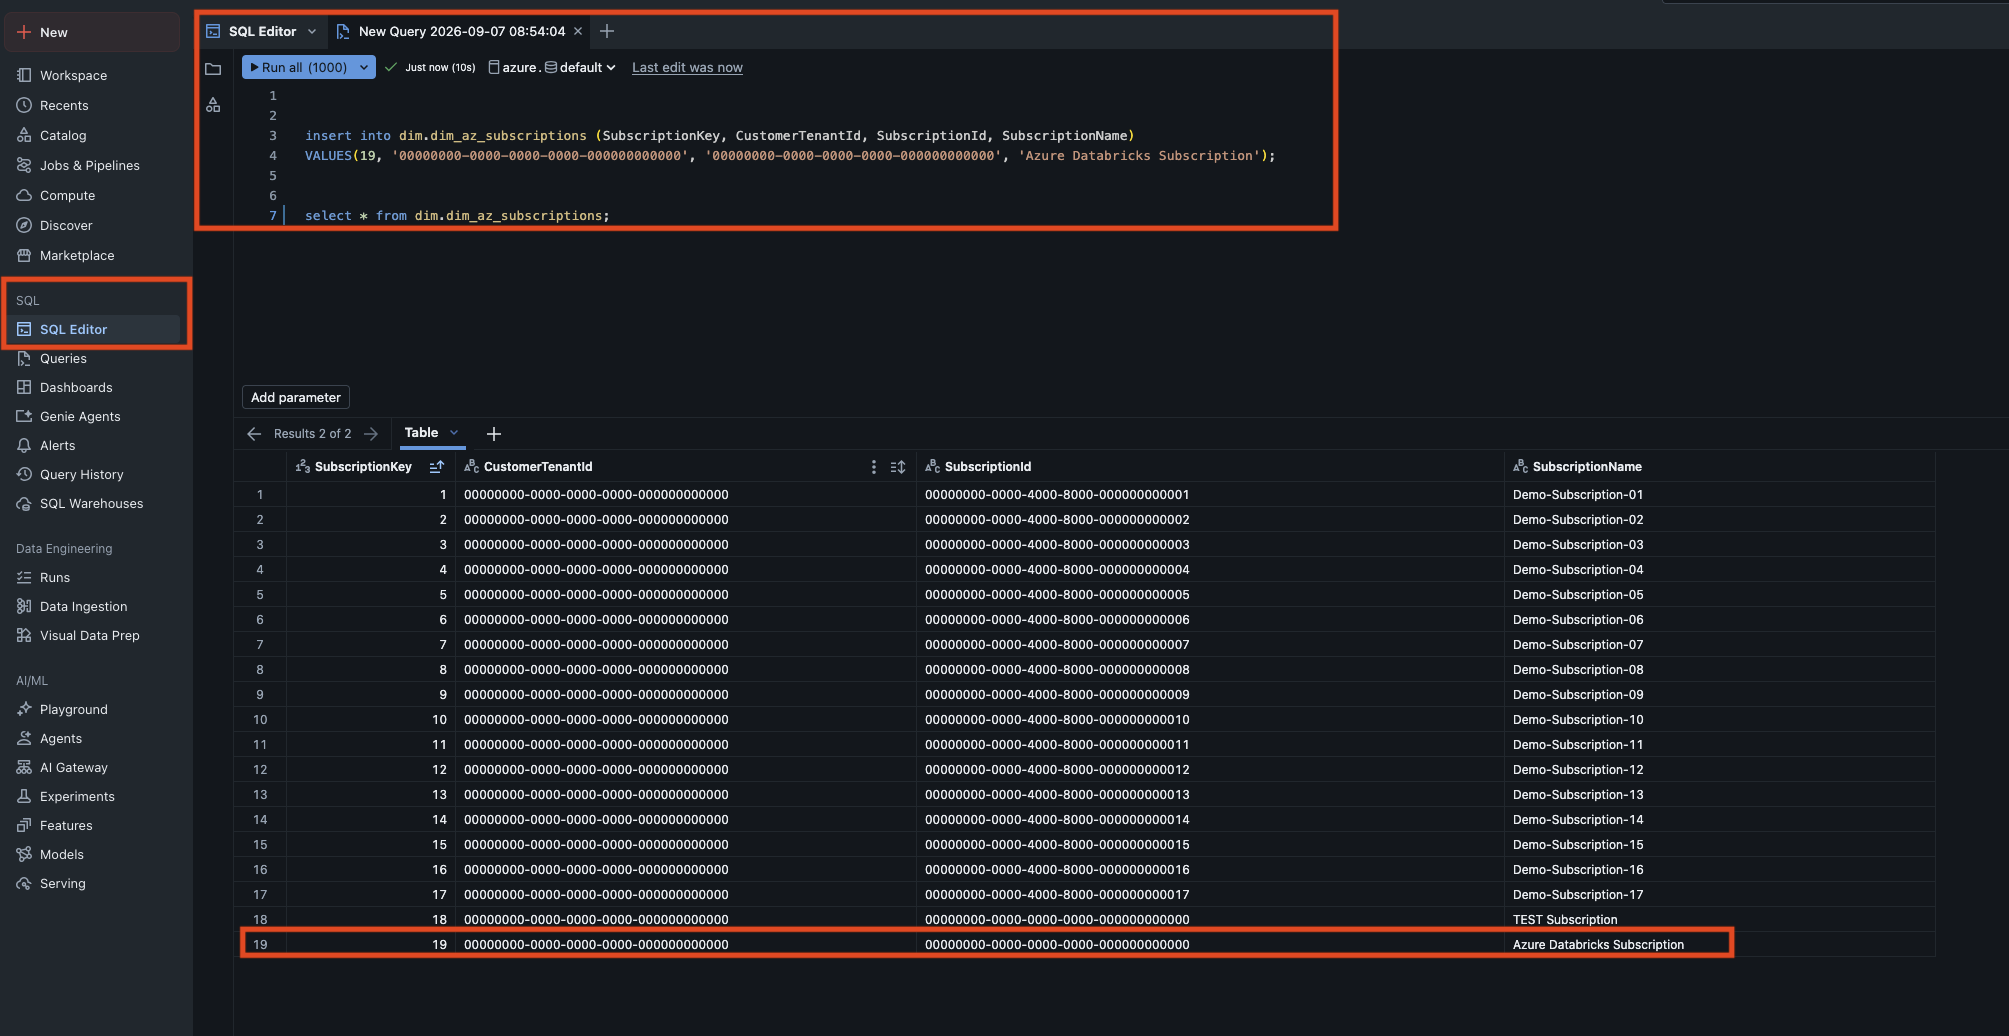
In Databricks, i switch to the SQL Editor, start the serverless starter Warehouse and add the query. Afterward run the query.
In Screenshot 3 you can see also it works from Azure Databricks.
SQL Examples from Fabric Notebook and Azure Databricks.
-- SQL Fabric Notebook --

-- Insert dim_az_subscriptions --
%%sql
insert into dim.dim_az_subscriptions (SubscriptionKey, CustomerTenantId, SubscriptionId, SubscriptionName)
VALUES(18, '00000000-0000-0000-0000-000000000000', '00000000-0000-0000-0000-000000000000', 'TEST Subscription');

-- Get all data --
select * from dim.dim_az_subscriptions;
-- SQL Azure Databricks SQL Editor --
-- Insert into dim_az_subscriptions --
insert into dim.dim_az_subscriptions (SubscriptionKey, CustomerTenantId, SubscriptionId, SubscriptionName)
VALUES(19, '00000000-0000-0000-0000-000000000000', '00000000-0000-0000-0000-000000000000', 'Azure Databricks Subscription');
-- Get all data --
select * from dim.dim_az_subscriptions;
-
- 1. SQL Query in Fabric Notebook – Get all data
-
- 2. SQL Query in Notebook – Insert Into
-
- 3. SQL Query in Databricks – Write from Databricks and select
Conclusion
As we’ve seen throughout this article, configuring Azure Databricks with OneLake as the storage layer isn’t as complicated as it might seem at first glance.
While there are several configuration steps involved and a few important details to pay attention to, the overall setup process is straightforward. Once everything is configured and the tables have been exposed through a Schema Lakehouse, the solution provides a powerful foundation for building Semantic Models, Power BI reports, and other Fabric workloads directly on top of your Azure Databricks data.
What I particularly like about this approach is that the data remains stored in OneLake while still being accessible from both Azure Databricks and Microsoft Fabric. This creates a seamless experience across both platforms without the need to duplicate data.
That said, I would love to see a native Fabric experience for Azure Databricks tables in the future. Currently, exposing the tables through a notebook works well, but it would be even better if Fabric could automatically discover and display these tables directly in a Lakehouse without requiring the additional notebook step.
Despite that limitation, the integration between Azure Databricks, OneLake, and Microsoft Fabric already opens up many interesting possibilities and provides a strong foundation for analytics, reporting, and data engineering scenarios.
One final note: This functionality is currently in Preview, so there’s still a lot that may change over the coming months. New features, improvements, and even configuration steps may evolve as Microsoft continues to develop the integration.
To stay up to date, I recommend regularly checking the official Microsoft documentation:
Documentation: Connect Azure Databricks to a OneLake external location